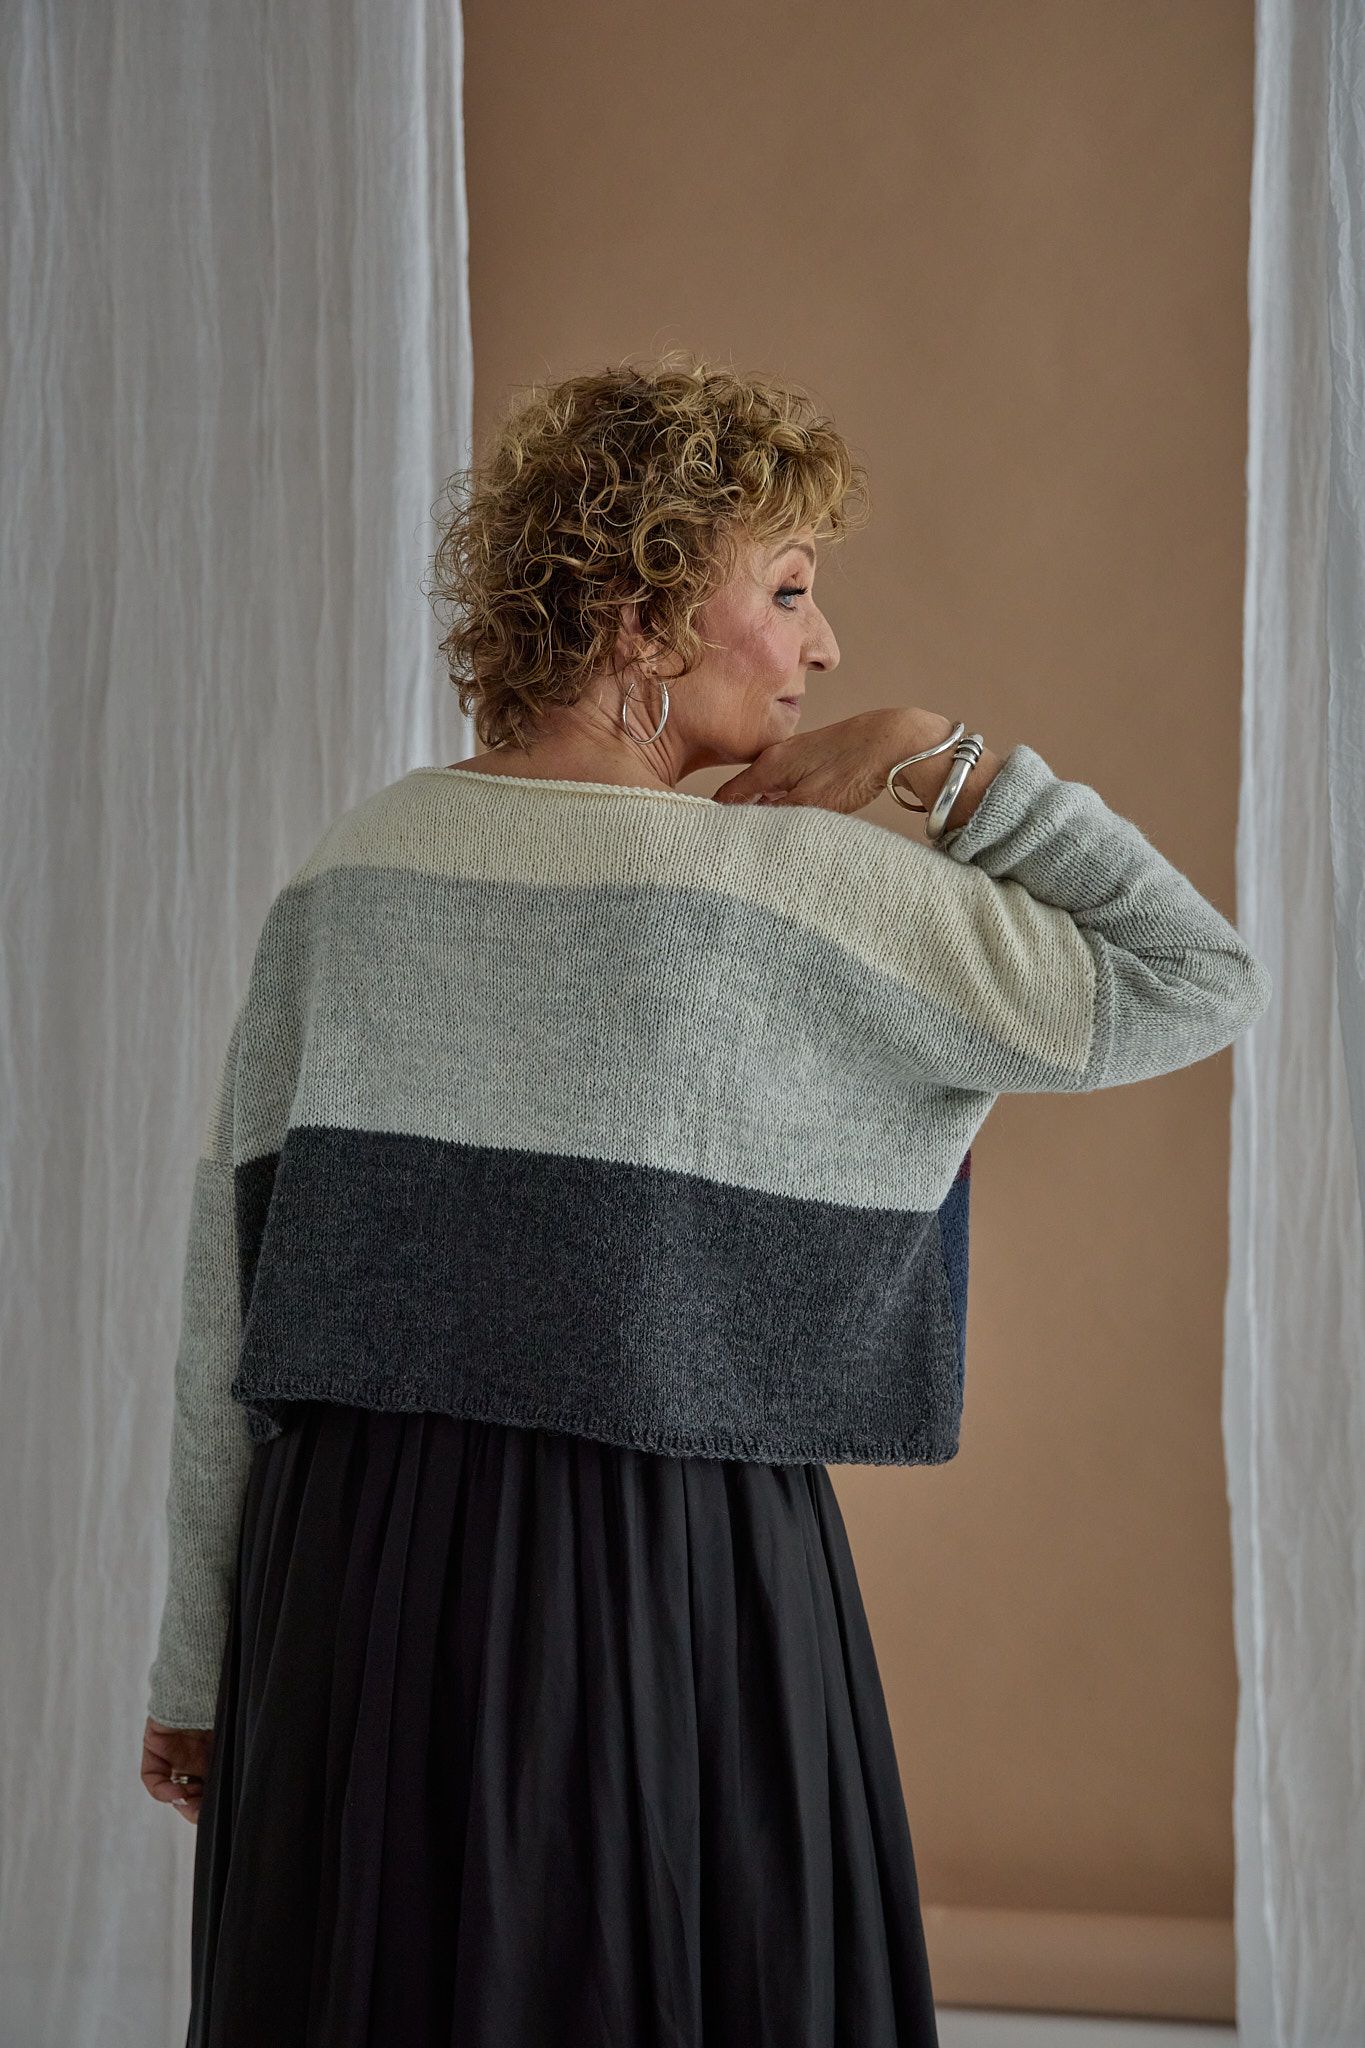
Wrapped Up knitted sweater
This sweater is such a captivating project that you will want to knit several of them in different colours. The Novita Halaus yarn is excellent for this jumper, making it light and airy and comfortably warm.
Designer
Linda Permanto
Language
Size(s)
XS/S(M/L)XL/XXL
Finished dimensions
chest circumference approx. 104(118)132 cm (relaxed fit)
garment length 55(59(63) cm
sleeve length 50(52)53 cm
Yarn demand
Novita Halaus (6011) breeze 400(500)650 g
Needles and other supplies
Circular needles (80 and 40 cm) Novita 7 mm and 8 mm, for the sleeves double pointed needles (DPNs) Novita 7 mm and 8 mm or size required to obtain gauge. Other supplies 2 stitch markers
Finished dimensions
chest circumference approx. 104(118)132 cm (relaxed fit)
garment length 55(59(63) cm
sleeve length 50(52)53 cm
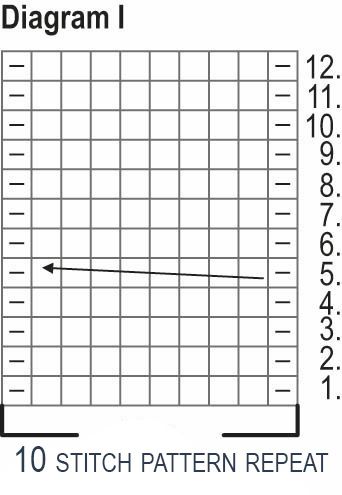
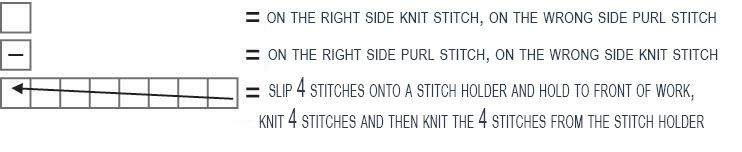
Stitch patterns Ribbing in the round: *k1, p1* and repeat *–*. Cable pattern: follow the chart and instructions.
Gauge 13.5 sts in cable pattern with the larger needles = 10 cm
Notes The lower part of the sweater is knitted in the round to the armholes, and the top parts are worked back and forth separately. The sleeves are worked in the round and joined to the armholes at the end.
Lower part of the front and back pieces
Cast on 140(160)180 sts on the smaller circular needles with the longer cable, and work ribbing in the round. Mark beg of round with a stitch marker.
Once you have worked 5 cm of ribbing, switch to the larger circular needles and begin working the cable pattern following chart I from round 1 and repeat the 10 st pattern repeat 14(16)18 times. Work rounds 2–12 and from then on repeat rounds 1–12.
Once the piece measures 35(37)39 cm, finish the cable pattern on an even-numbered round, place the stitch markers to mark the sides: remove the beg of round marker and work 5 sts from the beg of round (to the middle of the cable pattern). This is the new beg of round point: place 1 stitch marker. Work 70(80)90 stitches, place a second stitch marker and work to the end of the round.
Divide the work into two for the armholes: knit the round until 5 sts before stitch marker 2, cast off the next 10 stitches for the armhole, removing the stitch marker at the same time. Continue around the same round until 5 stitches before stitch marker 1 to mark the beg of round, cast off the last 5 sts of the round for the other armhole, remove the stitch marker, and cast off another 5 stitches at the beginning of the next round. The front and back pieces should now each have 60(70)80 stitches. Put the stitches on the back piece on hold for now.
Top part of the front piece
Continue working the cable pattern back and forth on the front piece across the 60(70)80 stitches.
When the armhole measures 14(16)18 cm, cast off the middle 20(24)24 sts for the neckline and first work one side of the neckline. Bind off 3 x 3 sts every 2nd row at the neckline edge.
When the armhole measures 20(24)26 cm, cast off the 11(14)19 sts at the shoulder.
Work the other side of the neckline in the same way.
Top part of the back piece
Continue working the cable pattern back and forth on the back piece across the 60(70)80 sts.
When the armhole measures 18(20)22 cm, cast off the middle 34(38)38 sts for the neckline and first work one side of the neckline. After 2 rows cast off 1x2 sts at the neckline edge.
When the armhole measures 20(24)26 cm, cast off the 11(14)19 sts at the shoulder.
Work the other side of the neckline in the same way.
Sleeves
Cast on 40(44)44 sts on the DPNs, and knit the ribbing in the round. Mark beg of round with a stitch marker. Work 6 cm of ribbing and increase0(1)1 st in the last round = 40(45)45 sts.
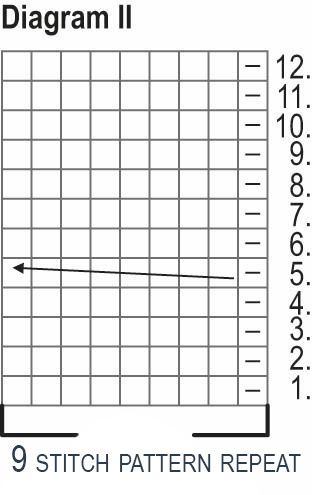
Switch to the larger DPNs and begin working the cabling following chart I(II)II from round 1 and repeat the 10(9)9 st pattern repeat 4(5)5 times. Work rounds 2–12 and from then on repeat rounds 1–12.
Size XS/S: When the length of the sleeve reaches 14 cm, start working increases: k1, make 1 left purlwise (= pick up the bar between stitches and purl through the back loop), work the cable pattern and in each stripe of purls between cables increase 1 p = 45 sts. At the beg of round, the stripe of purls is 4 sts wide, while the stripes of purls between cables are 3 sts wide. Work 9 cm without increases.
At the start of the next round increase 1 p and when there is 1 st left in the round, increase 1 p = 47 sts. Repeat these increases every 9 cm twice more = 51 sts.
Size M/L: Once the sleeve reaches 16 cm in length, increase every stripe of purls between cables by 1 purl (= pick up the bar between stitches and purl through the back loop) = 50 sts. Each stripe of purls between cables is now 2 sts wide. Repeat the increases after 3 cm, into the stripes of purls = 55 sts. There are now 3 purls between cables.
When the sleeve reaches 48 cm in length, at either side of the beg of round increase 1 st: at the beg of round increase 1 p and when there is 1 st left in the round, increase 1 p = 57 sts.
Size XL/XXL: Once the sleeve reaches 18 cm in length, increase every stripe of purls between cables by 1 purl (= pick up the bar between stitches and purl through the back loop) = 50 sts. Each stripe of purls between cables is now 2 sts wide. Repeat the increases after 4 cm = 55 sts. There are now 3 purls between cables.
When the sleeve reaches 28 cm in length, at either side of the beg of round increase 1 st: at the beg of round increase 1 p and when there is 1 st left in the round, increase 1 p = 57 sts. Repeat the increases every 6 cm a further 3 times = 63 sts.
When the sleeve measures 50(52)53 cm, cast off.
Work the second sleeve in the same way.
Finishing
Sew the shoulder seams. Using the smaller circular needles (with 40 cm cord), pick up 62(64)68 sts at the neckline and work ribbing in the round until it measures 6 cm. Bind off in rib.
Attach the sleeves to the armholes.
Pin the item to the correct measurements, right sides facing each other, dampen by spraying and allow to dry, or steam lightly.
Wrapped Up knitted sweater
Size(s)
XS/S(M/L)XL/XXL
Finished dimensions
chest circumference approx. 104(118)132 cm (relaxed fit)
garment length 55(59(63) cm
sleeve length 50(52)53 cm
Yarn demand
Novita Halaus (6011) breeze 400(500)650 g
Needles and other supplies
Circular needles (80 and 40 cm) Novita 7 mm and 8 mm, for the sleeves double pointed needles (DPNs) Novita 7 mm and 8 mm or size required to obtain gauge. Other supplies 2 stitch markers
Stitch patterns Ribbing in the round: *k1, p1* and repeat *–*. Cable pattern: follow the chart and instructions.
Gauge 13.5 sts in cable pattern with the larger needles = 10 cm
Notes The lower part of the sweater is knitted in the round to the armholes, and the top parts are worked back and forth separately. The sleeves are worked in the round and joined to the armholes at the end.
Lower part of the front and back pieces
Cast on 140(160)180 sts on the smaller circular needles with the longer cable, and work ribbing in the round. Mark beg of round with a stitch marker.
Once you have worked 5 cm of ribbing, switch to the larger circular needles and begin working the cable pattern following chart I from round 1 and repeat the 10 st pattern repeat 14(16)18 times. Work rounds 2–12 and from then on repeat rounds 1–12.
Once the piece measures 35(37)39 cm, finish the cable pattern on an even-numbered round, place the stitch markers to mark the sides: remove the beg of round marker and work 5 sts from the beg of round (to the middle of the cable pattern). This is the new beg of round point: place 1 stitch marker. Work 70(80)90 stitches, place a second stitch marker and work to the end of the round.
Divide the work into two for the armholes: knit the round until 5 sts before stitch marker 2, cast off the next 10 stitches for the armhole, removing the stitch marker at the same time. Continue around the same round until 5 stitches before stitch marker 1 to mark the beg of round, cast off the last 5 sts of the round for the other armhole, remove the stitch marker, and cast off another 5 stitches at the beginning of the next round. The front and back pieces should now each have 60(70)80 stitches. Put the stitches on the back piece on hold for now.
Top part of the front piece
Continue working the cable pattern back and forth on the front piece across the 60(70)80 stitches.
When the armhole measures 14(16)18 cm, cast off the middle 20(24)24 sts for the neckline and first work one side of the neckline. Bind off 3 x 3 sts every 2nd row at the neckline edge.
When the armhole measures 20(24)26 cm, cast off the 11(14)19 sts at the shoulder.
Work the other side of the neckline in the same way.
Top part of the back piece
Continue working the cable pattern back and forth on the back piece across the 60(70)80 sts.
When the armhole measures 18(20)22 cm, cast off the middle 34(38)38 sts for the neckline and first work one side of the neckline. After 2 rows cast off 1x2 sts at the neckline edge.
When the armhole measures 20(24)26 cm, cast off the 11(14)19 sts at the shoulder.
Work the other side of the neckline in the same way.
Sleeves
Cast on 40(44)44 sts on the DPNs, and knit the ribbing in the round. Mark beg of round with a stitch marker. Work 6 cm of ribbing and increase0(1)1 st in the last round = 40(45)45 sts.
Switch to the larger DPNs and begin working the cabling following chart I(II)II from round 1 and repeat the 10(9)9 st pattern repeat 4(5)5 times. Work rounds 2–12 and from then on repeat rounds 1–12.
Size XS/S: When the length of the sleeve reaches 14 cm, start working increases: k1, make 1 left purlwise (= pick up the bar between stitches and purl through the back loop), work the cable pattern and in each stripe of purls between cables increase 1 p = 45 sts. At the beg of round, the stripe of purls is 4 sts wide, while the stripes of purls between cables are 3 sts wide. Work 9 cm without increases.
At the start of the next round increase 1 p and when there is 1 st left in the round, increase 1 p = 47 sts. Repeat these increases every 9 cm twice more = 51 sts.
Size M/L: Once the sleeve reaches 16 cm in length, increase every stripe of purls between cables by 1 purl (= pick up the bar between stitches and purl through the back loop) = 50 sts. Each stripe of purls between cables is now 2 sts wide. Repeat the increases after 3 cm, into the stripes of purls = 55 sts. There are now 3 purls between cables.
When the sleeve reaches 48 cm in length, at either side of the beg of round increase 1 st: at the beg of round increase 1 p and when there is 1 st left in the round, increase 1 p = 57 sts.
Size XL/XXL: Once the sleeve reaches 18 cm in length, increase every stripe of purls between cables by 1 purl (= pick up the bar between stitches and purl through the back loop) = 50 sts. Each stripe of purls between cables is now 2 sts wide. Repeat the increases after 4 cm = 55 sts. There are now 3 purls between cables.
When the sleeve reaches 28 cm in length, at either side of the beg of round increase 1 st: at the beg of round increase 1 p and when there is 1 st left in the round, increase 1 p = 57 sts. Repeat the increases every 6 cm a further 3 times = 63 sts.
When the sleeve measures 50(52)53 cm, cast off.
Work the second sleeve in the same way.
Finishing
Sew the shoulder seams. Using the smaller circular needles (with 40 cm cord), pick up 62(64)68 sts at the neckline and work ribbing in the round until it measures 6 cm. Bind off in rib.
Attach the sleeves to the armholes.
Pin the item to the correct measurements, right sides facing each other, dampen by spraying and allow to dry, or steam lightly.