Snowberry socks for babies Novita Baby Merino and Baby Merino Dream
These cute little socks from soft Novita Baby Merino will keep your baby's feet warm, with no itching at all. The small pompoms raise cuteness level even further. Yarns are Mulessing free merino.
Designer
Sari Nordlund
Size(s)
one size
Finished dimensions
62(86) cm; foot length 10(12) cm / 4(4¾) in
Yarn demand
Novita Baby Merino (448) Tin or (326) Silver Willow <50 g and for the pompoms some Novita Baby Merino Dream (834) Raindrop or (896) Baby Seal
Needles and other supplies
Double-pointed needles Novita 2½ mm (UK 12½ / US 1½) or size needed to obtain gauge
Finished dimensions
62(86) cm; foot length 10(12) cm / 4(4¾) in
Stitch patterns
- Twisted ribbing in the round: *k1 through back loop, p1*
Cast on 44(52) sts and divide them onto four needles: 15(15) sts needle I + 10(12) sts needle II + 10(12) sts needle III + 9(13) sts needle IV. The beginning of round is between needles I and IV. Work twisted ribbing in the round for 2,5 cm.
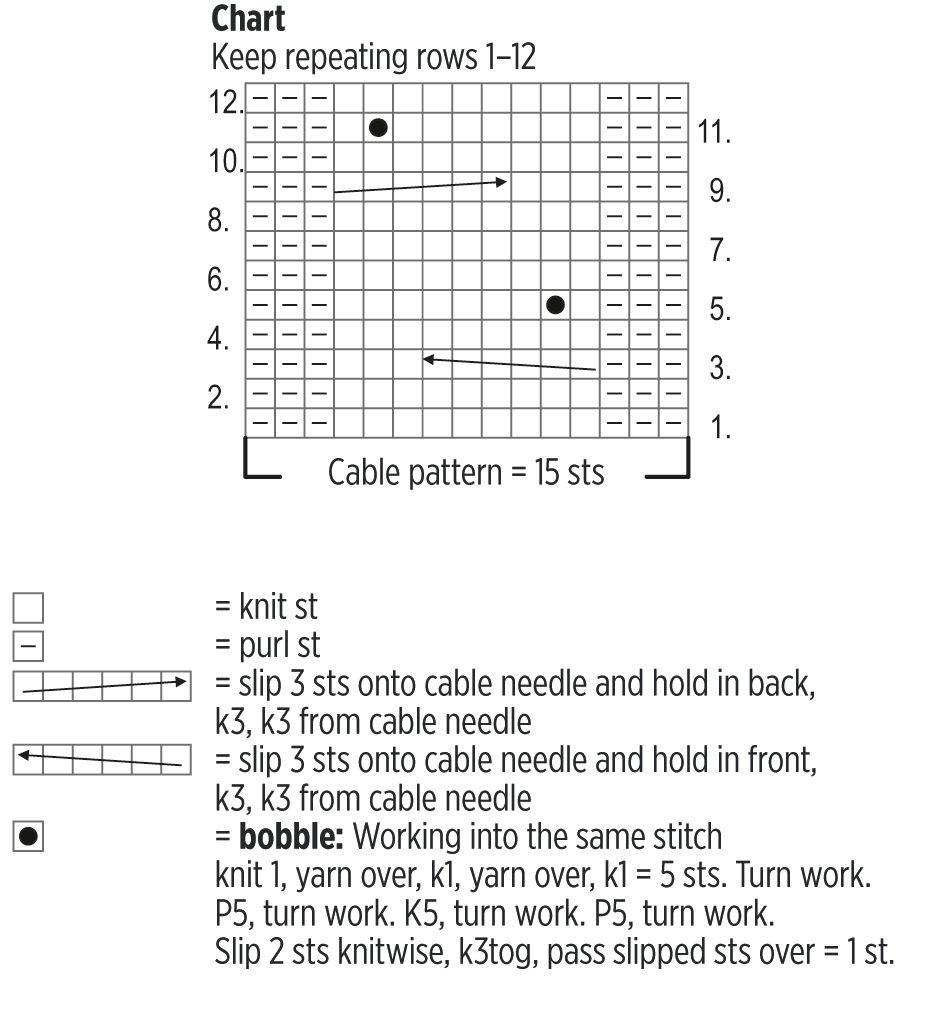
Begin the cable pattern on row 1 of the chart: work the 15 st pattern on needle I and work the other sts in stockinette st. Work rows 2-12 of the chart, then keep repeating rows 1-12.
When the leg measures 8(9) cm, knit 7 sts at the beginning of the next round onto needle IV. The beginning of round is now here. Redistribute the sts so that there are 11(13) sts on each needle. The cable sts are on needles I and IV.
Begin heel flap: knit the sts on needle I onto needle IV = 22(26) sts. Turn work.
Reinforced stitch pattern:
Row 1: (WS) slip 1, purl to end. Turn work.
Row 2: (RS) *slip 1 with yarn in back, k1*, repeat *-* 10(12) more times. Turn work.
Row 3: slip 1, purl to end. Turn work.
Repeat rows 2-3 10(13) more times.
French heel:
Row 1: (RS) slip 1, k12(14), skp (= slip 1 knitwise, k1, pass slipped st over), k1. Turn work.
Row 2: (WS) slip 1, p5, p2tog, p1. Turn work.
Row 3: slip 1, knit to last st before gap, skp, k1. Turn work.
Row 4: slip 1, purl to last st before gap, p2tog, p1. Turn work.
Continue in this manner until all sts have been worked. Redistribute the remaining sts onto two needles. Using a free needle pick up and knit 11(13) sts from the left end of the heel flap + 1 st from between the flap and needle II. Using the left-hand sole needle knit the heel flap sts and knit the picked-up sts through the back loop. On needles II and III work stockinette st as established. Using the right-hand sole needle pick up 11(13) sts from the right end + 1 st from between needle III and the heel flap. Knit the picked-up sts through the back loop and knit the flap sts.
Work stockinette st in the round and begin gusset decreases: at the end of needle I, k2tog; at the beginning of needle IV, skp. Repeat the decreases every other round until 11(13) sts remain on needles I and IV = 44(52) sts.
Work until the foot measures approx. 8(10) cm or until the sock covers the fifth toe.
Begin toe decreases: at the end of needles I and III, k2tog, k1; at the beginning of needles II and IV, k1, skp. Decrease as established on every other round until 12 sts remain on each needle. Break the yarn and pull it through the sts. Close the hole.
Knit the other sock in the same manner.
Finishing
Securely weave in all ends. Lightly steam the socks.
Using the multi-coloured yarn make 1 or 2 pompoms approx. 2,5-3 cm in diameter for both socks. Attach them to the top edge of the cable pattern.
Snowberry socks for babies Novita Baby Merino and Baby Merino Dream
Size(s)
one size
Finished dimensions
62(86) cm; foot length 10(12) cm / 4(4¾) in
Yarn demand
Novita Baby Merino (448) Tin or (326) Silver Willow <50 g and for the pompoms some Novita Baby Merino Dream (834) Raindrop or (896) Baby Seal
Needles and other supplies
Double-pointed needles Novita 2½ mm (UK 12½ / US 1½) or size needed to obtain gauge
Stitch patterns
- Twisted ribbing in the round: *k1 through back loop, p1*
Cast on 44(52) sts and divide them onto four needles: 15(15) sts needle I + 10(12) sts needle II + 10(12) sts needle III + 9(13) sts needle IV. The beginning of round is between needles I and IV. Work twisted ribbing in the round for 2,5 cm.
Begin the cable pattern on row 1 of the chart: work the 15 st pattern on needle I and work the other sts in stockinette st. Work rows 2-12 of the chart, then keep repeating rows 1-12.
When the leg measures 8(9) cm, knit 7 sts at the beginning of the next round onto needle IV. The beginning of round is now here. Redistribute the sts so that there are 11(13) sts on each needle. The cable sts are on needles I and IV.
Begin heel flap: knit the sts on needle I onto needle IV = 22(26) sts. Turn work.
Reinforced stitch pattern:
Row 1: (WS) slip 1, purl to end. Turn work.
Row 2: (RS) *slip 1 with yarn in back, k1*, repeat *-* 10(12) more times. Turn work.
Row 3: slip 1, purl to end. Turn work.
Repeat rows 2-3 10(13) more times.
French heel:
Row 1: (RS) slip 1, k12(14), skp (= slip 1 knitwise, k1, pass slipped st over), k1. Turn work.
Row 2: (WS) slip 1, p5, p2tog, p1. Turn work.
Row 3: slip 1, knit to last st before gap, skp, k1. Turn work.
Row 4: slip 1, purl to last st before gap, p2tog, p1. Turn work.
Continue in this manner until all sts have been worked. Redistribute the remaining sts onto two needles. Using a free needle pick up and knit 11(13) sts from the left end of the heel flap + 1 st from between the flap and needle II. Using the left-hand sole needle knit the heel flap sts and knit the picked-up sts through the back loop. On needles II and III work stockinette st as established. Using the right-hand sole needle pick up 11(13) sts from the right end + 1 st from between needle III and the heel flap. Knit the picked-up sts through the back loop and knit the flap sts.
Work stockinette st in the round and begin gusset decreases: at the end of needle I, k2tog; at the beginning of needle IV, skp. Repeat the decreases every other round until 11(13) sts remain on needles I and IV = 44(52) sts.
Work until the foot measures approx. 8(10) cm or until the sock covers the fifth toe.
Begin toe decreases: at the end of needles I and III, k2tog, k1; at the beginning of needles II and IV, k1, skp. Decrease as established on every other round until 12 sts remain on each needle. Break the yarn and pull it through the sts. Close the hole.
Knit the other sock in the same manner.
Finishing
Securely weave in all ends. Lightly steam the socks.
Using the multi-coloured yarn make 1 or 2 pompoms approx. 2,5-3 cm in diameter for both socks. Attach them to the top edge of the cable pattern.


