
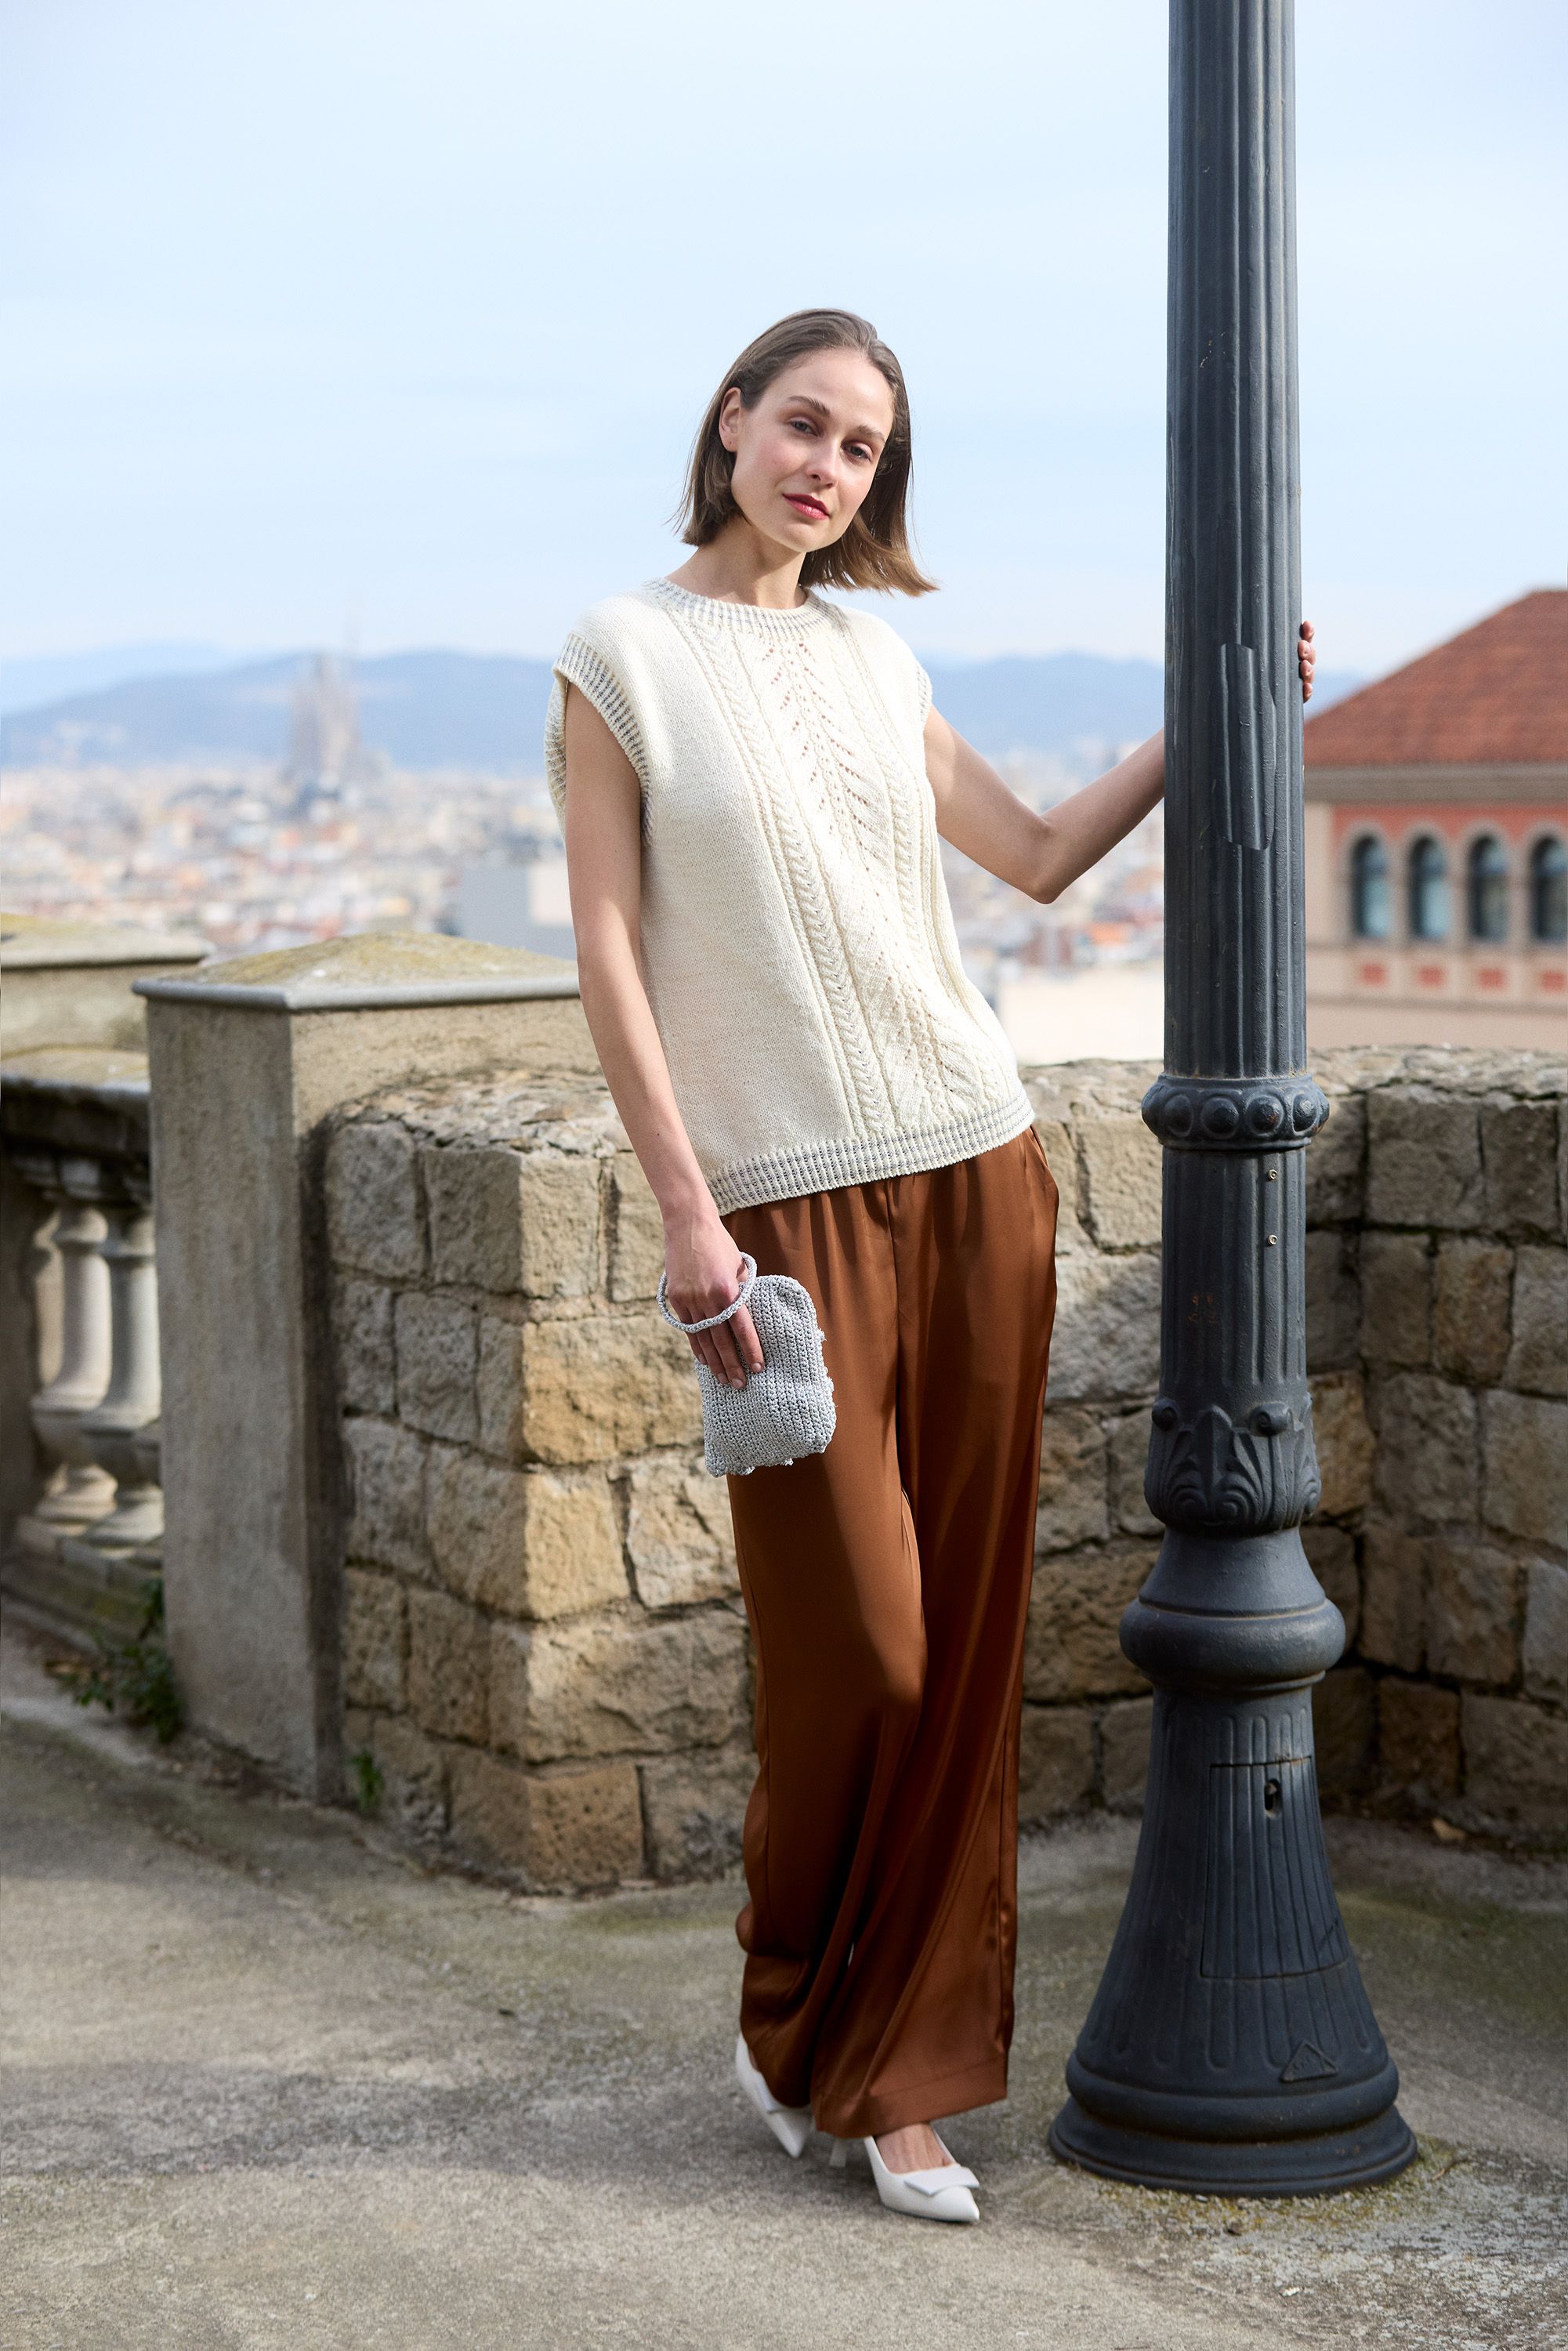

Novita Essentials: Lauren Slipover
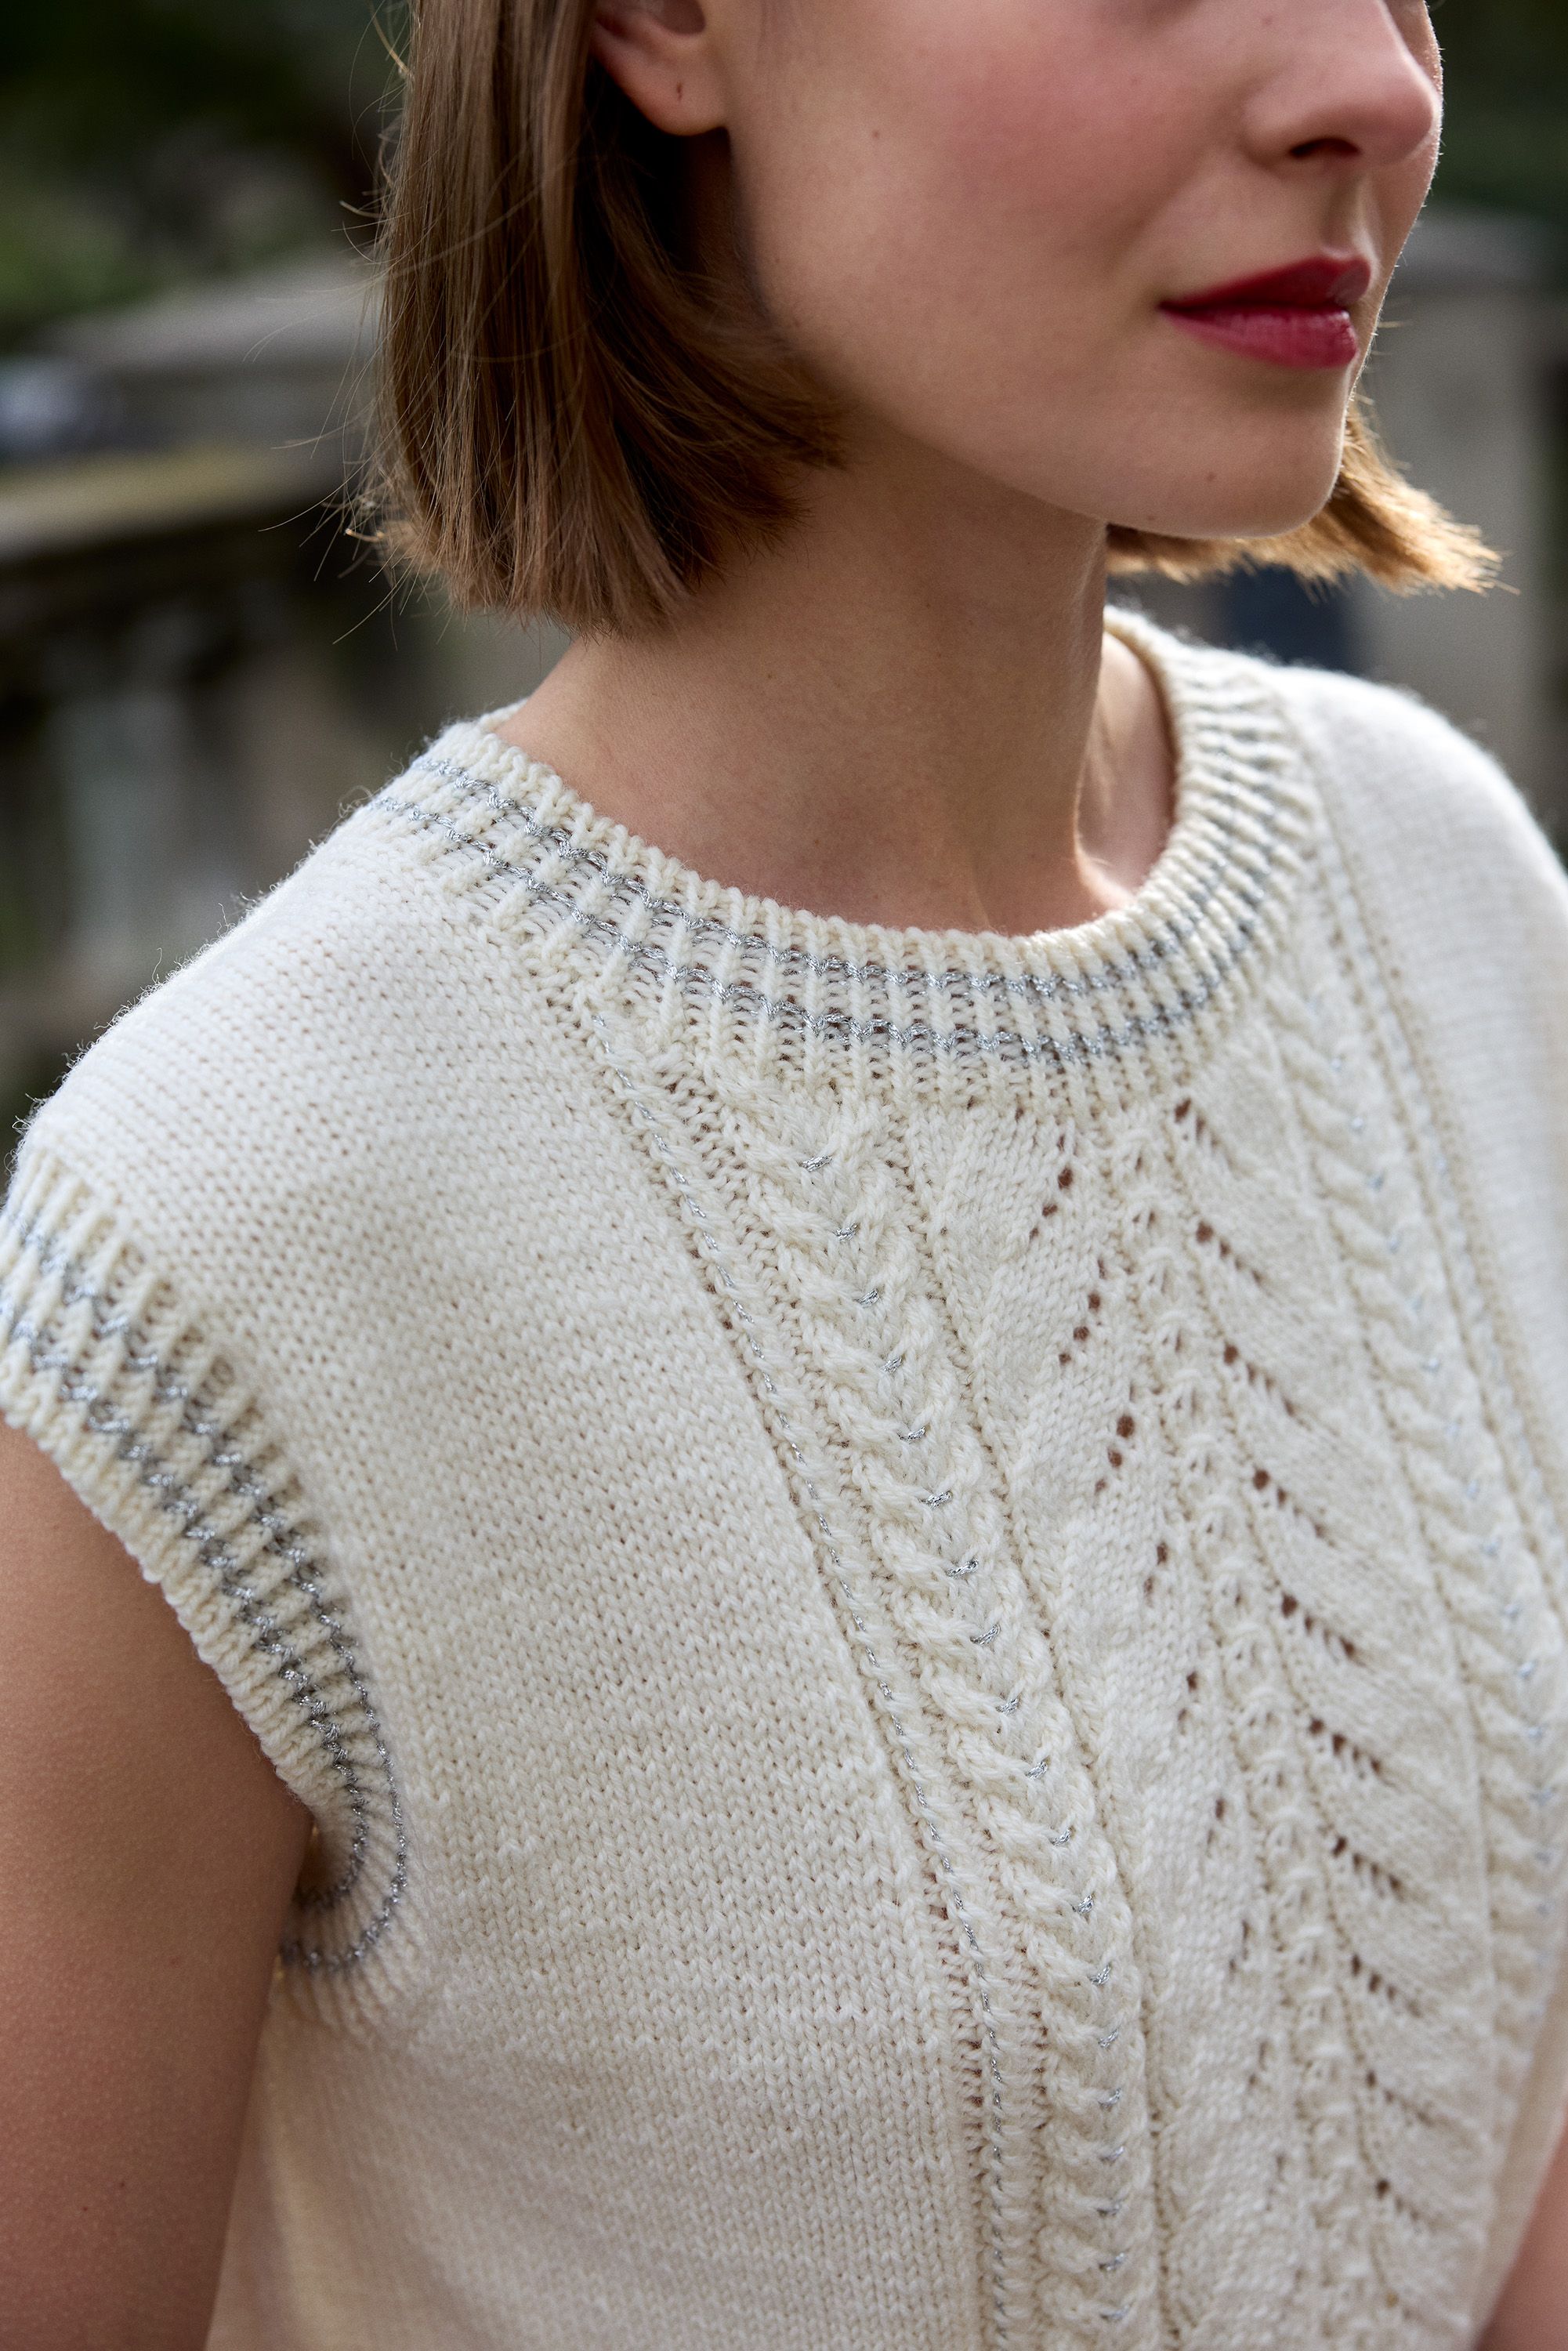
This subtly decorative slipover is a real wardrobe staple which can be used as a top, a slipover or over a collared shirt. Knitted from the soft Wonder Wool DK yarn, it can also be worn directly on the skin. The decorative front panel, combining lace and cables, along with details knitted with the glimmering Disco yarn make this an elegant and festive garment. The Lauren slipover is knitted seamlessly from the top down starting at the back neckline and features a European shoulder.
Designer
Minna Metsänen
Language
Size(s)
XS(S)M(L)XL(2XL)3XL(4XL) Sample size: M
Finished dimensions
body circumference 96(104)112(120)128(136)144(152) cm / 37.75(41)44(47.25)50.5(53.5)56.75(59.75) in
middle back length 58(60)62(64)66(68)70(72) cm / 22.75(23.5)24.5(25.25)26(26.75)27.5(28.25) in
Yarn demand
Novita Wonder Wool DK (017) Foam 300(350)400(400)450(450)500(500) g Novita Disco (420) Silver 25(25)25(25)50(50)50(50) g
Needles and other supplies
Circular needles (80 cm / 32 in; 40 cm / 16 in) Novita 3.5 mm (US 4) and 4 mm (US 6) or sizes needed for gauge Other supplies: 2 stitch markers, blunt needle
Finished dimensions
body circumference 96(104)112(120)128(136)144(152) cm / 37.75(41)44(47.25)50.5(53.5)56.75(59.75) in
middle back length 58(60)62(64)66(68)70(72) cm / 22.75(23.5)24.5(25.25)26(26.75)27.5(28.25) in
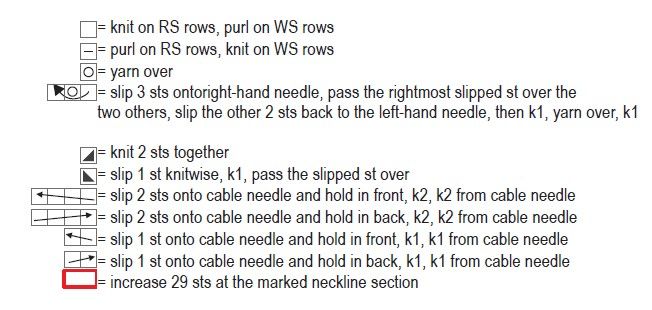
Stitch patterns Stockinette stitch (flat): knit the right side rows and purl the wrong side rows. Stockinette stitch in the round: knit all rounds. Cable pattern: follow the chart and instructions.Twisted ribbing in the round:*k1 through the back loop, p1*, repeat *–*.
Techniques M1R: Make one right: pick up the strand of yarn between the sts onto the left needle from the back and knit it through the front loop. M1L: Make one left: pick up the strand of yarn between the sts onto the left needle from the front and knit it through the back loop. M1R(p): Make one right purl: pick up the strand of yarn between the sts onto the left needle from the back and purl it through the front loop. M1L(p): Make one left purl: pick up the strand of yarn between the sts onto the left needle from the front and purl it through the back loop.
Gauge 22 sts and 28 rows in stockinette st = 10 cm / 4 in
Construction The slipover is knitted seamlessly from the top down.The silver details in the cables are embroidered on the finished knit.
Top back
Using the Foam yarn and the larger circular needle, cast on 50(50)50(52)52(52)54(54) sts for neckline.Work the WS row as follows: p3, place marker (PM), purl to last 3 sts, PM, p3.
Work stockinette st flat and begin increases at both ends:
Increase row 1 (RS):k3, slip marker (SM), M1L, knit to second marker, M1R, SM, k3.2 sts increased = 52(52)52(54)54(54)56(56) sts.Turn work.
Increase row 2 (WS):p3, SM, M1R(p), purl to second marker, M1L(p), SM, p3.2 sts increased = 54(54)54(56)56(56)58(58) sts.Turn work.
Repeat rows 1–2 a further 8(9)10(11)12(13)14(15) times.86(90)94(100)104(108)114(118) sts now on the needles.Remove all markers.
Work stockinette st without increasing until the centre back measures 17(18)20(20)21(22)24(24) cm / 6.75(7)7.75(7.75)8.25(8.75)9.5(9.5) in.
Begin increases for the armhole.Increase row (RS): k2, M1L, work to last 2 sts, M1R, k2.Repeat the increases on every other row 6(6)6(7)7(7)7(7) more times = 100(104)108(116)120(124)130(134) sts.Work the WS row.Break yarn and leave the sts on hold.
Top front
Lay back piece flat with the cast-on edge up.
Left side:With RS facing, evenly pick up and knit 18(20)22(24)26(28)30(32) sts from the left top edge of the back piece (from where the increases are).Work stockinette st flat for 13(13)13(11)11(11)9(9) rows, finishing after a WS row.
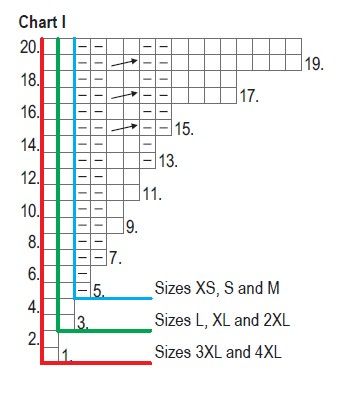
With the shoulder sts, work stockinette st flat; at the right end, begin increases for the neckline and the cable pattern.Make the first increase at the end of the WS row just finished: cast on 1 st using the backwards-loop method, turn work.Begin the cable pattern on row 5(5)5(3)3(3)1(1) of chart I: work the cast-on st following the chart, PM, knit the shoulder sts.Turn work, purl to marker, work last st following row 6(6)6(4)4(4)2(2) of the chart.Cast on 1 st at the end of row, turn work.
Keep working as established and increasing by casting on new sts at the right end.Work rows 7(7)7(5)5(5)3(3)–20; at the end of each WS row, cast on 1 st using the backwards-loop method.On every other row cast on 6(6)6(7)7(7)8(8)x1 st and then 2x4 sts.32(34)36(39)41(43)46(48) sts now on the needles.Leave the sts on hold.
Right side:With RS facing, evenly pick up and knit 18(20)22(24)26(28)30(32) sts from the right top edge of the back piece (from where the increases are).Work stockinette st flat for 13(13)13(11)11(11)9(9) rows, finishing after a WS row.
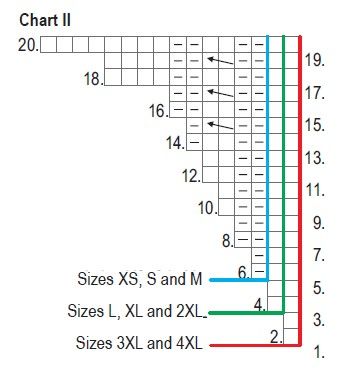
With the shoulder sts, work stockinette st flat; at the left end, begin increases for the neckline and the cable pattern.On the next RS row, knit the shoulder sts, cast on 1 st using backwards-loop method, turn work.Begin the cable pattern on row 6(6)6(4)4(4)2(2) of chart II: (WS) work the cast-on st following the chart, PM, purl the shoulder sts.
Keep working as established, increasing at the left end.Work rows 7(7)7(5)5(5)3(3)–20; at the end of each RS row, cast on 1 st using the backwards-loop method.On every other row cast on 6(6)6(7)7(7)8(8)x1 st and then 2x4 sts.32(34)36(39)41(43)46(48) sts now on the needles.Finish after a WS row.Do not break yarn.
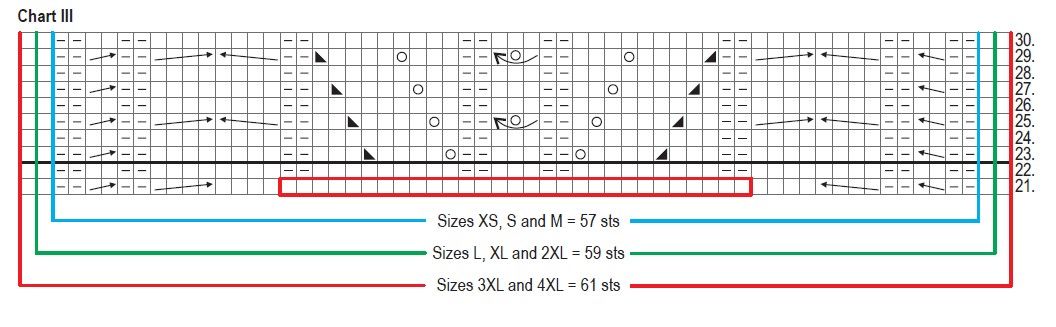
Continue on row 21 of chart III and join the front pieces as follows: knit the 32(34)36(39)41(43)46(48) right shoulder sts, cast on 29 sts at the neckline using the backwards-loop method, knit the 32(34)36(39)41(43)46(48) left shoulder sts = 93(97)101(107)111(115)121(125) sts.Work row 22. Work stockinette st at the ends and the cable pattern in the centre.With the 57(57)57(59)59(59)61(61) cable section sts, keep repeating rows 23–30.
When the piece measures 9(10)12(12)13(14)16(16) cm / 3.5(4)4.75(4.75)5(5.5)6.25(6.25) from the neckline cast-on, begin increases for the armholes.Increase row:(RS) k2, M1L, work to last 2 sts, M1R, k2.Repeat the increases on every other row 6(6)6(7)7(7)7(7) more times = 107(111)115(123)127(131)137(141) sts.After the last increases, work the WS row once more.
Body
On the next RS row, knit the front and back sts onto the same circular needle: work 107(111)115(123)127(131)137(141) front sts, cast on 6(10)15(16)20(25)28(33) sts for armhole, work 100(104)108(116)120(124)130(134) back sts, cast on 6(10)15(16)20(25)28(33) sts for armhole = 219(235)253(271)287(305)323(341) sts.
Work in the round as established until the piece measures 31(32)32(33)34(35)35(37) cm / 12.25(12.5)12.5(13)13.5(13.75)13.75(14.5) from the armhole.Switch to the smaller needles. With all sts, work twisted ribbing in the round.On the first round, decrease 1 st at each p2 in the front cable pattern: p2tog or k2tog as required to maintain rib pattern. Work 2 rounds in twisted ribbing.Join the Disco yarn held double, work 1 round.Keep alternating 3 rounds with Foam and 1 round with Silver until the ribbing has 3 stripes in Silver.Work 3 more rounds using Foam, then work an Italian bind-off or bind off as desired.
Finishing
Armhole borders:With RS facing, pick up and knit sts from the armhole using the Foam yarn and the shorter 3.5 mm circular needle. Pick up 1 st from each st and 3 sts per 4 rows.Switch to smaller needles and work twisted ribbing in the round for 2 rounds.Join the Disco yarn held double, work 1 round.Keep alternating 3 rounds with Foam and 1 round with Silver until the ribbing has 2 stripes in Silver.Work 3 more rounds using Foam, then work an Italian bind-off or bind off as desired.
Knit the other armhole border in the same manner.
Neck border:With RS facing, pick up and knit sts from the neckline using the Foam yarn and the shorter 3.5 mm circular needle.Pick up a total of 124(124)124(128)128(128)132(132) sts and work as for the armhole border.
Pin to measurements and steam lightly.
Embroidery: First, thread one strand of the Disco yarn into the narrow cables at the edges of the cable pattern.Use a blunt needle and go under the bottom edge of the “diagonal” sts at the top of the cables.Work until you reach the neckline.Straighten the yarn as you go and take care not to work too tightly.Securely weave in.
Using one strand of Disco, make small horizontal stitches in the middle of the 8 st cables, at the cable turns.Make sure you have enough yarn, approx. twice the length of the piece.Go through the inside edges of the middle sts in the cable.Work the satin sts twice and move to the next cable turn on the WS.Don’t work too tightly.Work until you reach the neckline. Securely weave in.
Novita Essentials: Lauren Slipover
Size(s)
XS(S)M(L)XL(2XL)3XL(4XL) Sample size: M
Finished dimensions
body circumference 96(104)112(120)128(136)144(152) cm / 37.75(41)44(47.25)50.5(53.5)56.75(59.75) in
middle back length 58(60)62(64)66(68)70(72) cm / 22.75(23.5)24.5(25.25)26(26.75)27.5(28.25) in
Yarn demand
Novita Wonder Wool DK (017) Foam 300(350)400(400)450(450)500(500) g Novita Disco (420) Silver 25(25)25(25)50(50)50(50) g
Needles and other supplies
Circular needles (80 cm / 32 in; 40 cm / 16 in) Novita 3.5 mm (US 4) and 4 mm (US 6) or sizes needed for gauge Other supplies: 2 stitch markers, blunt needle
Stitch patterns Stockinette stitch (flat): knit the right side rows and purl the wrong side rows. Stockinette stitch in the round: knit all rounds. Cable pattern: follow the chart and instructions.Twisted ribbing in the round:*k1 through the back loop, p1*, repeat *–*.
Techniques M1R: Make one right: pick up the strand of yarn between the sts onto the left needle from the back and knit it through the front loop. M1L: Make one left: pick up the strand of yarn between the sts onto the left needle from the front and knit it through the back loop. M1R(p): Make one right purl: pick up the strand of yarn between the sts onto the left needle from the back and purl it through the front loop. M1L(p): Make one left purl: pick up the strand of yarn between the sts onto the left needle from the front and purl it through the back loop.
Gauge 22 sts and 28 rows in stockinette st = 10 cm / 4 in
Construction The slipover is knitted seamlessly from the top down.The silver details in the cables are embroidered on the finished knit.
Top back
Using the Foam yarn and the larger circular needle, cast on 50(50)50(52)52(52)54(54) sts for neckline.Work the WS row as follows: p3, place marker (PM), purl to last 3 sts, PM, p3.
Work stockinette st flat and begin increases at both ends:
Increase row 1 (RS):k3, slip marker (SM), M1L, knit to second marker, M1R, SM, k3.2 sts increased = 52(52)52(54)54(54)56(56) sts.Turn work.
Increase row 2 (WS):p3, SM, M1R(p), purl to second marker, M1L(p), SM, p3.2 sts increased = 54(54)54(56)56(56)58(58) sts.Turn work.
Repeat rows 1–2 a further 8(9)10(11)12(13)14(15) times.86(90)94(100)104(108)114(118) sts now on the needles.Remove all markers.
Work stockinette st without increasing until the centre back measures 17(18)20(20)21(22)24(24) cm / 6.75(7)7.75(7.75)8.25(8.75)9.5(9.5) in.
Begin increases for the armhole.Increase row (RS): k2, M1L, work to last 2 sts, M1R, k2.Repeat the increases on every other row 6(6)6(7)7(7)7(7) more times = 100(104)108(116)120(124)130(134) sts.Work the WS row.Break yarn and leave the sts on hold.
Top front
Lay back piece flat with the cast-on edge up.
Left side:With RS facing, evenly pick up and knit 18(20)22(24)26(28)30(32) sts from the left top edge of the back piece (from where the increases are).Work stockinette st flat for 13(13)13(11)11(11)9(9) rows, finishing after a WS row.
With the shoulder sts, work stockinette st flat; at the right end, begin increases for the neckline and the cable pattern.Make the first increase at the end of the WS row just finished: cast on 1 st using the backwards-loop method, turn work.Begin the cable pattern on row 5(5)5(3)3(3)1(1) of chart I: work the cast-on st following the chart, PM, knit the shoulder sts.Turn work, purl to marker, work last st following row 6(6)6(4)4(4)2(2) of the chart.Cast on 1 st at the end of row, turn work.
Keep working as established and increasing by casting on new sts at the right end.Work rows 7(7)7(5)5(5)3(3)–20; at the end of each WS row, cast on 1 st using the backwards-loop method.On every other row cast on 6(6)6(7)7(7)8(8)x1 st and then 2x4 sts.32(34)36(39)41(43)46(48) sts now on the needles.Leave the sts on hold.
Right side:With RS facing, evenly pick up and knit 18(20)22(24)26(28)30(32) sts from the right top edge of the back piece (from where the increases are).Work stockinette st flat for 13(13)13(11)11(11)9(9) rows, finishing after a WS row.
With the shoulder sts, work stockinette st flat; at the left end, begin increases for the neckline and the cable pattern.On the next RS row, knit the shoulder sts, cast on 1 st using backwards-loop method, turn work.Begin the cable pattern on row 6(6)6(4)4(4)2(2) of chart II: (WS) work the cast-on st following the chart, PM, purl the shoulder sts.
Keep working as established, increasing at the left end.Work rows 7(7)7(5)5(5)3(3)–20; at the end of each RS row, cast on 1 st using the backwards-loop method.On every other row cast on 6(6)6(7)7(7)8(8)x1 st and then 2x4 sts.32(34)36(39)41(43)46(48) sts now on the needles.Finish after a WS row.Do not break yarn.
Continue on row 21 of chart III and join the front pieces as follows: knit the 32(34)36(39)41(43)46(48) right shoulder sts, cast on 29 sts at the neckline using the backwards-loop method, knit the 32(34)36(39)41(43)46(48) left shoulder sts = 93(97)101(107)111(115)121(125) sts.Work row 22. Work stockinette st at the ends and the cable pattern in the centre.With the 57(57)57(59)59(59)61(61) cable section sts, keep repeating rows 23–30.
When the piece measures 9(10)12(12)13(14)16(16) cm / 3.5(4)4.75(4.75)5(5.5)6.25(6.25) from the neckline cast-on, begin increases for the armholes.Increase row:(RS) k2, M1L, work to last 2 sts, M1R, k2.Repeat the increases on every other row 6(6)6(7)7(7)7(7) more times = 107(111)115(123)127(131)137(141) sts.After the last increases, work the WS row once more.
Body
On the next RS row, knit the front and back sts onto the same circular needle: work 107(111)115(123)127(131)137(141) front sts, cast on 6(10)15(16)20(25)28(33) sts for armhole, work 100(104)108(116)120(124)130(134) back sts, cast on 6(10)15(16)20(25)28(33) sts for armhole = 219(235)253(271)287(305)323(341) sts.
Work in the round as established until the piece measures 31(32)32(33)34(35)35(37) cm / 12.25(12.5)12.5(13)13.5(13.75)13.75(14.5) from the armhole.Switch to the smaller needles. With all sts, work twisted ribbing in the round.On the first round, decrease 1 st at each p2 in the front cable pattern: p2tog or k2tog as required to maintain rib pattern. Work 2 rounds in twisted ribbing.Join the Disco yarn held double, work 1 round.Keep alternating 3 rounds with Foam and 1 round with Silver until the ribbing has 3 stripes in Silver.Work 3 more rounds using Foam, then work an Italian bind-off or bind off as desired.
Finishing
Armhole borders:With RS facing, pick up and knit sts from the armhole using the Foam yarn and the shorter 3.5 mm circular needle. Pick up 1 st from each st and 3 sts per 4 rows.Switch to smaller needles and work twisted ribbing in the round for 2 rounds.Join the Disco yarn held double, work 1 round.Keep alternating 3 rounds with Foam and 1 round with Silver until the ribbing has 2 stripes in Silver.Work 3 more rounds using Foam, then work an Italian bind-off or bind off as desired.
Knit the other armhole border in the same manner.
Neck border:With RS facing, pick up and knit sts from the neckline using the Foam yarn and the shorter 3.5 mm circular needle.Pick up a total of 124(124)124(128)128(128)132(132) sts and work as for the armhole border.
Pin to measurements and steam lightly.
Embroidery: First, thread one strand of the Disco yarn into the narrow cables at the edges of the cable pattern.Use a blunt needle and go under the bottom edge of the “diagonal” sts at the top of the cables.Work until you reach the neckline.Straighten the yarn as you go and take care not to work too tightly.Securely weave in.
Using one strand of Disco, make small horizontal stitches in the middle of the 8 st cables, at the cable turns.Make sure you have enough yarn, approx. twice the length of the piece.Go through the inside edges of the middle sts in the cable.Work the satin sts twice and move to the next cable turn on the WS.Don’t work too tightly.Work until you reach the neckline. Securely weave in.