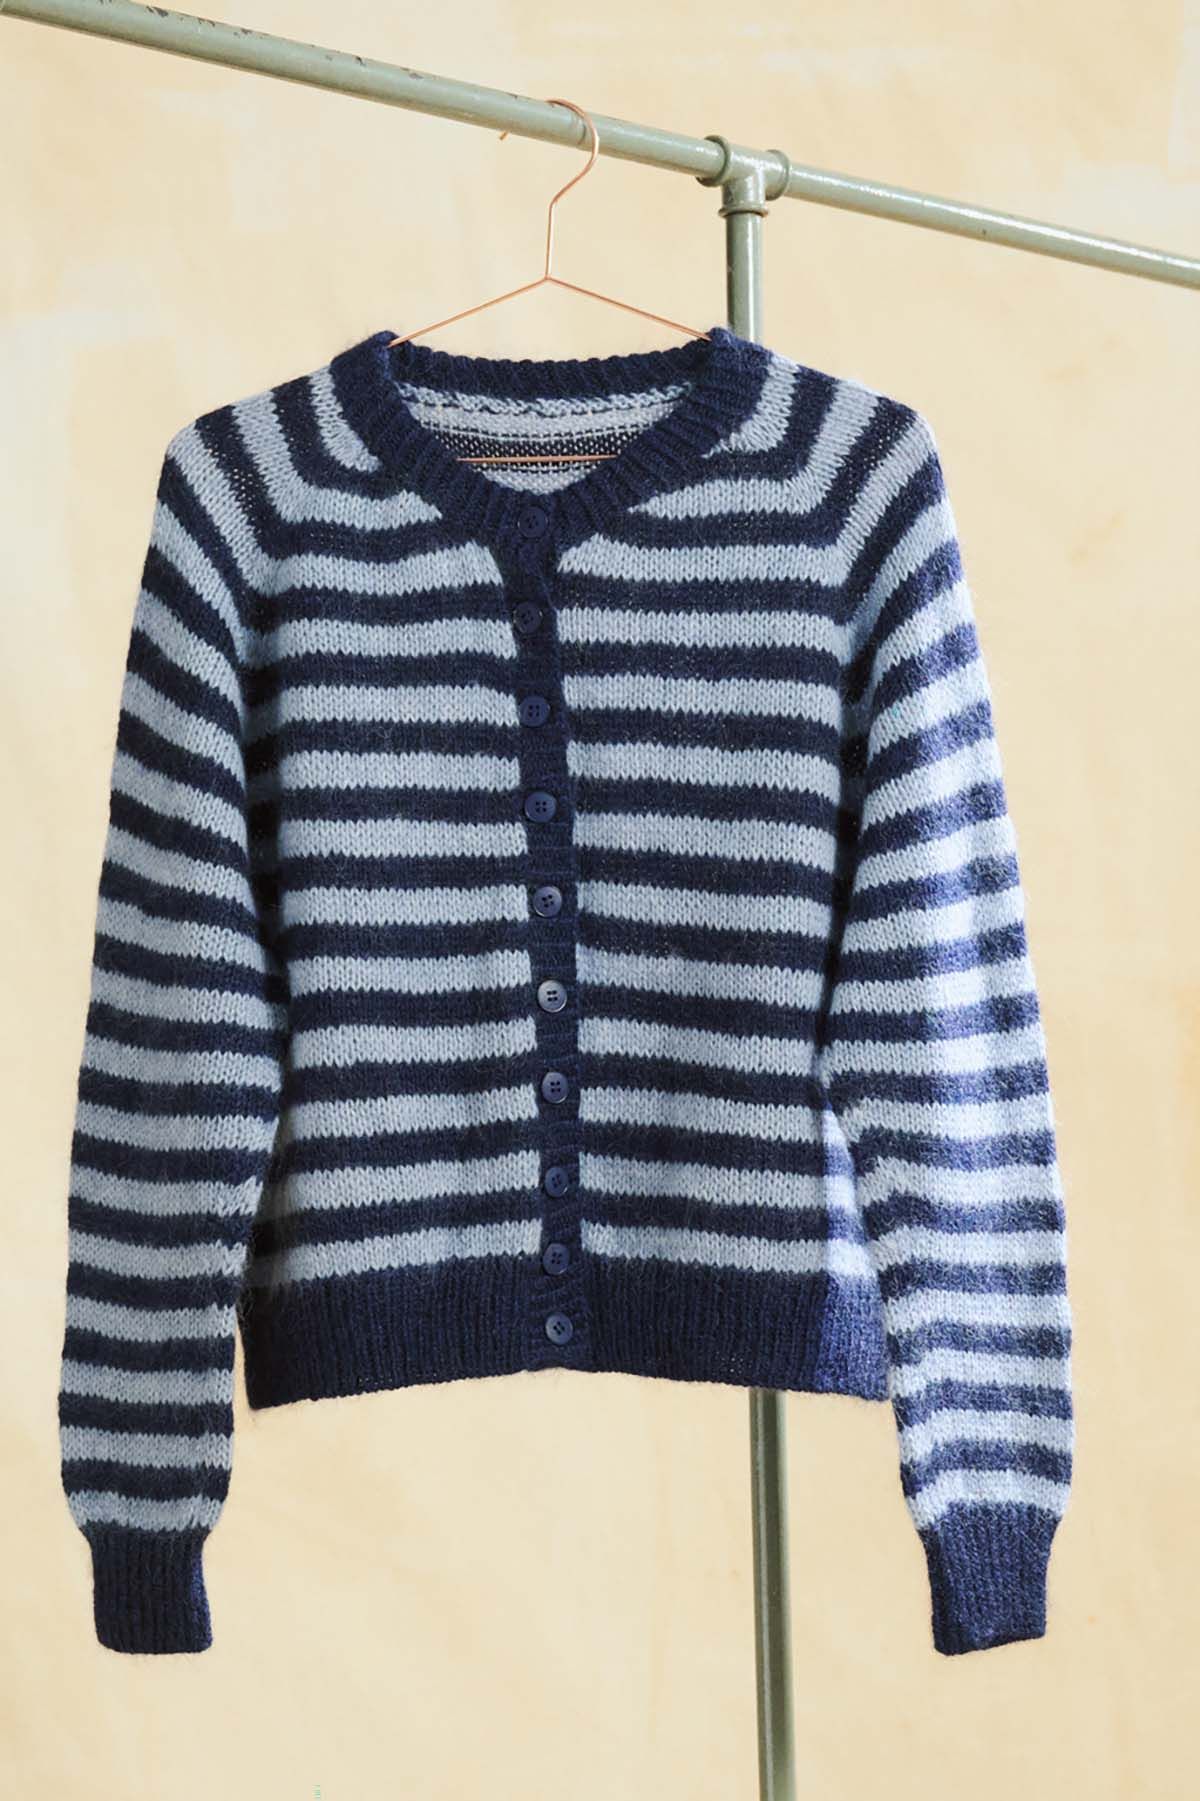
Novita Nalle: Kielo Knitted Cardigan
The Kielo cardigan (Finnish for lily of the valley) is full of delicate details that signify early summer. The shoulder seams, and the button bands with the wave pattern, give the cardigan a neat look. The delicate Kielo cardigan is knitted from Novita Nalle yarn, in the color Flax.
Designer
Essi Kyllönen
Language
Size(s)
XS(S/M)L/XL(XXL)
Finished dimensions
Finished measurements:
Chest circumference: 82(88)100(112) cm/32.3(34.7)39.4(44.1)”
Total length: 49(51)53(56) cm/19.3(20.1)20.9(22.1)”
Underarm length: 52(53)54(54) cm/20.5(20.9)21.3(21.3)”
Yarn demand
Novita Nalle (061) Flax 400(450)500(600) g
Needles and other supplies
Needles: Novita circular needle (80 cm) and dpns in size 3.5 mm (US 4/UK 10 or 9) and 4 mm (US 6/UK 8) or size needed to fit gauge, a crochet hook: Novita 3.5 mm (US 8/UK 6) Notions: 6 buttons
Finished dimensions
Finished measurements:
Chest circumference: 82(88)100(112) cm/32.3(34.7)39.4(44.1)”
Total length: 49(51)53(56) cm/19.3(20.1)20.9(22.1)”
Underarm length: 52(53)54(54) cm/20.5(20.9)21.3(21.3)”
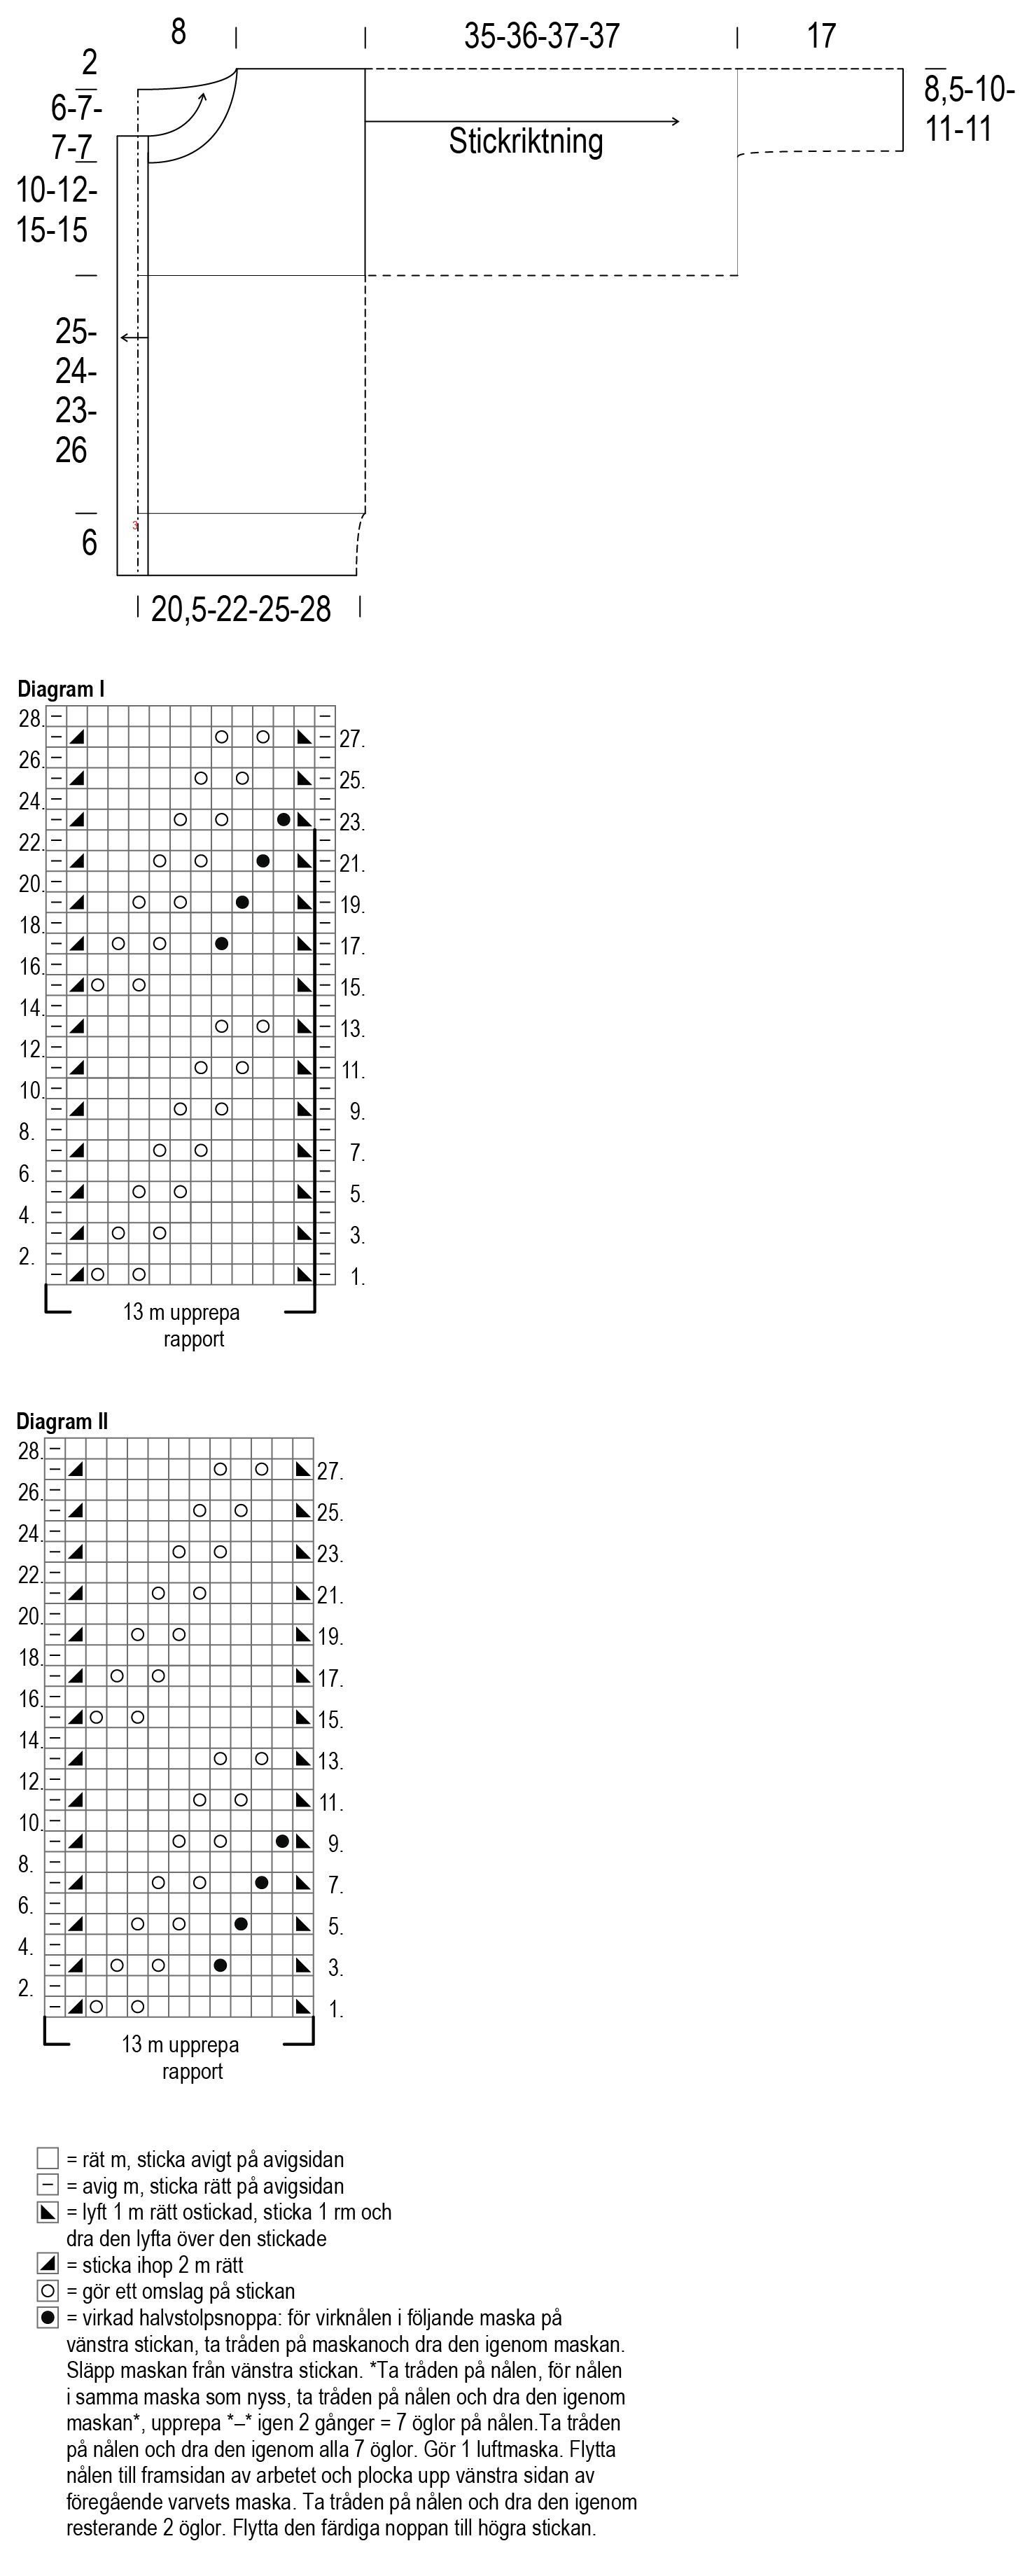
Stitch patterns: Ribbing: *k1, p1, rep from *. In the following rows, work the sts as they appear. Garter st: knit all sts on RS and WS rows. Lace pattern: Work acc to chart and written instructions. Stockinette stitch: knit the RS rows, purl the WS rows. Reverse stockinette stitch: purl the RS rows, knit the WS rows.
Crochet stitches: single crochet (sc), half double crochet (hdc), to form the bobbles in the lace pattern.
Note: In the legend, US crochet terms are used for the instructions on how to crochet the bobble. Sometimes, they differ from UK terms. At the end of the pattern, you can find a list of Abbreviation & Term Differences between the U.S./Canada and United Kingdom (U.K.). Please check this list if you are used to the UK terms!
Gauge/Tension: 22 sts in lace pattern, using the larger size ndls = 10 cm/4”
Front and back, lower part
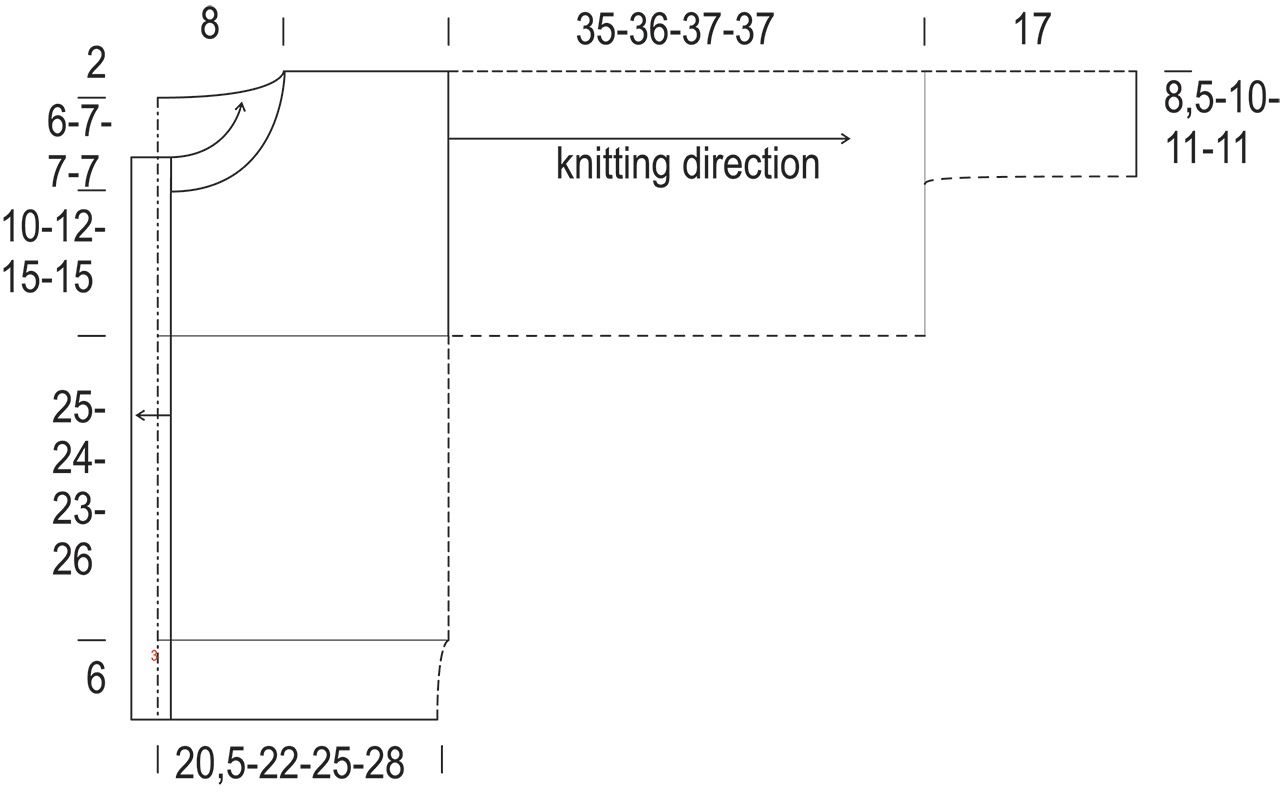
The cardigan is worked in one piece, from the bottom up to the armholes, with opening mid front.
Loosely CO 170(183)209(235) sts using the smaller size circ. ndls. Work 6 cm/2.4” ribbing back and forth, end with a WS row. Change to larger size ndls and work 2 rows in st st.
Continue working lace pattern acc to chart I, row 1, as follows: k1, then work patt rep of 13 sts 13(14)16(18) times. Work rows 2-28 of the chart, then rep rows 1-28.
When work measures 31(30)29(32) cm/12.2(11.8)11.4(12.6)”, place removable markers on both sides (or use a contrast colored piece of yarn), as follows: place first M around the 47th(47th)53rd(60th) stitch from the right, place second M around 47th(47th)53rd(60th) stitch from the left. Now divide work into 3 parts: work the next RS row in pattern to first M, BO marked st for armhole, work in pattern to second armhole, BO marked st for second armhole and work in pattern to end of row. Both front parts now have 46(46)52(59) sts and back part has 76(89)103(115) sts.
Place sts of right front and back on hold and finish left front first. Make a note of the last worked row of the chart.
Left front, upper part
46(46)52(59) sts of left front.
Note: In the lace pattern, every decrease is accompanied by a yarn over, so the number of stitches always remains the same. When one of the two is decreased, this decrease pair is no longer worked and the stitch is worked as k1.
When armhole depth measures 10(12)15(15) cm/4(4.7)6(6)”, BO 10(8)8(8) sts at the left side of the work, for the neck opening, and at the neck opening of every following 2nd row, BO 5(4)4(4) sts once, 3 sts once, 2 sts 2(1)1(1) time(s) and 1 st 3(2)1(2) time(s).
When armhole depth measures 18(21)24(24) cm/7.1(8.3) 9.5(9.5)”, BO the rem 21(27)34(40) shoulder-sts, or place them on hold, to graft the shoulders-sts of front and back together later.
Right front, upper part
Continue working lace pattern across the 46(46)52(59) sts of right front, starting with the same row of lace pattern chart as for left front.
When armhole depth measures 10(12)15(15) cm/4(4.7)6(6)”, BO 10(8)8(8) sts at the right side of the work, for the neck opening, and at the neck opening of every following 2nd row, BO 5(4)4(4) sts once, 3 sts once, 2 sts 2(1)1(1) time(s) and 1 st 3(2)1(2) time(s).
When armhole depth measures 18(21)24(24) cm/7.1(8.3) 9.5(9.5)”, BO the rem 21(27)34(40) shoulder-sts, or place them on hold, to graft the shoulders-sts of front and back together later.
Back, upper part
Continue working lace pattern across the 76(89)103(115) back-sts, starting with the same row of lace pattern chart as for front parts.
When armhole depth measures 16(19)22(22) cm/6.3(7.5)8.7(8.7)”, BO the middle 26(27)27(27) sts and work each shoulder separately. In every 2nd row, BO 2 sts twice, for the neck opening.
When armhole depth measures 19(22)24(24) cm/7.5(8.7) 9.5(9.5)”, BO the rem 21(27)34(40) shoulder-sts, or place them on hold, to graft the shoulders-sts of front and back together later
Work the second shoulder in the same way, but reverse shaping.
Sleeves
Sew or graft the shoulder seams.
With RS facing and using the larger size dpns, PUK 78(91)104(104) sts along armhole edge and place marker to mark beg of rnd.
Knit 1 rnd.
Work lace pattern in the rnd acc to chart II, row 1 and work patt rep of 13 sts 6(7)8(8) times. Work rows 2-28 of the chart, then rep rows 1-28.
When sleeve measures 35(36)37(37) cm/13.8(14.2)14.6(14.6)”, BO 39(45)52(52) sts in the next rnd, as follows: k0(1)0(0), *k2tog, rep from * to end of rnd = 39(46)52(52) sts.
Change to smaller size dpns and continue working ribbing in the round. For size XS: dec 1 more st in the first rnd = 38(46)52(52) sts.
When sleeve measures 52(53)54(54) cm/20.5(20.9)21.3(21.3)”, loosely BO all sts.
Work second sleeve in the same way.
Finishing
Collar at neckline: with RS facing and using the smaller size circ. ndl, PUK 96 sts, as follows: 30 sts from neckline at front part, 36 sts from back neckline and another 30 sts from neckline at second front part. Turn work and in the next WS row, knit all sts. Work 7 more rows in reverse st st. In the next WS row, purl all sts (= folding ridge) and work 8 more rows in reverse st st. In the next RS row, BO all sts purlwise. Fold the collar in half and sew on the RS of the work, so that the chain of stitches, formed by the BO, remains visible on the RS. You can also choose not to bind off the stitches, but instead secure the live collar sts by crocheting single crochets.
Left front button band: with RS facing and using the smaller size circ. ndl, PUK 21 sts per 10 cm/4” from left front edge and from the collar at the neckline. PUK 1 extra st on each side, for the seam. The total number of sts should be divisible by 4 + 3 sts. Work 7 rows in st st, end with a WS row. Knit a picot edge, which will serve as folding edge, as follows: in the next RS row * k2, k2tog, yo, rep from * to the last 3 sts, k3. Work 7 rows in st st and BO all sts. Fold the button band in half and secure at the inside.
Mark the places for the buttonholes on the button band, with the top and bottom button at a distance of 3 sts from the edge and the remaining 4 buttonholes evenly spaced in between. One buttonhole will be 4 sts wide.
Button band at right front: work in the same way as described for left button band, but work buttonholes at the spots corresponding to the marked spots on the left front piece, when 1 WS row has been worked.
How to work a buttonhole: *knit the RS row to 1 st before first buttonhole, drop working yarn and take a piece of scrap yarn to knit the next 4 sts for the buttonhole, move these sts back onto the left ndl and knit the sts again, using the working yarn, rep from * to end of row.
Now you have 6 small stripes, knitted with a piece of scrap yarn, over 4 sts in the button band. There are no buttonholes yet.
Work in st st for 5 rows, ending with a WS row, work picot edge as described for left front, work another 5 rows in st st and work another set of buttonholes at the same spots as before, as described above. Fold the button band in half and secure at the inside.
Finish the buttonholes by grafting the sts together, as follows: remove the scrap yarn and place the live sts back onto a ndl. Graft the live sts of the outside of the button band and the corresponding sts on the inside (the button band-facing) together.
Weave in all ends and sew buttons on left button band.
Place work inside out onto a flat surface, dampen and leave to dry or lightly steam the cardigan, which will open up the lace pattern nicely.
Abbreviations
acc = according
beg = begin(ning)
BO = bind off
circ. = circular
CO = cast on
dpn(s) = double pointed needle(s)
dec(‘s) = decrease(s)
k = knit
k2tog = knit 2 sts together
LH = left hand
M = marker
ndl(s) = needle(s)
p = purl
PUK = pick up and knit
rem = remaining
rep = repeat
rnd(s) = round(s)
RH = right hand
skp = slip 1 stitch knitwise, knit 1 stitch, pass slipped stitch over
RS = right side
st(s) = stitch(es)
st st = stockinette st
WS = wrong side
yo(‘s) = yarn over(s)
Novita Nalle: Kielo Knitted Cardigan
Size(s)
XS(S/M)L/XL(XXL)
Finished dimensions
Finished measurements:
Chest circumference: 82(88)100(112) cm/32.3(34.7)39.4(44.1)”
Total length: 49(51)53(56) cm/19.3(20.1)20.9(22.1)”
Underarm length: 52(53)54(54) cm/20.5(20.9)21.3(21.3)”
Yarn demand
Novita Nalle (061) Flax 400(450)500(600) g
Needles and other supplies
Needles: Novita circular needle (80 cm) and dpns in size 3.5 mm (US 4/UK 10 or 9) and 4 mm (US 6/UK 8) or size needed to fit gauge, a crochet hook: Novita 3.5 mm (US 8/UK 6) Notions: 6 buttons
Stitch patterns: Ribbing: *k1, p1, rep from *. In the following rows, work the sts as they appear. Garter st: knit all sts on RS and WS rows. Lace pattern: Work acc to chart and written instructions. Stockinette stitch: knit the RS rows, purl the WS rows. Reverse stockinette stitch: purl the RS rows, knit the WS rows.
Crochet stitches: single crochet (sc), half double crochet (hdc), to form the bobbles in the lace pattern.
Note: In the legend, US crochet terms are used for the instructions on how to crochet the bobble. Sometimes, they differ from UK terms. At the end of the pattern, you can find a list of Abbreviation & Term Differences between the U.S./Canada and United Kingdom (U.K.). Please check this list if you are used to the UK terms!
Gauge/Tension: 22 sts in lace pattern, using the larger size ndls = 10 cm/4”
Front and back, lower part
The cardigan is worked in one piece, from the bottom up to the armholes, with opening mid front.
Loosely CO 170(183)209(235) sts using the smaller size circ. ndls. Work 6 cm/2.4” ribbing back and forth, end with a WS row. Change to larger size ndls and work 2 rows in st st.
Continue working lace pattern acc to chart I, row 1, as follows: k1, then work patt rep of 13 sts 13(14)16(18) times. Work rows 2-28 of the chart, then rep rows 1-28.
When work measures 31(30)29(32) cm/12.2(11.8)11.4(12.6)”, place removable markers on both sides (or use a contrast colored piece of yarn), as follows: place first M around the 47th(47th)53rd(60th) stitch from the right, place second M around 47th(47th)53rd(60th) stitch from the left. Now divide work into 3 parts: work the next RS row in pattern to first M, BO marked st for armhole, work in pattern to second armhole, BO marked st for second armhole and work in pattern to end of row. Both front parts now have 46(46)52(59) sts and back part has 76(89)103(115) sts.
Place sts of right front and back on hold and finish left front first. Make a note of the last worked row of the chart.
Left front, upper part
46(46)52(59) sts of left front.
Note: In the lace pattern, every decrease is accompanied by a yarn over, so the number of stitches always remains the same. When one of the two is decreased, this decrease pair is no longer worked and the stitch is worked as k1.
When armhole depth measures 10(12)15(15) cm/4(4.7)6(6)”, BO 10(8)8(8) sts at the left side of the work, for the neck opening, and at the neck opening of every following 2nd row, BO 5(4)4(4) sts once, 3 sts once, 2 sts 2(1)1(1) time(s) and 1 st 3(2)1(2) time(s).
When armhole depth measures 18(21)24(24) cm/7.1(8.3) 9.5(9.5)”, BO the rem 21(27)34(40) shoulder-sts, or place them on hold, to graft the shoulders-sts of front and back together later.
Right front, upper part
Continue working lace pattern across the 46(46)52(59) sts of right front, starting with the same row of lace pattern chart as for left front.
When armhole depth measures 10(12)15(15) cm/4(4.7)6(6)”, BO 10(8)8(8) sts at the right side of the work, for the neck opening, and at the neck opening of every following 2nd row, BO 5(4)4(4) sts once, 3 sts once, 2 sts 2(1)1(1) time(s) and 1 st 3(2)1(2) time(s).
When armhole depth measures 18(21)24(24) cm/7.1(8.3) 9.5(9.5)”, BO the rem 21(27)34(40) shoulder-sts, or place them on hold, to graft the shoulders-sts of front and back together later.
Back, upper part
Continue working lace pattern across the 76(89)103(115) back-sts, starting with the same row of lace pattern chart as for front parts.
When armhole depth measures 16(19)22(22) cm/6.3(7.5)8.7(8.7)”, BO the middle 26(27)27(27) sts and work each shoulder separately. In every 2nd row, BO 2 sts twice, for the neck opening.
When armhole depth measures 19(22)24(24) cm/7.5(8.7) 9.5(9.5)”, BO the rem 21(27)34(40) shoulder-sts, or place them on hold, to graft the shoulders-sts of front and back together later
Work the second shoulder in the same way, but reverse shaping.
Sleeves
Sew or graft the shoulder seams.
With RS facing and using the larger size dpns, PUK 78(91)104(104) sts along armhole edge and place marker to mark beg of rnd.
Knit 1 rnd.
Work lace pattern in the rnd acc to chart II, row 1 and work patt rep of 13 sts 6(7)8(8) times. Work rows 2-28 of the chart, then rep rows 1-28.
When sleeve measures 35(36)37(37) cm/13.8(14.2)14.6(14.6)”, BO 39(45)52(52) sts in the next rnd, as follows: k0(1)0(0), *k2tog, rep from * to end of rnd = 39(46)52(52) sts.
Change to smaller size dpns and continue working ribbing in the round. For size XS: dec 1 more st in the first rnd = 38(46)52(52) sts.
When sleeve measures 52(53)54(54) cm/20.5(20.9)21.3(21.3)”, loosely BO all sts.
Work second sleeve in the same way.
Finishing
Collar at neckline: with RS facing and using the smaller size circ. ndl, PUK 96 sts, as follows: 30 sts from neckline at front part, 36 sts from back neckline and another 30 sts from neckline at second front part. Turn work and in the next WS row, knit all sts. Work 7 more rows in reverse st st. In the next WS row, purl all sts (= folding ridge) and work 8 more rows in reverse st st. In the next RS row, BO all sts purlwise. Fold the collar in half and sew on the RS of the work, so that the chain of stitches, formed by the BO, remains visible on the RS. You can also choose not to bind off the stitches, but instead secure the live collar sts by crocheting single crochets.
Left front button band: with RS facing and using the smaller size circ. ndl, PUK 21 sts per 10 cm/4” from left front edge and from the collar at the neckline. PUK 1 extra st on each side, for the seam. The total number of sts should be divisible by 4 + 3 sts. Work 7 rows in st st, end with a WS row. Knit a picot edge, which will serve as folding edge, as follows: in the next RS row * k2, k2tog, yo, rep from * to the last 3 sts, k3. Work 7 rows in st st and BO all sts. Fold the button band in half and secure at the inside.
Mark the places for the buttonholes on the button band, with the top and bottom button at a distance of 3 sts from the edge and the remaining 4 buttonholes evenly spaced in between. One buttonhole will be 4 sts wide.
Button band at right front: work in the same way as described for left button band, but work buttonholes at the spots corresponding to the marked spots on the left front piece, when 1 WS row has been worked.
How to work a buttonhole: *knit the RS row to 1 st before first buttonhole, drop working yarn and take a piece of scrap yarn to knit the next 4 sts for the buttonhole, move these sts back onto the left ndl and knit the sts again, using the working yarn, rep from * to end of row.
Now you have 6 small stripes, knitted with a piece of scrap yarn, over 4 sts in the button band. There are no buttonholes yet.
Work in st st for 5 rows, ending with a WS row, work picot edge as described for left front, work another 5 rows in st st and work another set of buttonholes at the same spots as before, as described above. Fold the button band in half and secure at the inside.
Finish the buttonholes by grafting the sts together, as follows: remove the scrap yarn and place the live sts back onto a ndl. Graft the live sts of the outside of the button band and the corresponding sts on the inside (the button band-facing) together.
Weave in all ends and sew buttons on left button band.
Place work inside out onto a flat surface, dampen and leave to dry or lightly steam the cardigan, which will open up the lace pattern nicely.
Abbreviations
acc = according
beg = begin(ning)
BO = bind off
circ. = circular
CO = cast on
dpn(s) = double pointed needle(s)
dec(‘s) = decrease(s)
k = knit
k2tog = knit 2 sts together
LH = left hand
M = marker
ndl(s) = needle(s)
p = purl
PUK = pick up and knit
rem = remaining
rep = repeat
rnd(s) = round(s)
RH = right hand
skp = slip 1 stitch knitwise, knit 1 stitch, pass slipped stitch over
RS = right side
st(s) = stitch(es)
st st = stockinette st
WS = wrong side
yo(‘s) = yarn over(s)