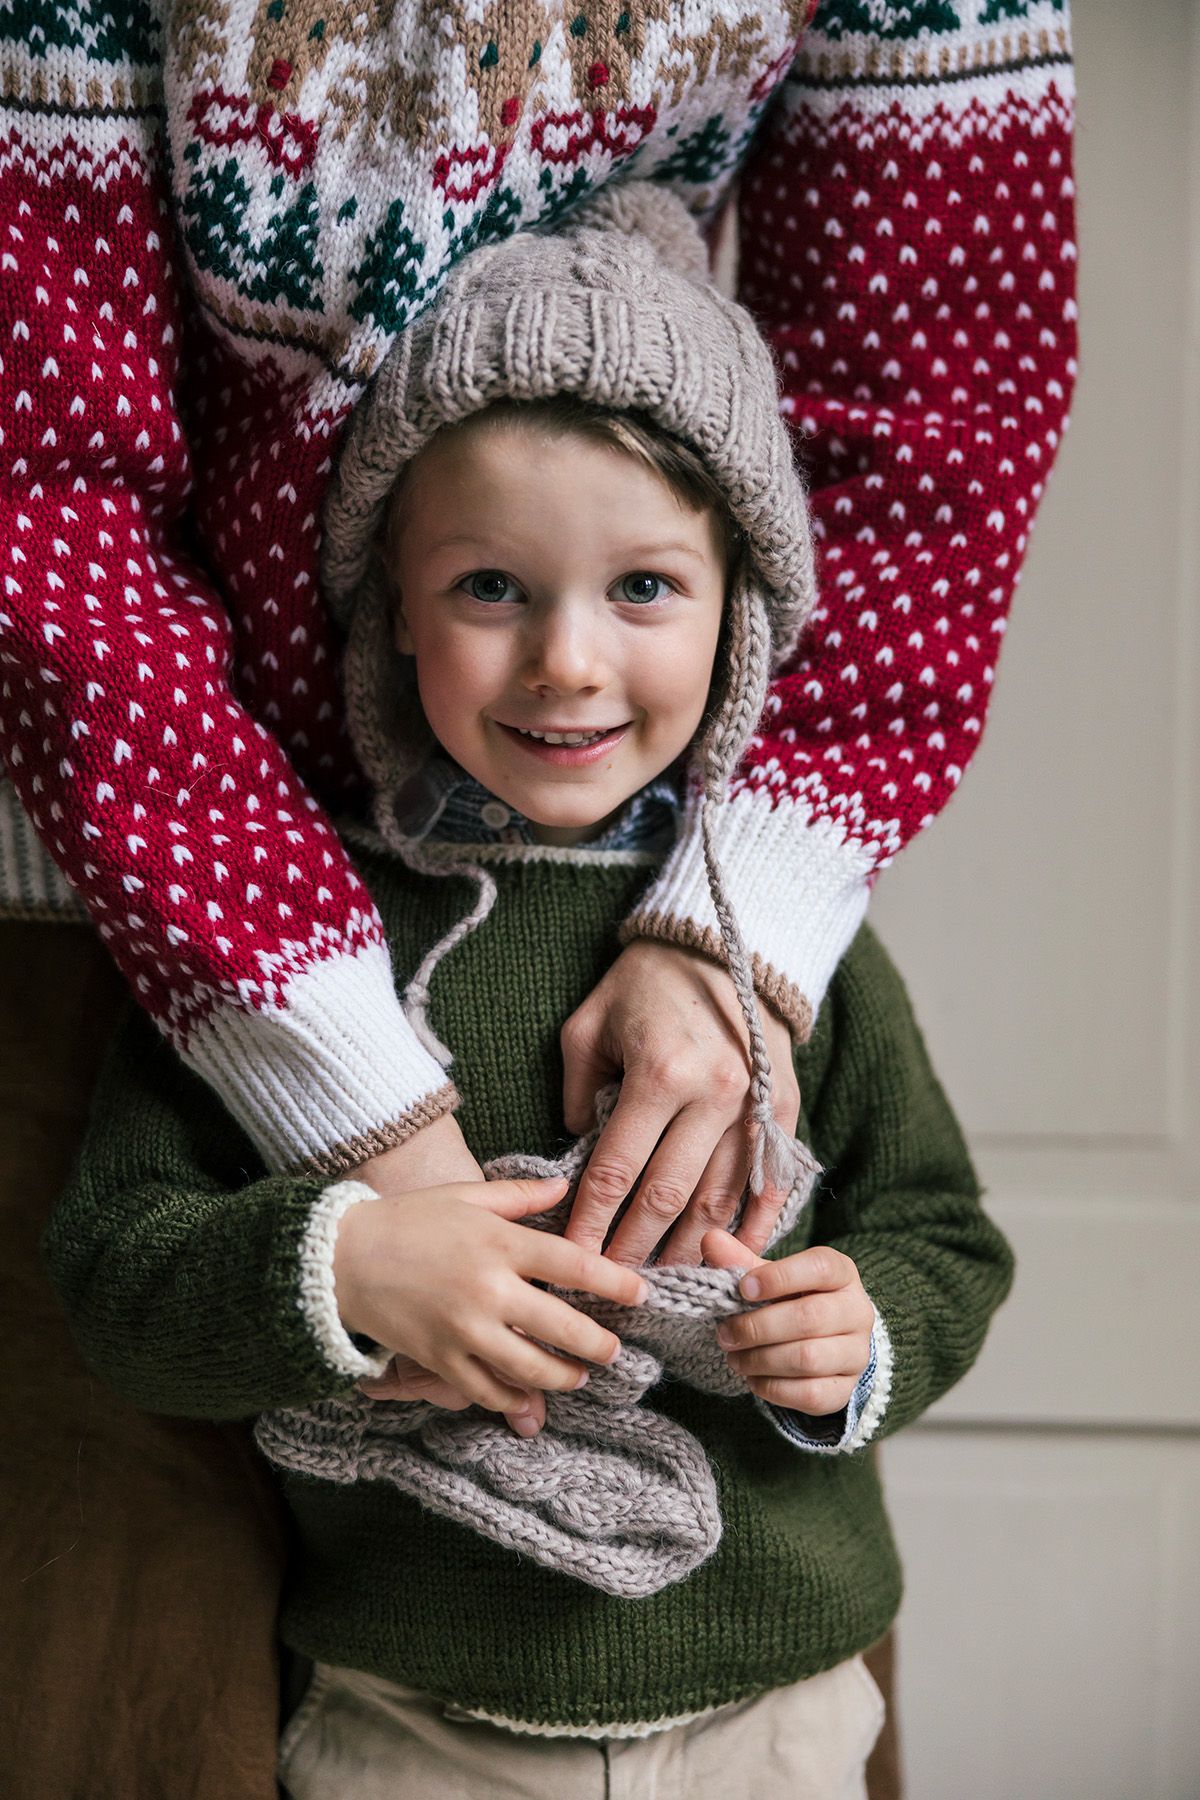
Kaamos KAL Training Program
Have you always wanted to knit cables? Is it your dream to make a striking cable sweater? Now’s the time to take up the challenge. If you follow the carefully planned 35-day schedule, your Kaamos KAL cable sweater project is sure to be a success! If you don’t have the time to make a whole sweater but still want to follow along, you can knit a slipover instead.
Designer
Piia Maria Pekkanen
Language
Size(s)
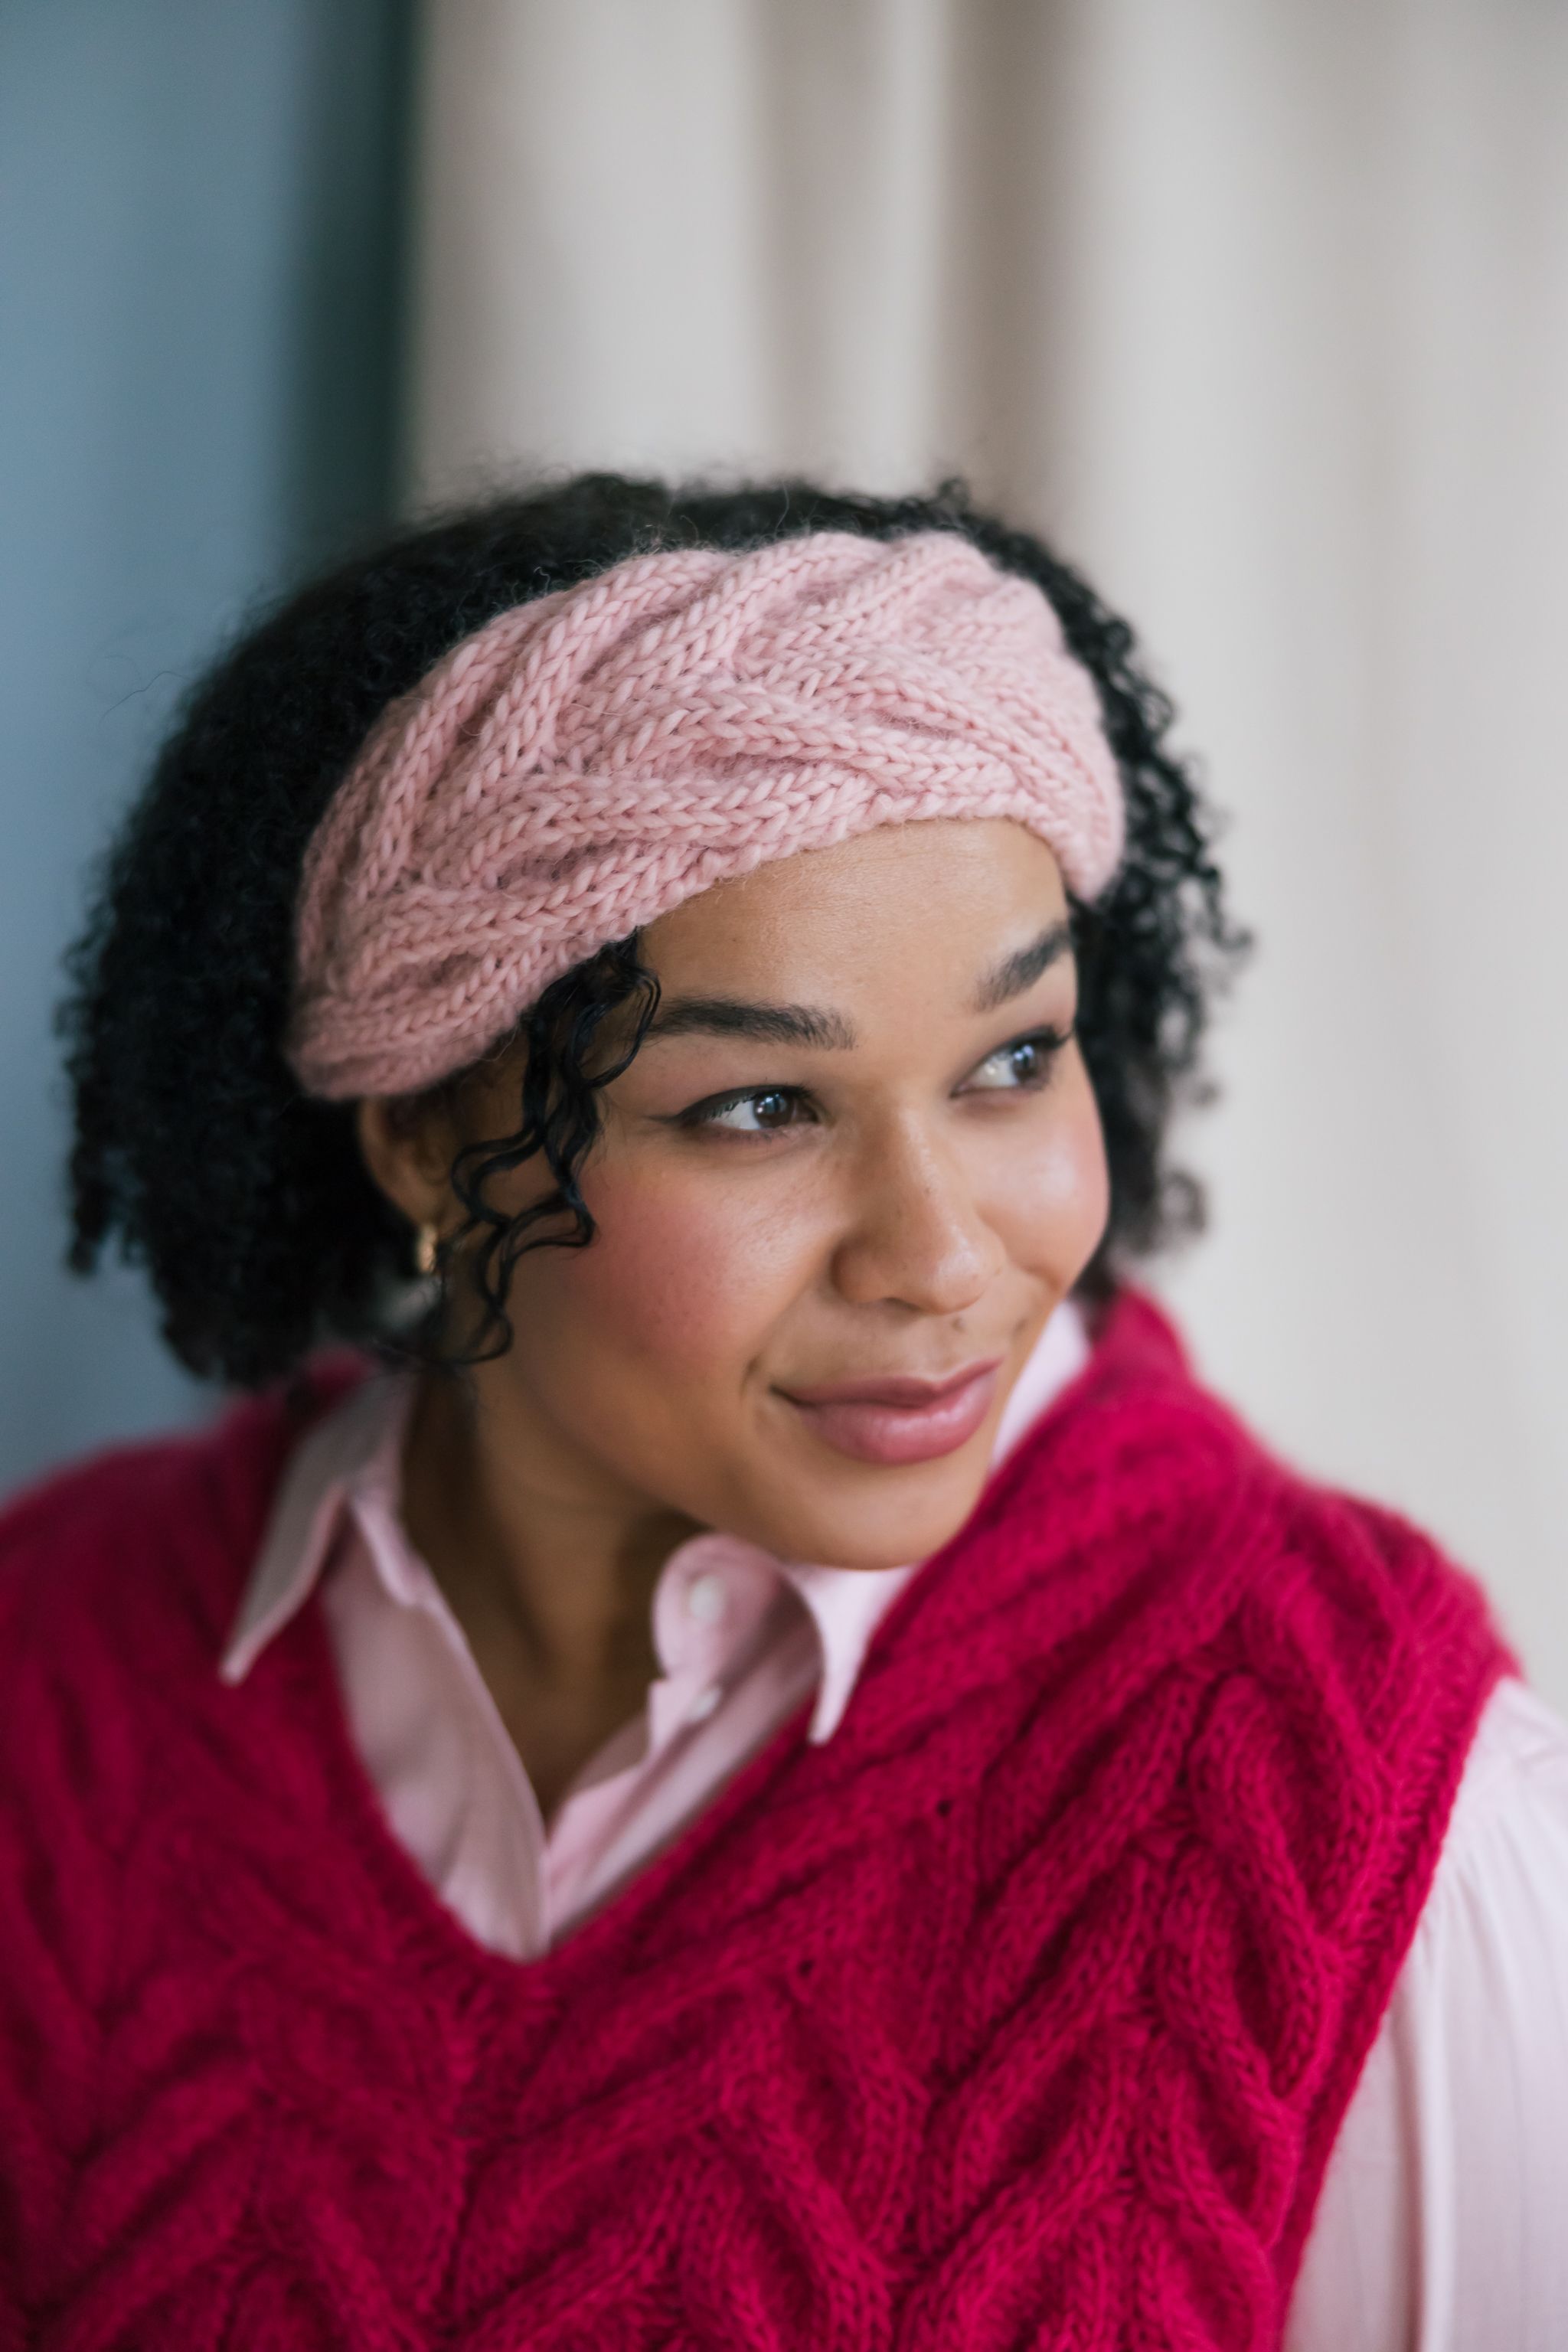
One size
Finished dimensions
width 12 cm / 4.75 in
length 55 cm / 21.75 in (or your head circumference)
Yarn demand
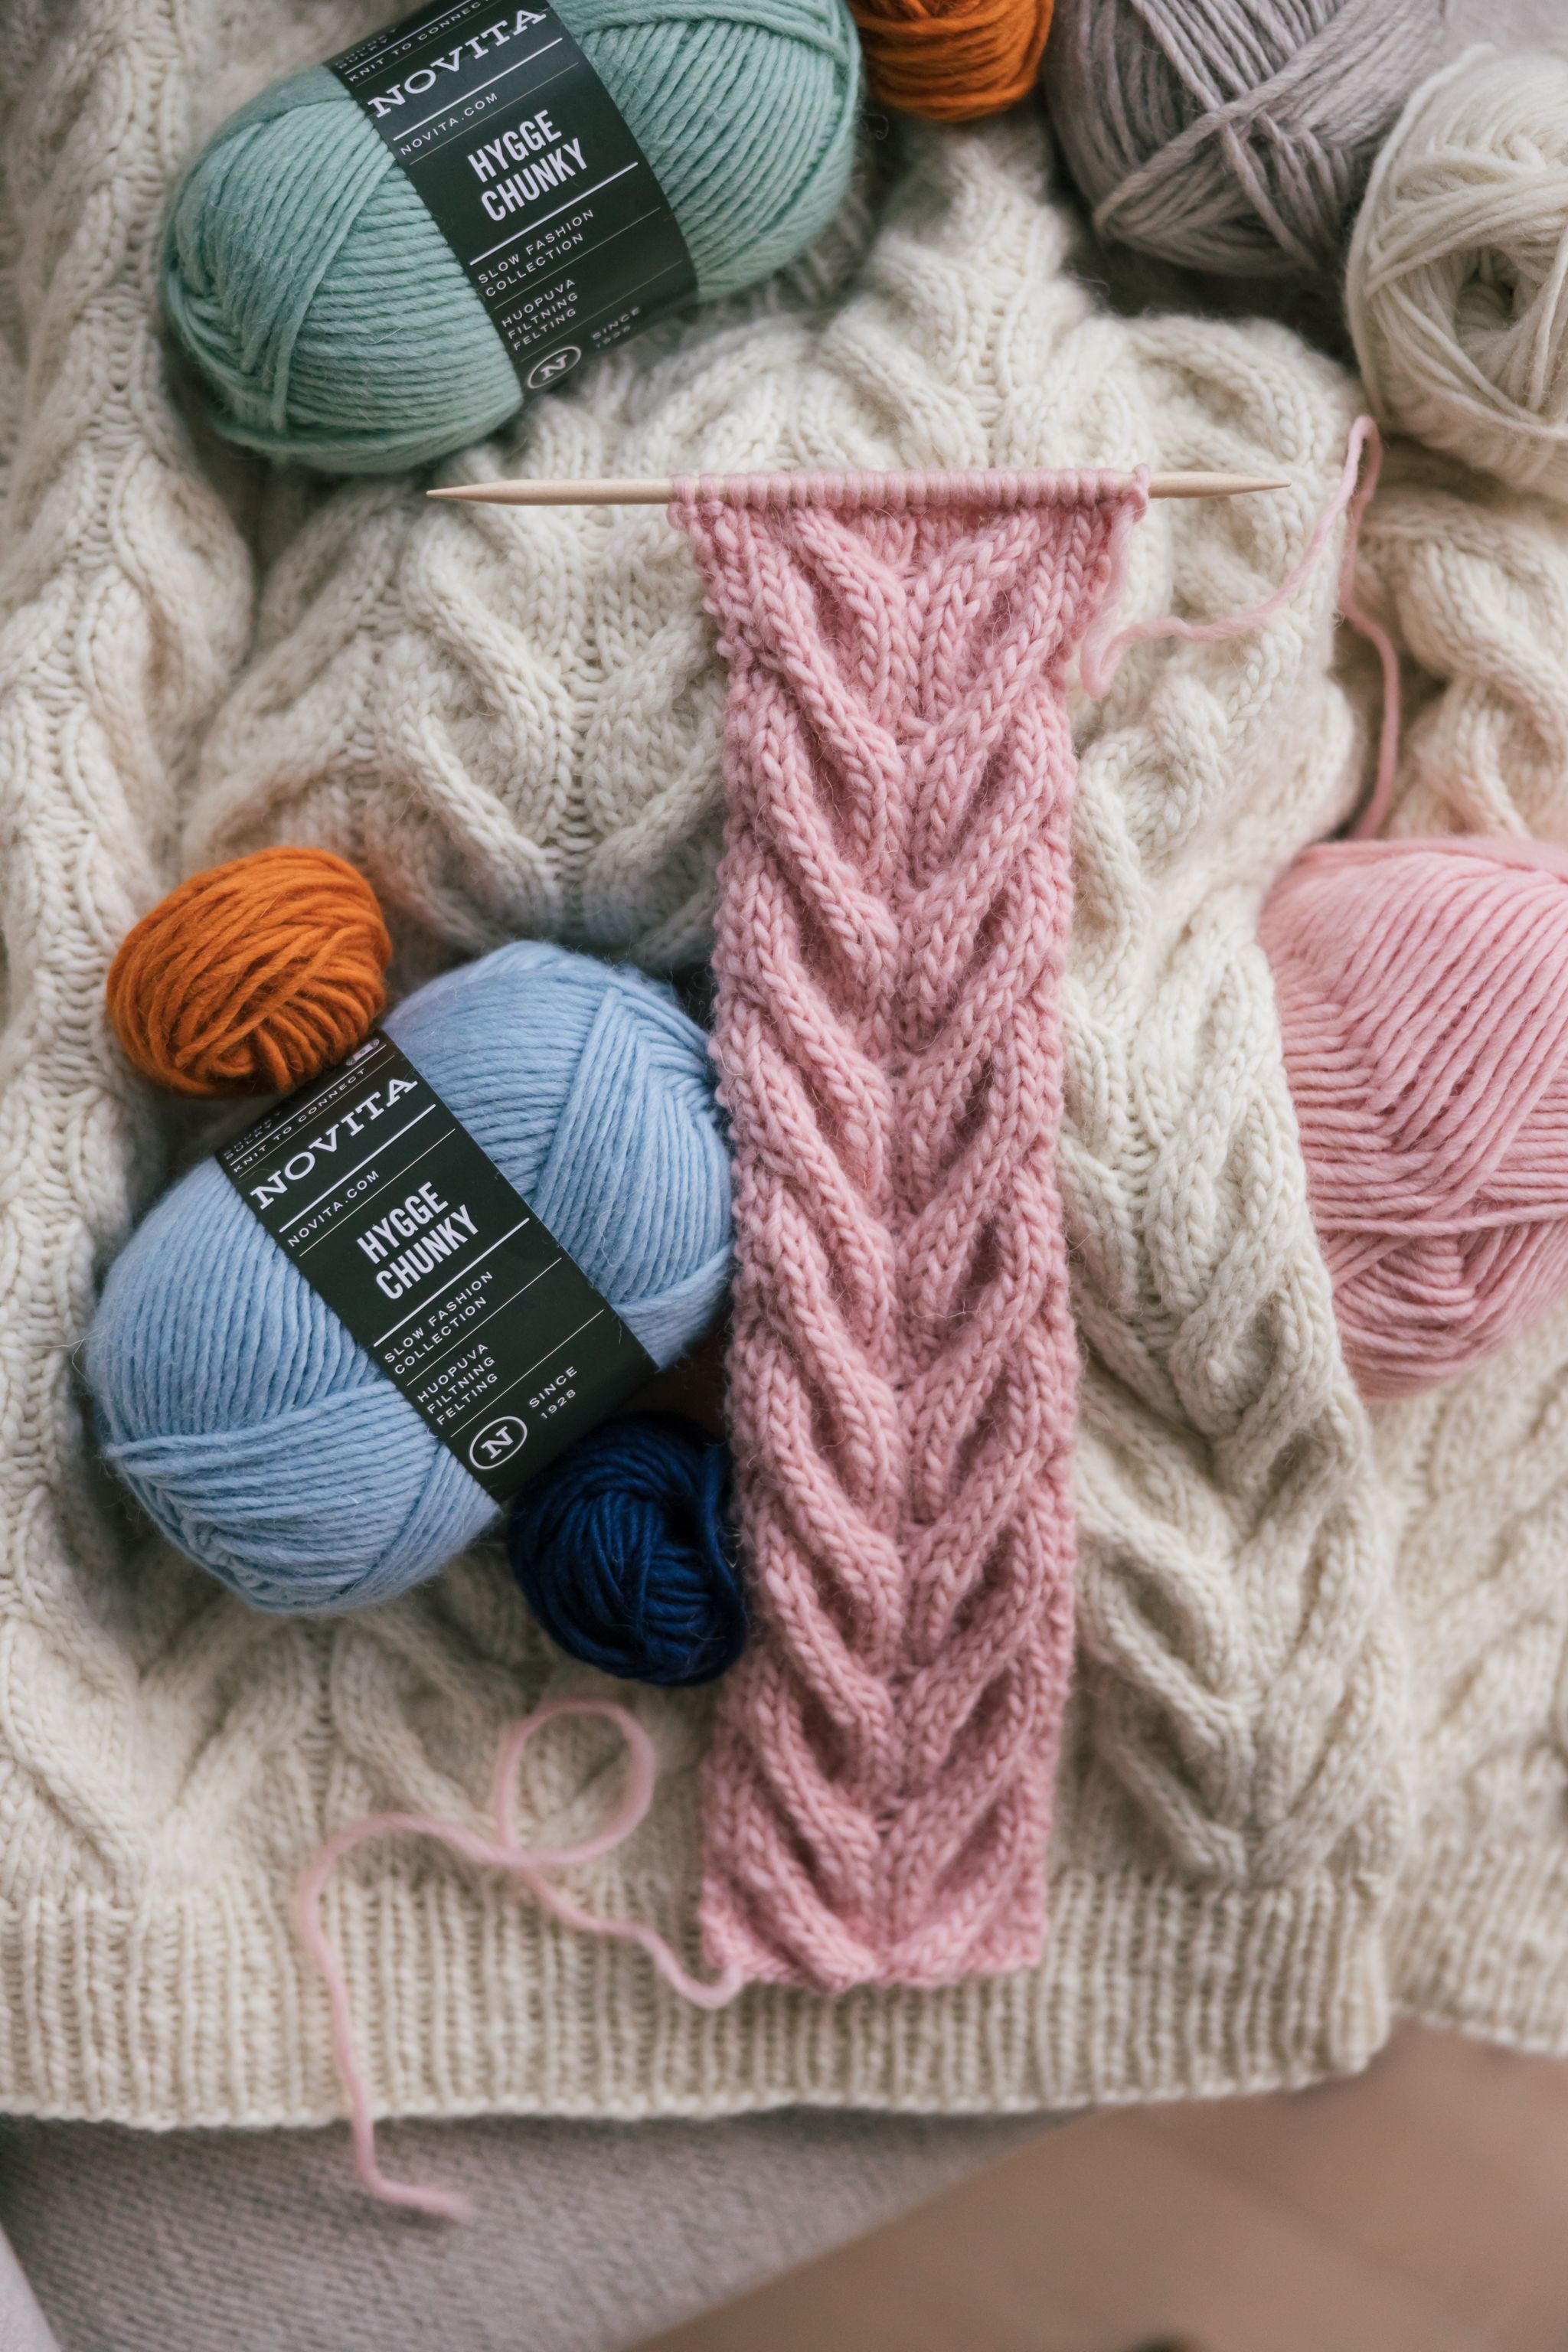
Novita Hygge Chunky (504) rose water 100 g
Needles and other supplies
Double-pointed needles Novita 6 mm (US 10) or size needed for gauge; cable needle. You can also use a third double-pointed needle instead of a cable needle.
Finished dimensions
width 12 cm / 4.75 in
length 55 cm / 21.75 in (or your head circumference)
Gauge 19 sts and 21 rows in cable pattern (blocked) = 10 cm x 10 cm / 4 in x 4 in
Flat cable knitting
Practice knitting cables and reading charts by working back and forth in rows – right side rows (RS) and wrong side rows (WS). First watch the knitting school tutorial video (https://novita.com/en/blogs/knitting-school/cables (https://novita.com/en/blogs/knitting-school/cables)) and then begin your cable headband.
Cable band
Cast on 23 sts.Turn work. Work the WS row as follows: k2, p9, k1, p9, k2.Turn work. Begin the cable pattern on row 1 of the chart.
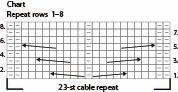
Reading the chart
The chart is read from bottom to top and from right to left on RS rows. In this pattern, a repeat consists of 8 rows after which you start again on row 1.
You'll find the chart under the Chart tab
When you are working back and forth, the odd row numbers (denoting RS rows) are shown on the right. The even numbers are the WS rows and they are shown on the left. The chart depicts all stitches as seen from the right side. On WS rows, read the chart from left to right.
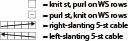
This pattern features two different sorts of cables.
Right-leaning 5-st cable (arrow pointing right):slip 2 sts onto cable needle and hold in back, k3, then k2 from the cable needle.If it feels difficult to knit straight from the cable needle, slip the stitches to the left-hand needle first and then knit them.
Left-leaning 5-st cable (arrow pointing left):slip 3 sts onto cable needle and hold in front, k2, then k3 from the cable needle.If it feels difficult to knit straight from the cable needle, slip the stitches to the left-hand needle first and then knit them.
Take a look at the chart one row at a time. You will see that the 9-stitch wide cables consist of sections. For every turn you will make three smaller 5-stitch cable turns marked with the arrows. The cable turns are worked on RS rows, first at the inner edge, then in the middle and finally at the outer edge. No cable turns are worked on WS rows. Finally, you will work 3 rows (rows 6–8) without cables and then start again on row 1.
There is 1 purl stitch between the cables and 2 purl stitches at both edges.On WS rows, knit these stitches.
Now work following the chart and these instructions:
Row 1 (RS):p2, k4, right-leaning 5-st cable, p1, left-leaning 5-st cable, k4, p2.
Row 2 (WS):k2, p9, k1, p9, k2.
Row 3 (RS):p2, k2, right-leaning 5-st cable, k2, p1, k2, left-leaning 5-st cable, k2, p2.
Row 4 (WS):k2, p9, k1, p9, k2.
Row 5 (RS): p2, right-leaning 5-st cable, k4, p1, k4, left-leaning 5-st cable, p2.
Row 6 (WS): k2, p9, k1, p9, k2.
Row 7 (RS): p2, k9, p1, k9, p2.
Row 8 (WS): k2, p9, k1, p9, k2.
Keep repeating rows 1–8 until the headband matches your head circumference when you stretch it lightly.On a RS row, bind off the knit sts knitwise and the purl sts purlwise.
Finishing
Spray until damp and lay flat right side up.Open up the cables gently. Steam lightly using a wool setting.Allow to dry overnight.Sew the ends of the headband together using mattress stitch.Weave in ends.
Kaamos KAL Training Program
Size(s)
One size
Finished dimensions
width 12 cm / 4.75 in
length 55 cm / 21.75 in (or your head circumference)
Yarn demand
Novita Hygge Chunky (504) rose water 100 g
Needles and other supplies
Double-pointed needles Novita 6 mm (US 10) or size needed for gauge; cable needle. You can also use a third double-pointed needle instead of a cable needle.
Gauge 19 sts and 21 rows in cable pattern (blocked) = 10 cm x 10 cm / 4 in x 4 in
Flat cable knitting
Practice knitting cables and reading charts by working back and forth in rows – right side rows (RS) and wrong side rows (WS). First watch the knitting school tutorial video (https://novita.com/en/blogs/knitting-school/cables (https://novita.com/en/blogs/knitting-school/cables)) and then begin your cable headband.
Cable band
Cast on 23 sts.Turn work. Work the WS row as follows: k2, p9, k1, p9, k2.Turn work. Begin the cable pattern on row 1 of the chart.
Reading the chart
The chart is read from bottom to top and from right to left on RS rows. In this pattern, a repeat consists of 8 rows after which you start again on row 1.
You'll find the chart under the Chart tab
When you are working back and forth, the odd row numbers (denoting RS rows) are shown on the right. The even numbers are the WS rows and they are shown on the left. The chart depicts all stitches as seen from the right side. On WS rows, read the chart from left to right.
This pattern features two different sorts of cables.
Right-leaning 5-st cable (arrow pointing right):slip 2 sts onto cable needle and hold in back, k3, then k2 from the cable needle.If it feels difficult to knit straight from the cable needle, slip the stitches to the left-hand needle first and then knit them.
Left-leaning 5-st cable (arrow pointing left):slip 3 sts onto cable needle and hold in front, k2, then k3 from the cable needle.If it feels difficult to knit straight from the cable needle, slip the stitches to the left-hand needle first and then knit them.
Take a look at the chart one row at a time. You will see that the 9-stitch wide cables consist of sections. For every turn you will make three smaller 5-stitch cable turns marked with the arrows. The cable turns are worked on RS rows, first at the inner edge, then in the middle and finally at the outer edge. No cable turns are worked on WS rows. Finally, you will work 3 rows (rows 6–8) without cables and then start again on row 1.
There is 1 purl stitch between the cables and 2 purl stitches at both edges.On WS rows, knit these stitches.
Now work following the chart and these instructions:
Row 1 (RS):p2, k4, right-leaning 5-st cable, p1, left-leaning 5-st cable, k4, p2.
Row 2 (WS):k2, p9, k1, p9, k2.
Row 3 (RS):p2, k2, right-leaning 5-st cable, k2, p1, k2, left-leaning 5-st cable, k2, p2.
Row 4 (WS):k2, p9, k1, p9, k2.
Row 5 (RS): p2, right-leaning 5-st cable, k4, p1, k4, left-leaning 5-st cable, p2.
Row 6 (WS): k2, p9, k1, p9, k2.
Row 7 (RS): p2, k9, p1, k9, p2.
Row 8 (WS): k2, p9, k1, p9, k2.
Keep repeating rows 1–8 until the headband matches your head circumference when you stretch it lightly.On a RS row, bind off the knit sts knitwise and the purl sts purlwise.
Finishing
Spray until damp and lay flat right side up.Open up the cables gently. Steam lightly using a wool setting.Allow to dry overnight.Sew the ends of the headband together using mattress stitch.Weave in ends.