


Kaamos KAL, Kaamos Cottage
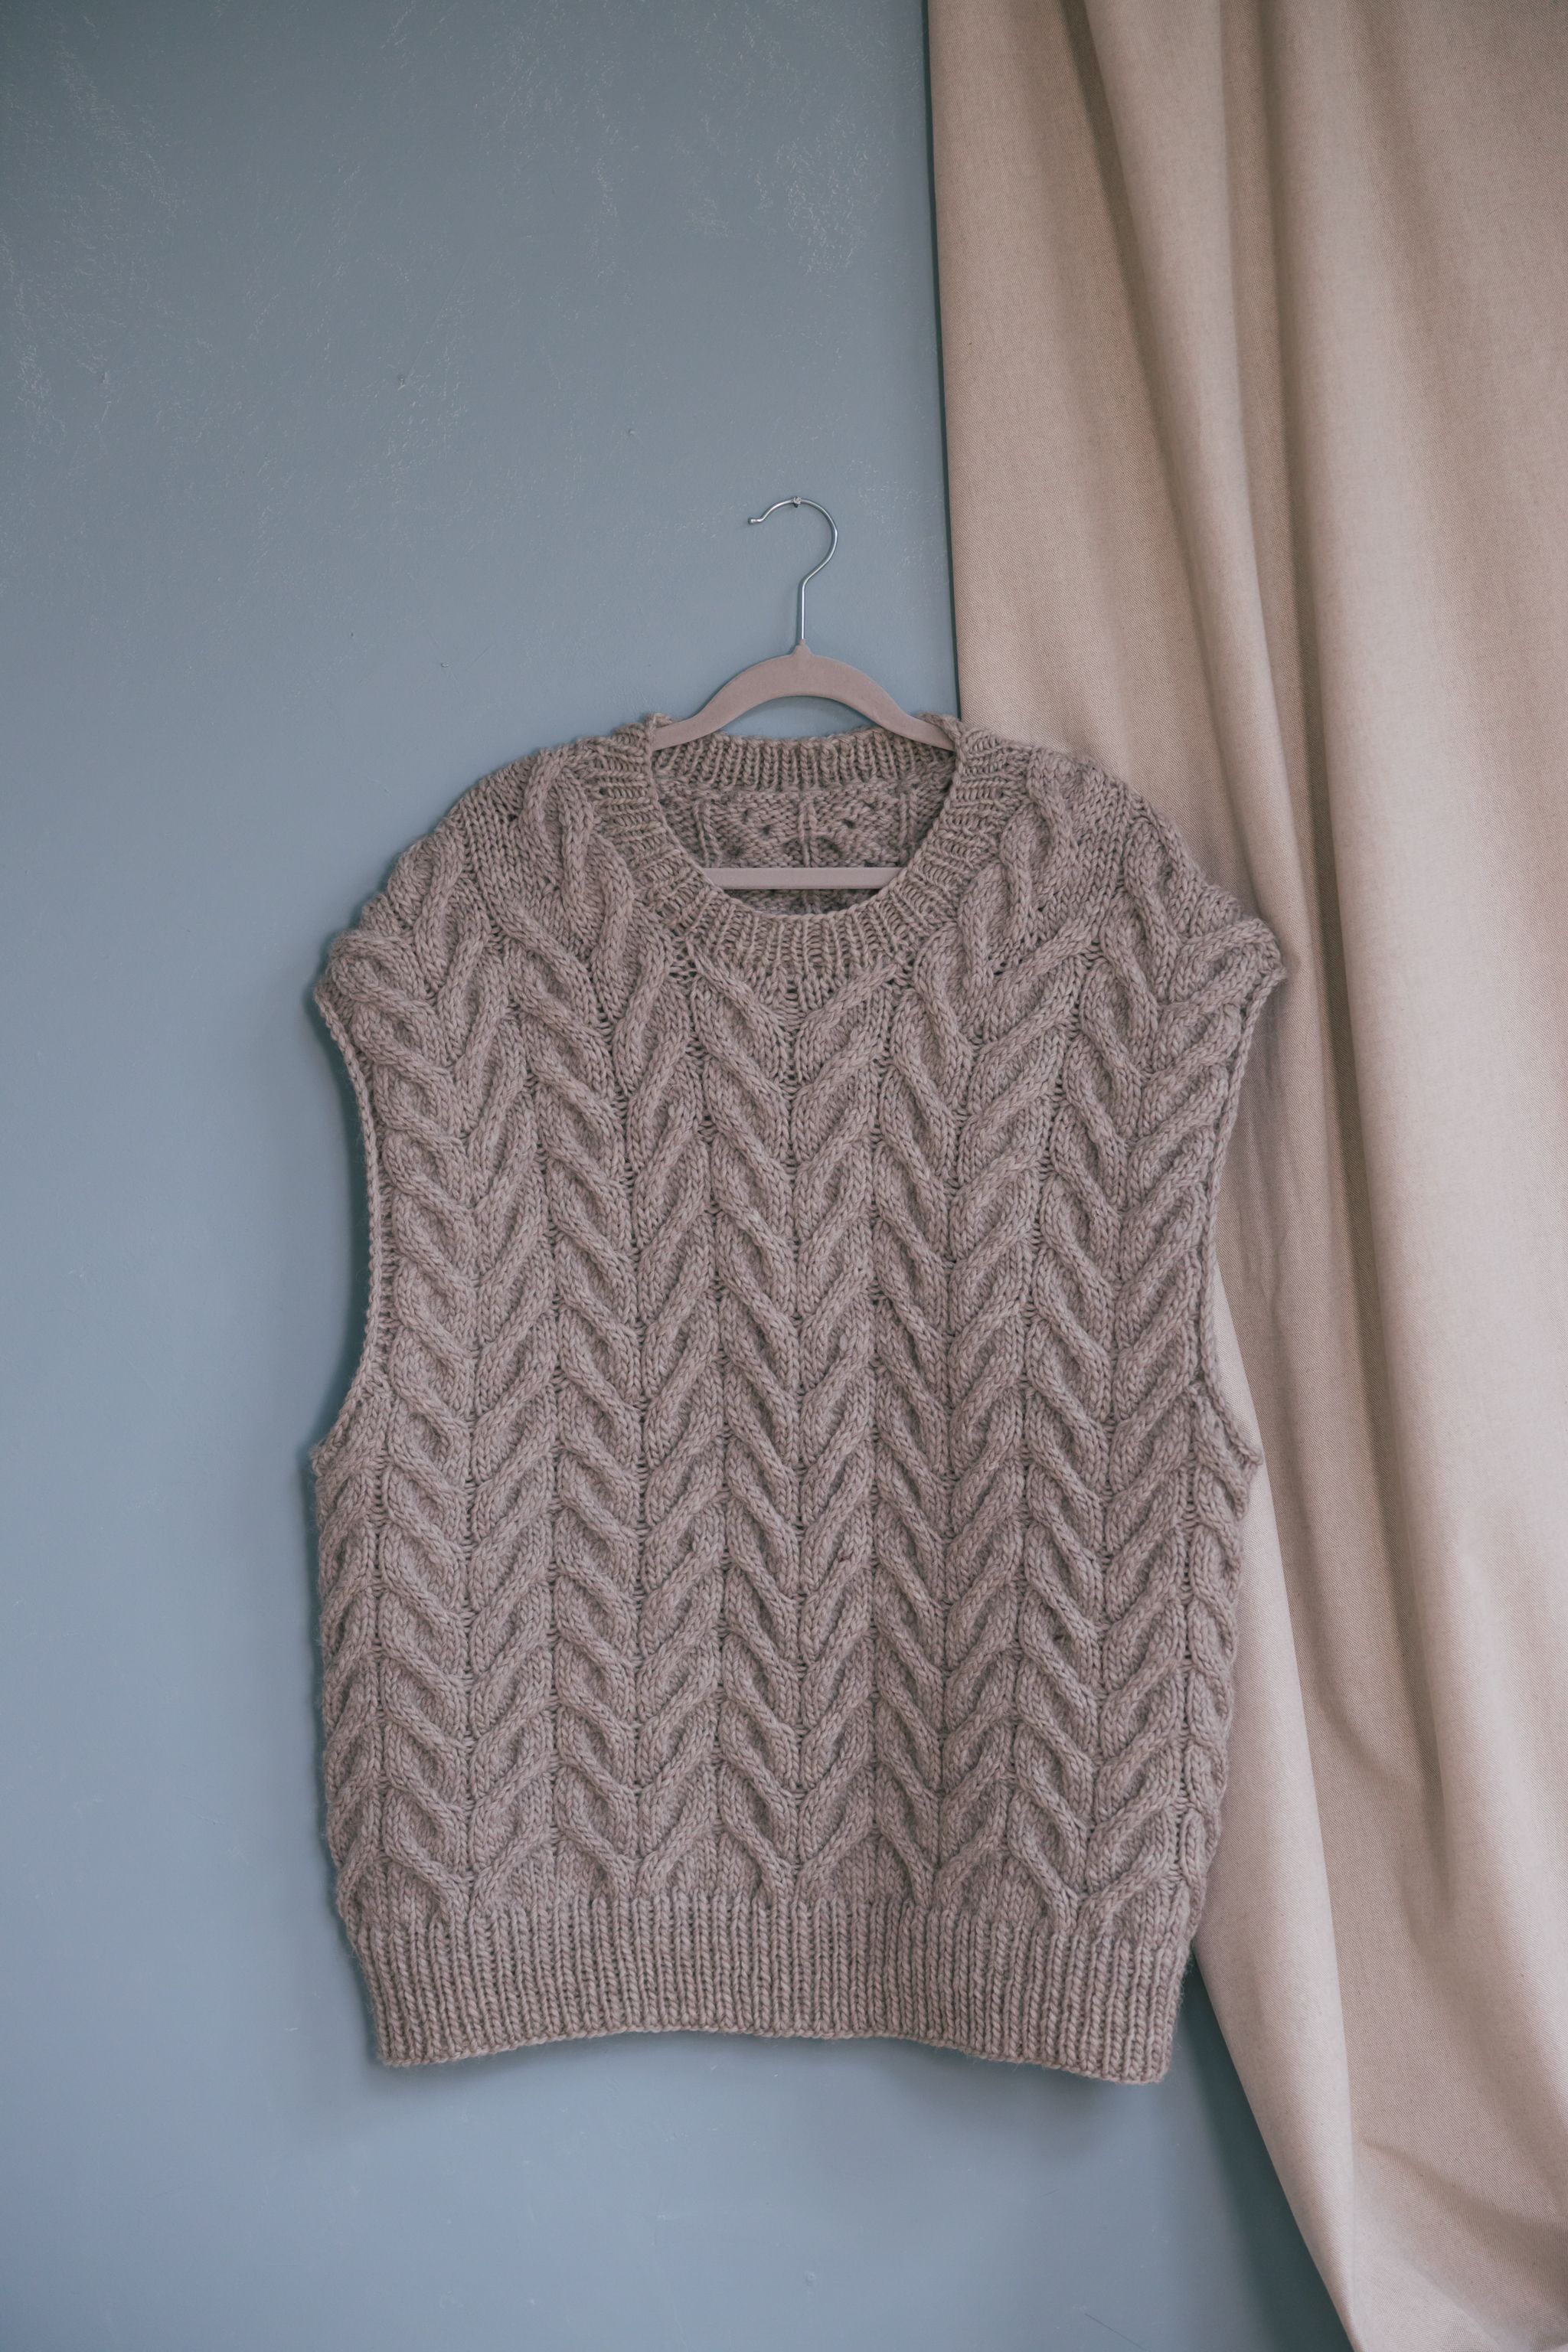
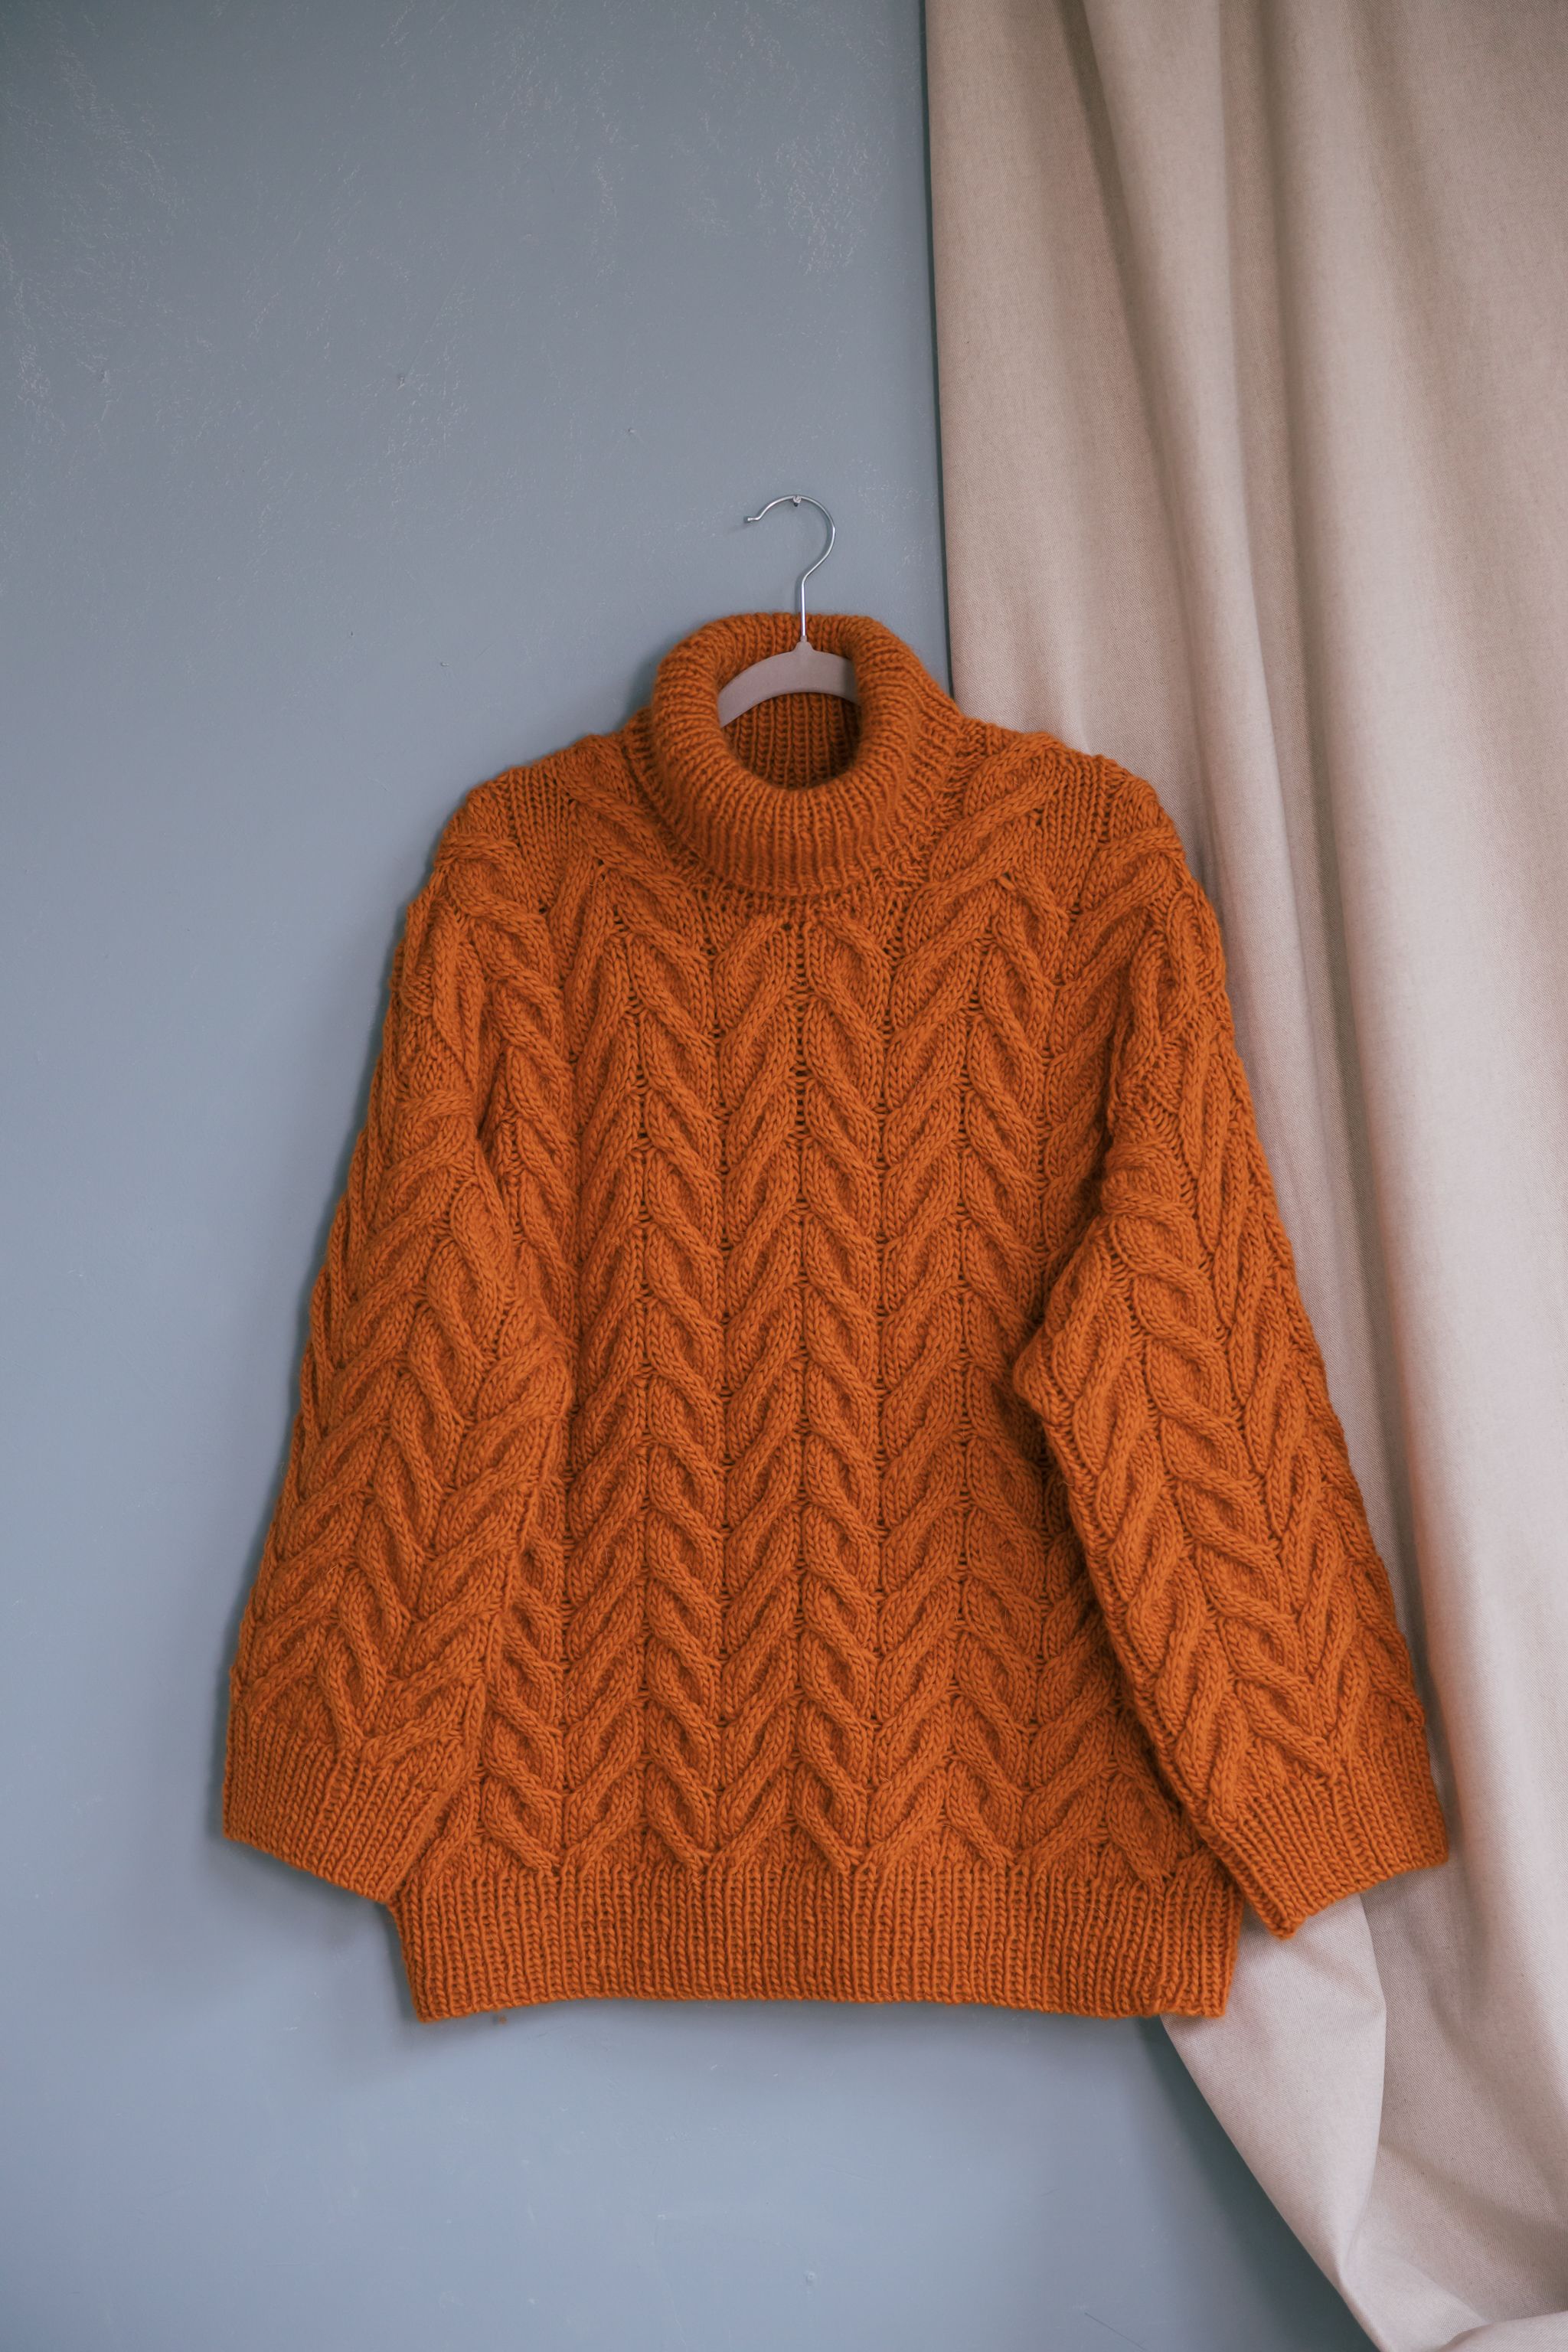
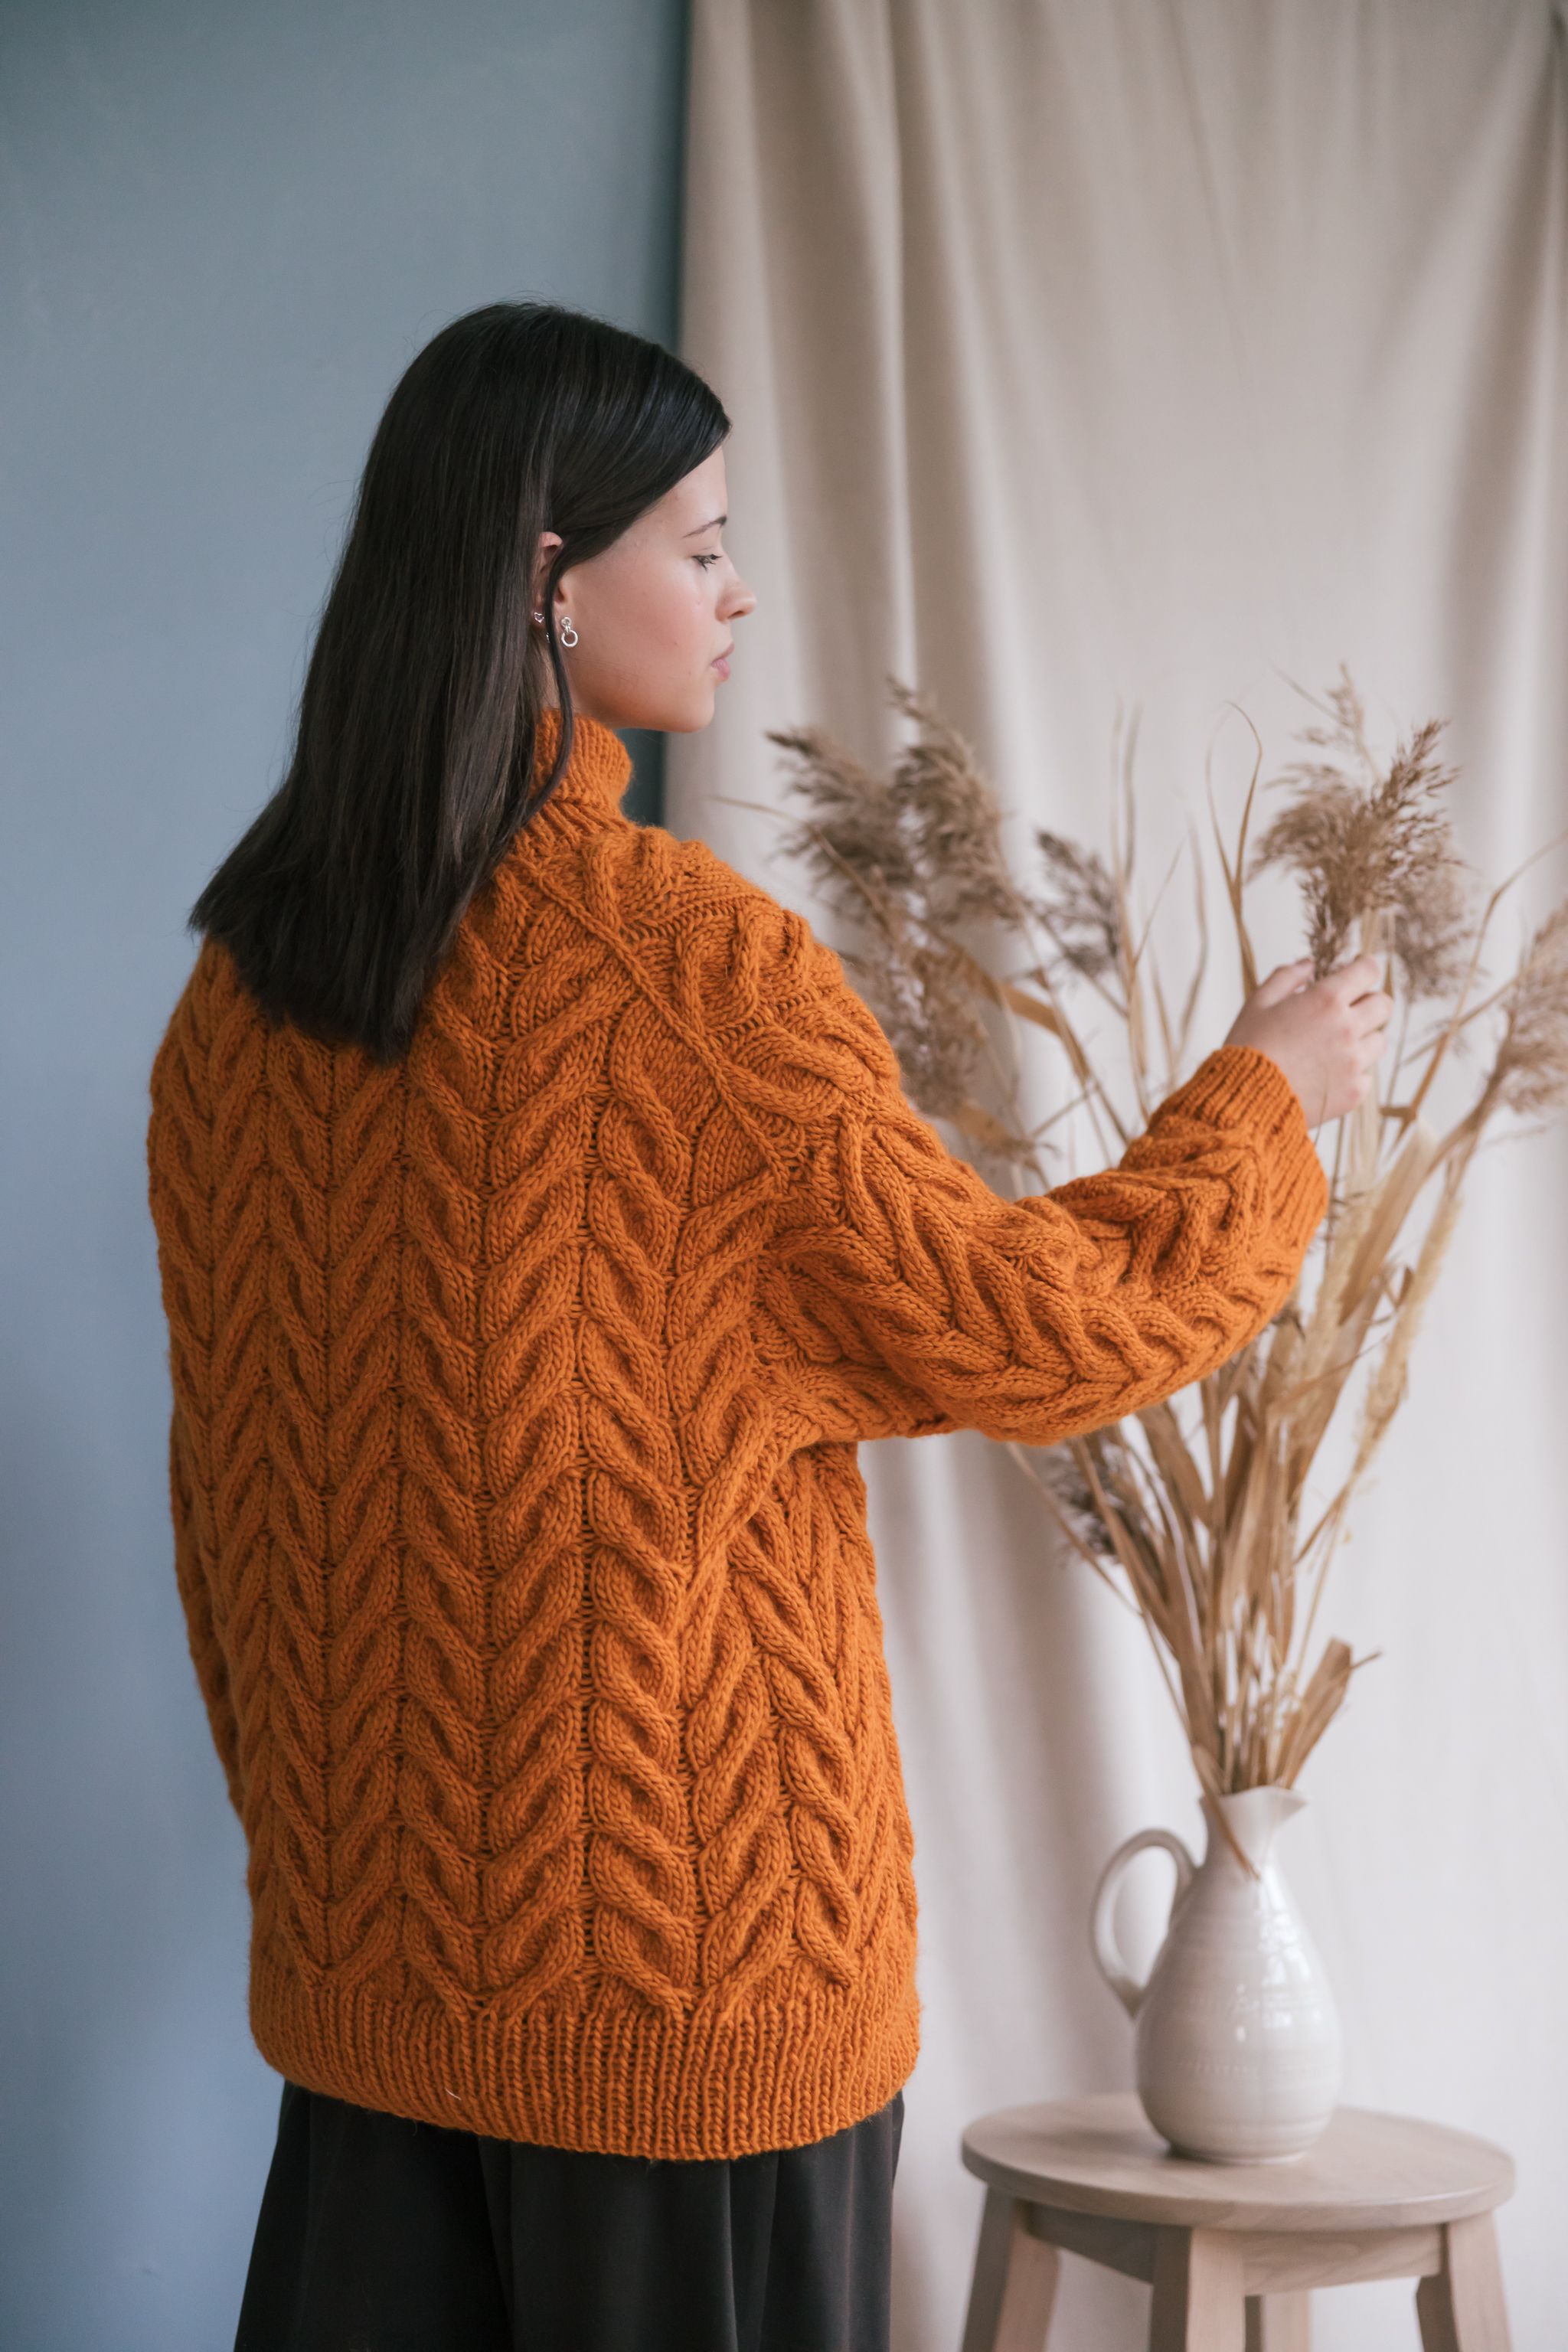
During the darkest days of winter, it's wonderful to curl up in the warmth of a soft sweater. The whistling wind outside only adds to the atmosphere as you sit down to knit by the fireplace at Kaamos Cottage. The sweater has a long hem that reaches to the hips and puffy sleeves with narrow ribbing at the cuffs. This sweater looks best when you choose a size larger than your normal size. The Kaamos Cottage vest has a short ribbed neckline and wide armholes.
Designer
Piia Maria Pekkanen
Language
Size(s)
XS/S(M)L(XL)XXL(3XL)4XL(5XL) Sample sizes: sweater L, vest XL
Finished dimensions
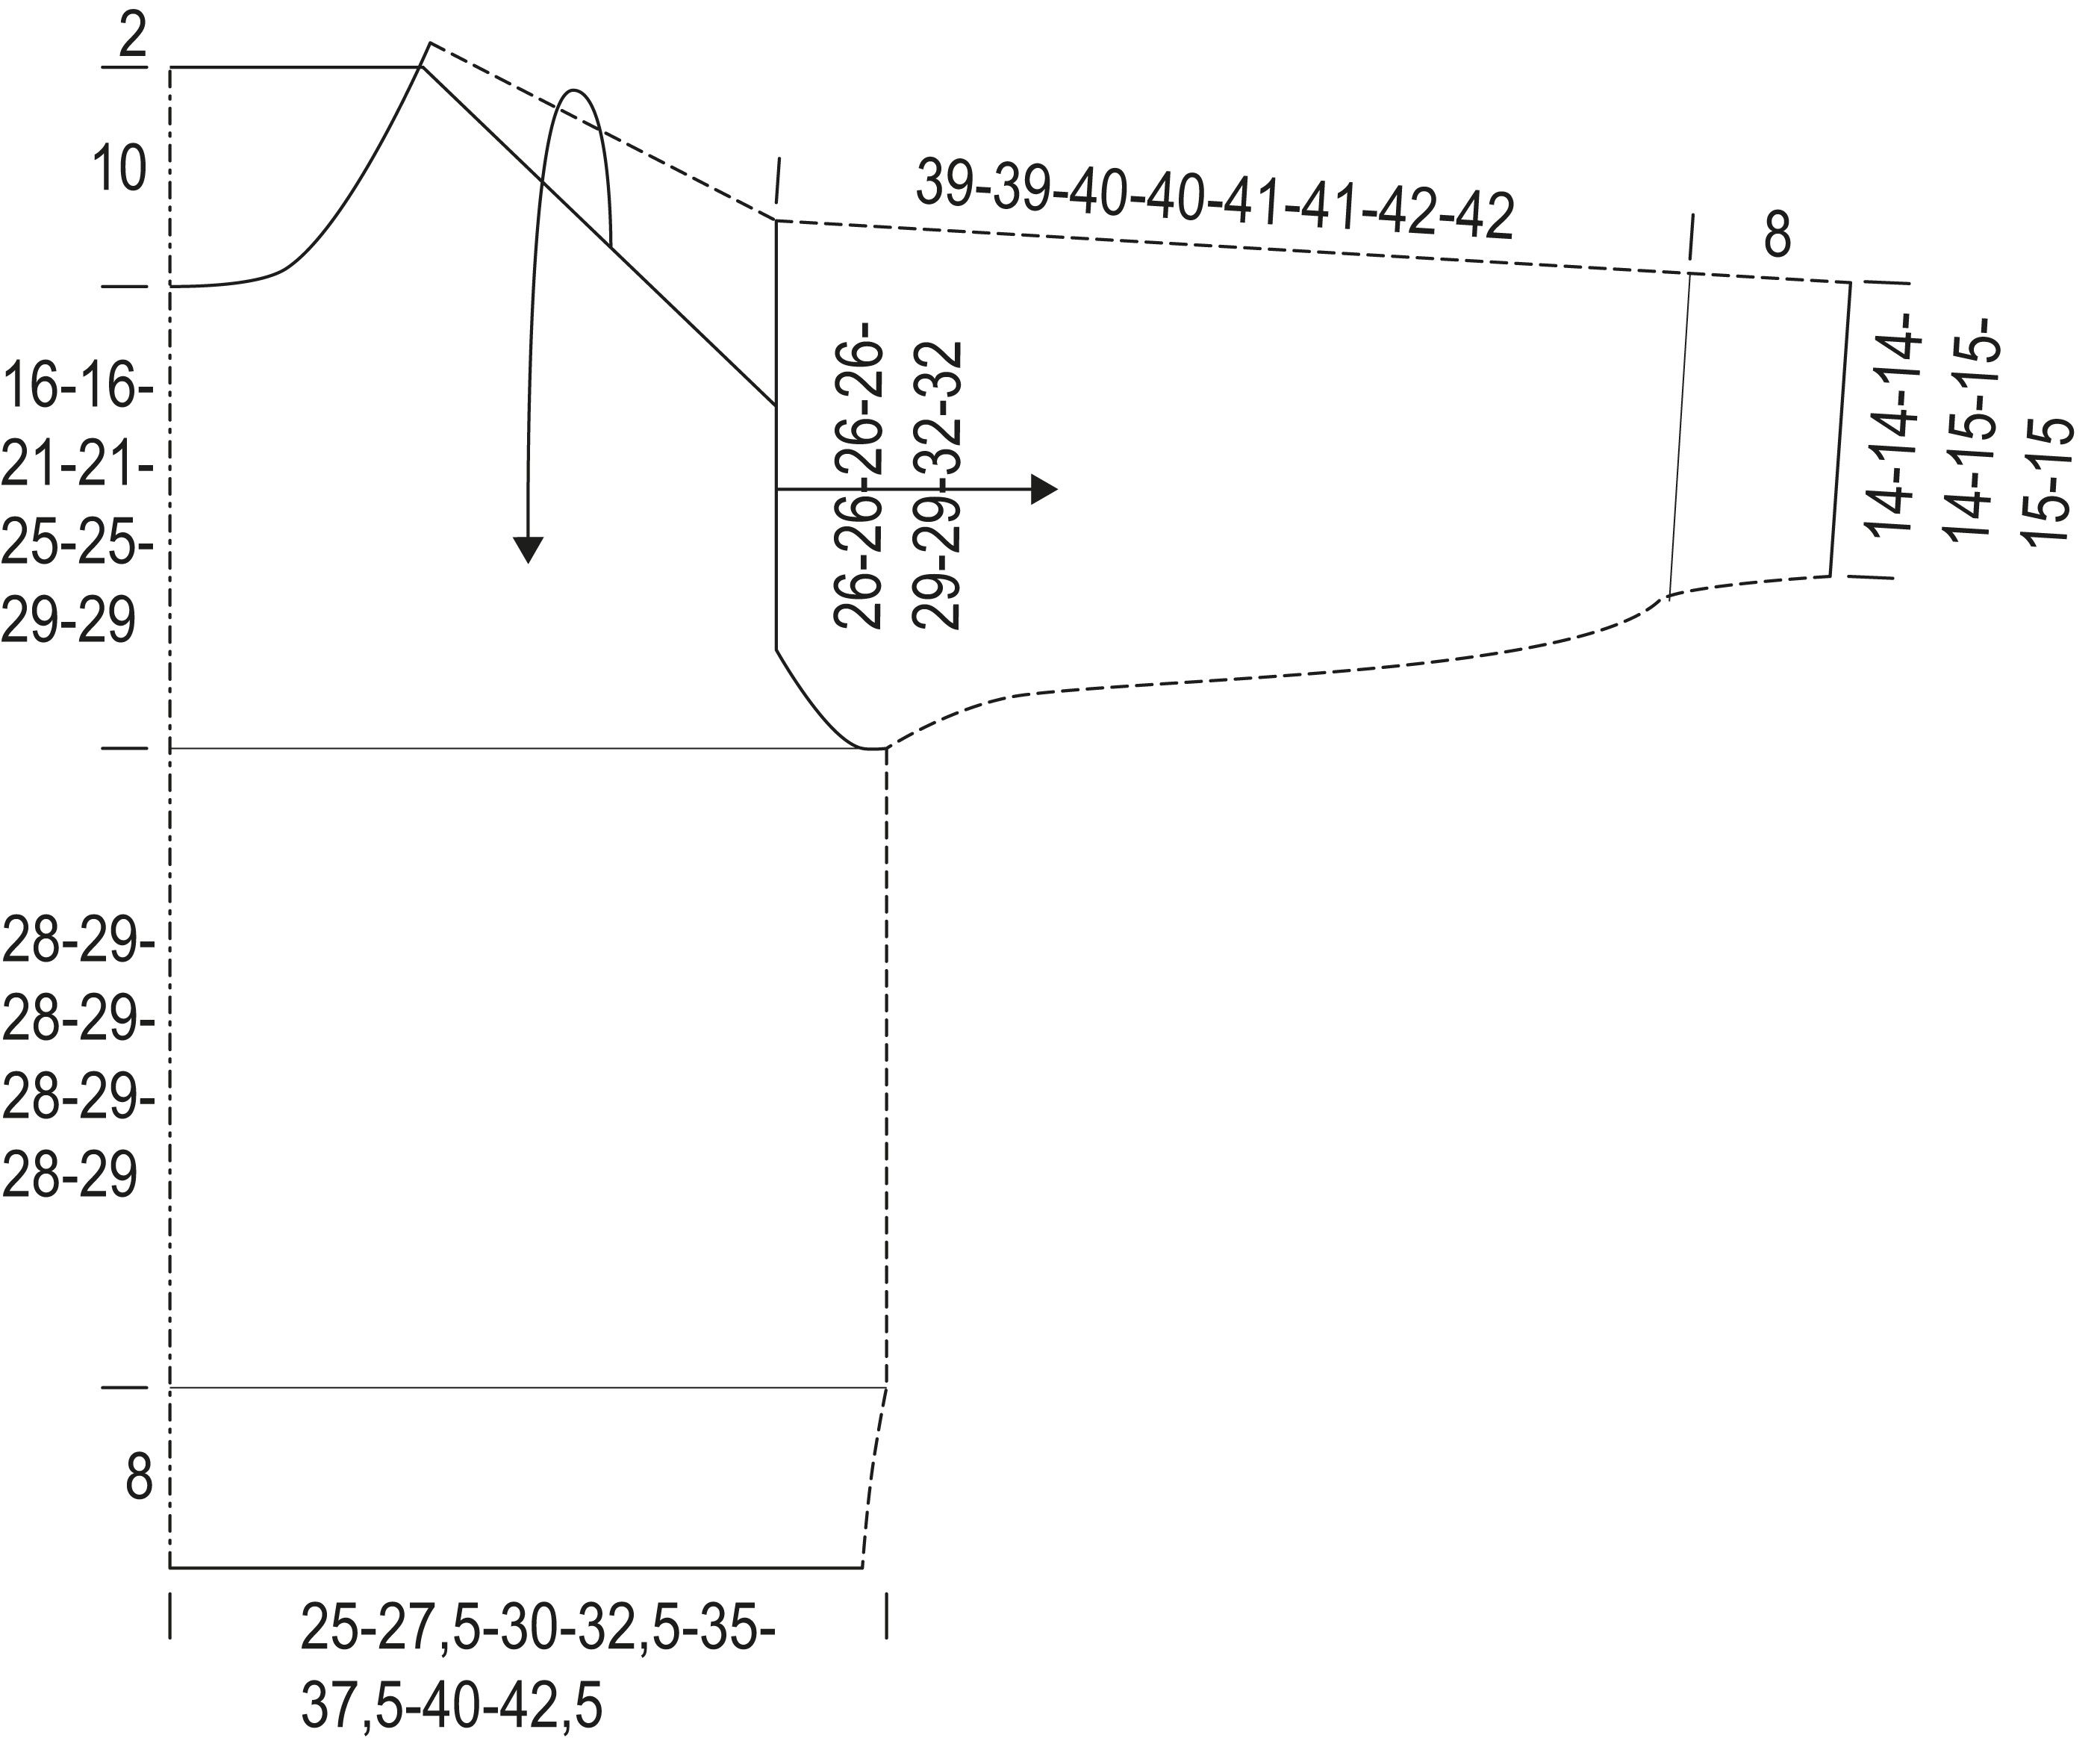
body circumference 100(110)120(130)140(150)160(170) cm
length 62(63)67(68)71(72)75(76) cm
inner sleeve length 47(47)48(48)49(49)50(50) cm
Yarn demand
Novita Hygge Chunky (273) brittlegill 800(900)950(1000)1050(1100)1150(1200) g for the sweater (060) sand 500(550)600(650)700(750)800(850) g for the vest Note! Yarn selections are according to the sweater's demand
Needles and other supplies
Circular needles (80 cm and 40 cm) 6 mm or size needed to obtain gauge, double-pointed needles 5 mm and circular needle (40 cm) 5 mm for the neck Other supplies Stitch markers and cable needle
Finished dimensions
body circumference 100(110)120(130)140(150)160(170) cm
length 62(63)67(68)71(72)75(76) cm
inner sleeve length 47(47)48(48)49(49)50(50) cm
Gauge 19 sts and 21 rows in cable pattern (blocked) = 10 cm x 10 cm / 4 in x 4 in
Stitch patterns Cable pattern (flat):follow the chart and instructions. Stockinette stitch in the round: knit all rounds. Ribbing in the round: *k1, p1*, repeat *–*.
Note The sweater is knitted seamlessly from neckline to hem.In the sweater version, the stitches for the top-down sleeves are picked up from the armholes. The garment is finished with a neck border and armhole borders (slipover version only).
Abbreviations and techniques
st(s) = stitch(es)
k = knit stitch
p = purl stitch
RS = right side
WS = wrong side
*–* = repeat section as instructed
M1R = make one right: pick up the strand of yarn between the sts onto the left needle from the back and knit it through the front loop.
M1L = make one left: pick up the strand of yarn between the sts onto the left needle from the front and knit it through the back loop.
M1RP = make one right purl: pick up the strand of yarn between the sts onto the left needle from the back and purl it through the front loop.
M1LP = make one left purl: pick up the strand of yarn between the sts onto the left needle from the front and purl it through the back loop.
Part 1
Days 1, 2 and 3. Work 7–17 rows each day.
Back
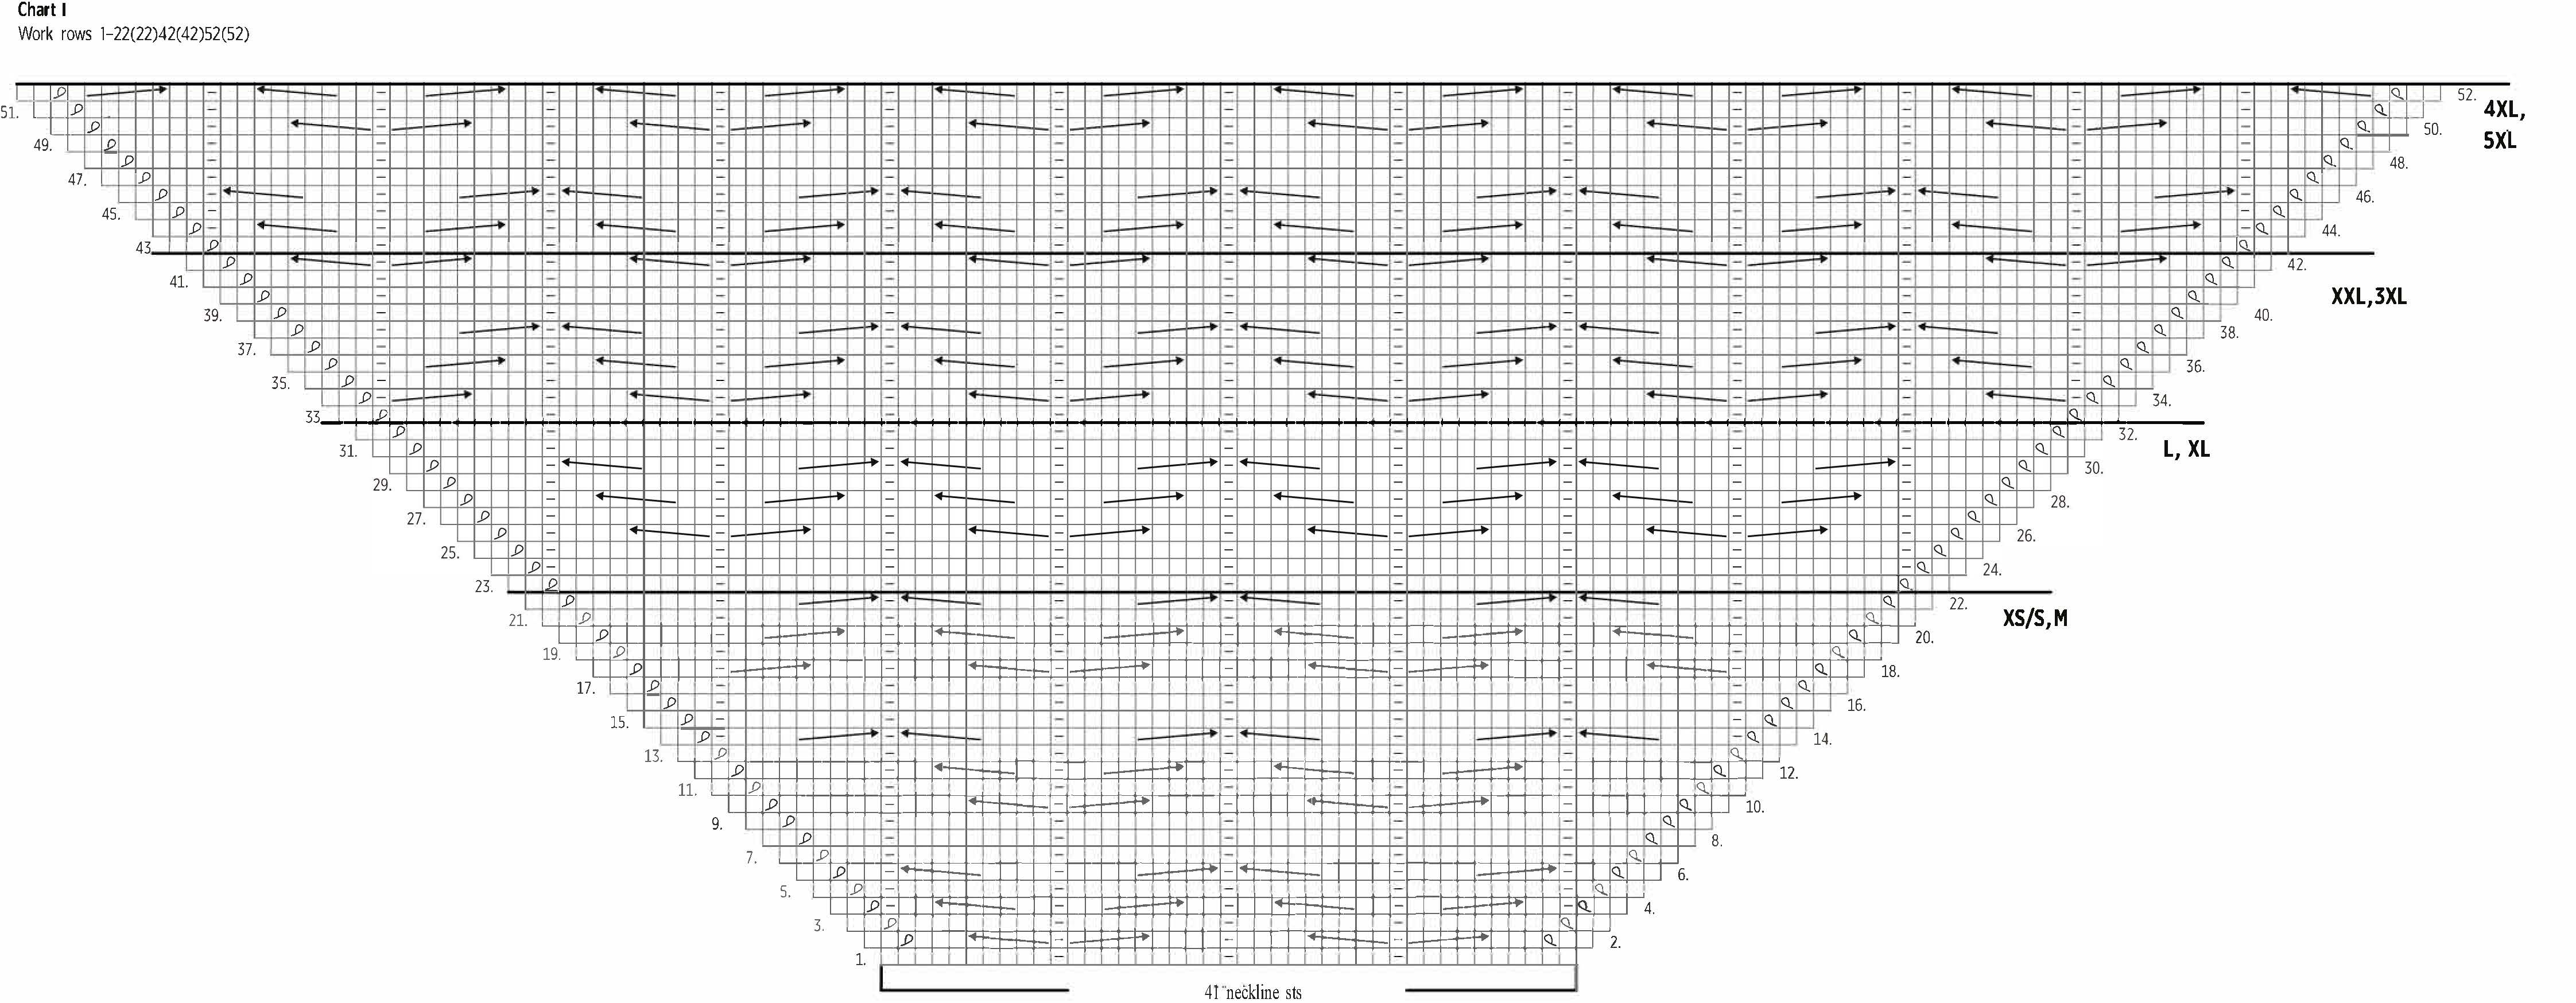
Cast on 41 sts for the neckline.Begin the cable pattern on row 1 of chart I (WS).
Row 1 (WS): p10, k1, p9, k1, p9, k1, p10.
Begin increases at the shoulder:
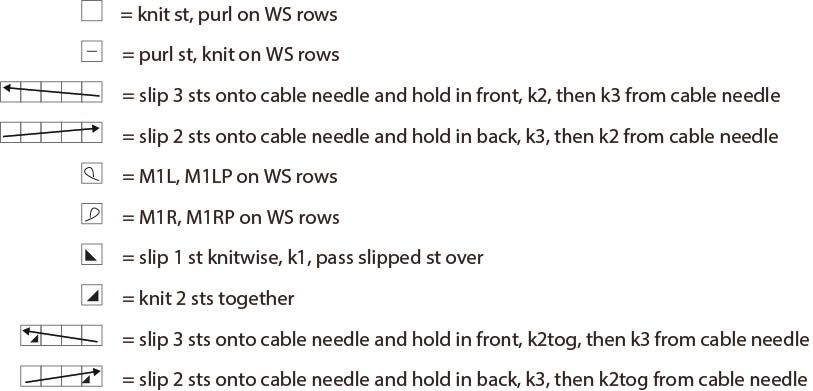
Row 2 (RS): k2, PM (place marker), M1L, k3, right-leaning cable (slip 2 sts onto cable needle and hold in back, k3, k2 from cable needle), p1, left-leaning cable (slip 3 sts onto cable needle and hold in front, k2, k3 from cable needle), k4, p1, k4, right-leaning cable, p1, left-leaning cable, k3, M1R, PM, k2 = 43 sts.
Row 3 (WS): p2, SM (slip marker), M1RP, p9, k1, p9, k1, p9, k1, p9, M1LP, SM, p2 = 45 sts.
Row 4 (RS): k2, SM, M1L, p1, k2, right-leaning cable, k2, p1, k2, left-leaning cable, k2, p1, k2, right-leaning cable, k2, p1, k2, left-leaning cable, k2, p1, M1R, SM, k2 = 47 sts.
You have now worked rows 1–4 of chart I.Work following the chart, increasing 1 st at both ends (2 sts from the edge) on each row.Work the increased sts following the cable pattern.When you have the 9 sts for the next cable at the edge of the piece, work the cables on the same rows as before but in the opposite direction compared to the adjacent cable.Always p1 between the cables (= k1 on WS rows).Repeat the increases 21(21)31(31)41(41)51(51) times in total. Finish after a RS row.83(83)103(103)123(123)143(143) sts now on the needles, 2(2)3(3)4(4)5(5) cables at the slanted edge + 2 edge sts.
Days 4 and 5. Work 12–14 rows each day.
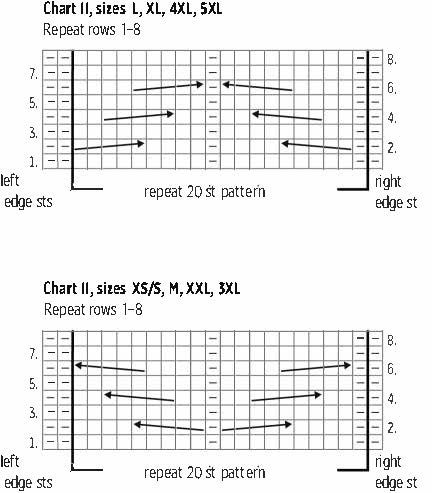
Place removable markers (shoulder markers) at both ends of the piece (on last row worked).Resume the cable pattern on row 7(7)1(1)3(3)5(5) of chart II.Work the 2 sts at the left end, repeat the 20 st pattern 4(4)5(5)6(6)7(7) times, work the st at the right end.Keep working the cable pattern until you have repeated the 8-row pattern 6(6)7(7)9(9)10(10) times in total after the cast-on edge. Finish after row 8.The next row is a WS row.
Day 6.
Sizes XS/S(L)XXL(4XL): work 10 more rows of the cable pattern.
Sizes M(XL)3XL(5XL): begin increases for the armhole: p1, M1R, work cable pattern to last st, M1L, p1.Repeat the increases on every other row 5 times in total.10 sts increased.Work the increased sts in stockinette st.
83(93)103(113)123(133)143(153) sts in the back.Leave the sts on hold.
Day 7.
Take the day off.
Part 2
Days 1, 2 and 3. Work 30–32 rows each day.
Right front
Use the larger needles. With RS facing and the cast-on edge up,pick up and knit sts from the slanted section of the right back shoulder.Begin at the shoulder marker and go towards the neck, picking up 1 st from each row. The outermost shoulder st is a selvedge st.Pick up 23(23)33(33)43(43)53(53) sts in total.
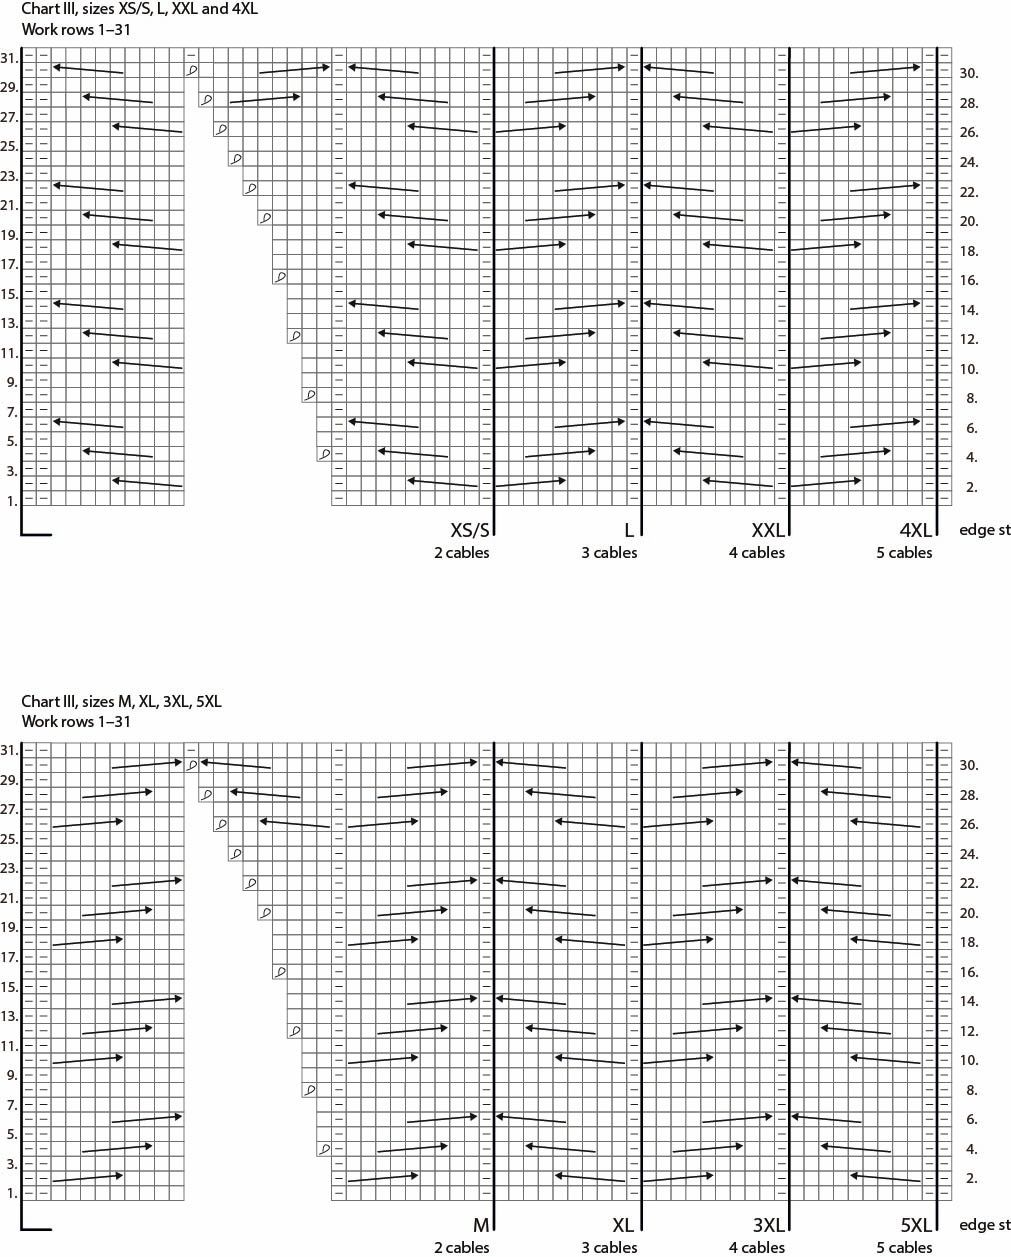
Begin the cable pattern on row 1 of chart III: (WS) work 11 sts, place marker, work as shown for your size, work the edge st.Work rows 2–3. On row 4, begin increases: work to marker, M1R, slip marker, work 11 sts.Repeat the increases 4 times on every 4th row and then 5 times on every other row = 33(33)43(43)53(53)63(63) sts. Note: When you have enough sts for the next cable, work the cables on the same rows as before but in the opposite direction compared to the adjacent cable.The last row is a WS row.Leave the sts on hold but do not break yarn.
Left front
Join a new ball of yarn and use the larger needles. With RS facing and the cast-on edge up,pick up and knit sts from the slanted section of the left back shoulder.Begin at the neck edge and go toward the shoulder marker.Pick up 1 st from each row. The outermost shoulder st is a selvedge st.Pick up 23(23)33(33)43(43)53(53) sts in total.
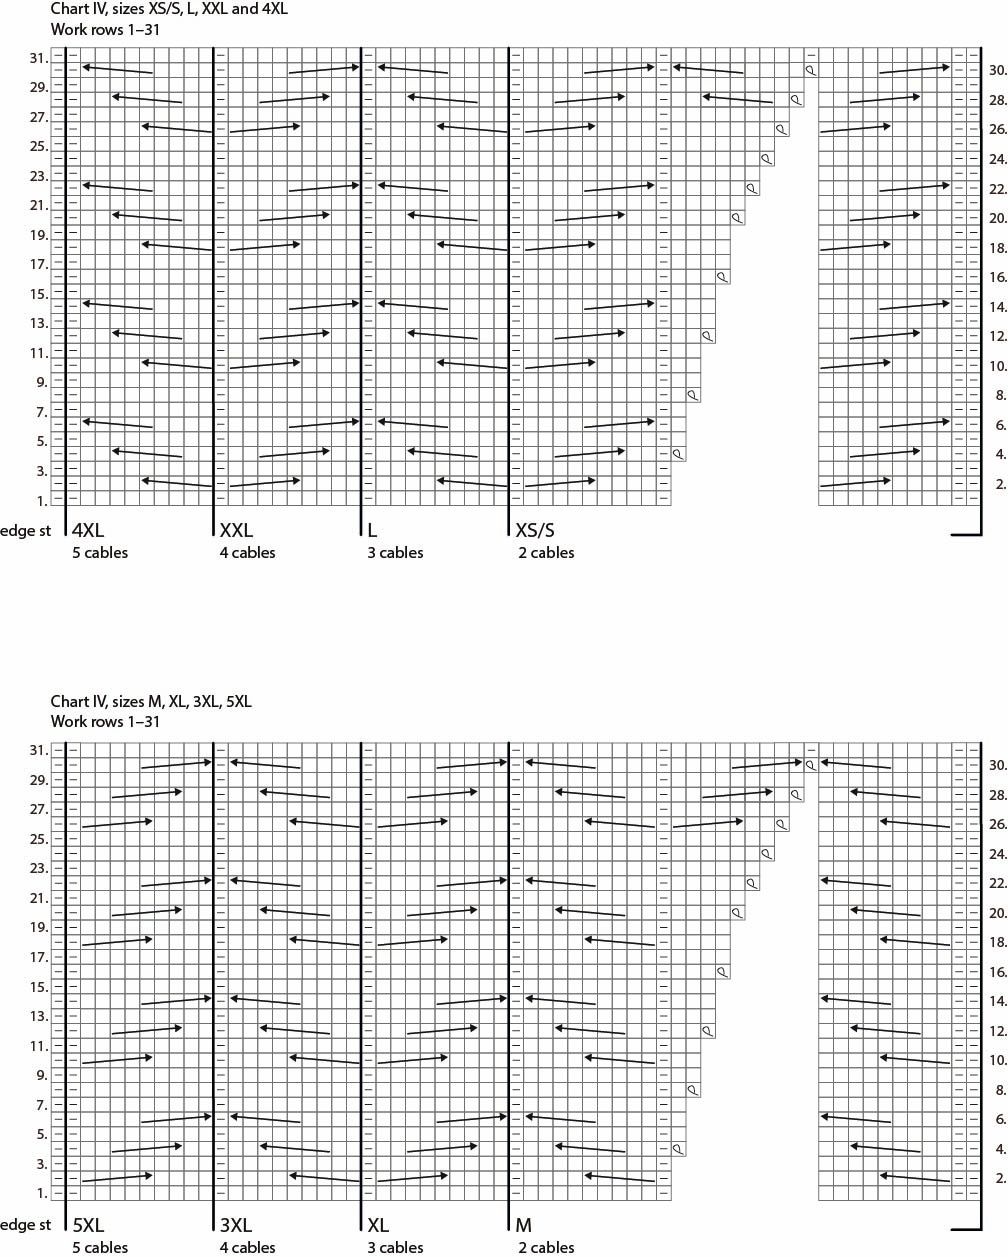
Begin the cable pattern on row 1 of chart IV:work the edge st, work as shown for your size, place marker, work 11 sts.Work rows 2–3. On row 4, begin increases: work 11 sts, SM, M1L, work to end.Repeat the increases 4 times on every 4th row and then 5 times on every other row = 33(33)43(43)53(53)63(63) sts. Note: When you have enough sts for the next cable, work the cables on the same rows as before but in the opposite direction compared to the adjacent cable.The last row is a WS row.Break yarn.
Days 4, 5 and 6. Work 15–17 rows each day.
Front
Place both fronts on the same needle and keep working the cable pattern.Work 33(33)43(43)53(53)63(63) sts (right front), cast on 17 sts, work 33(33)43(43)53(53)63(63) sts (left front) = 83(83)103(103)123(123)143(143) sts.Keep working the cable pattern until you have repeated the 8-row pattern 8(8)9(9)10(10)11(11) times in total after the pick-up edge. Finish after row 8.The next row is a WS row. Note: The front is significantly longer than the back at the armhole edge.
Sizes XS/S(L)XXL(4XL): work cable pattern for 10 more rows.The last row is a RS row.
Sizes M(XL)3XL(5XL): work the WS row, then begin increases for the armhole: p1, M1R, work cable pattern to last st, M1L, p1.Repeat the increases on every other row 5 times in total.10 sts increased.
83(93)103(113)123(133)143(153) sts in the front.
Day 7.
Take the day off.
Part 3
Days 1, 2, 3, 4 and 5. Work 5–5.5 cm / 2–2.25 in each day.
Body
Make sure you finished after the same row in the front and back.Place the front and back pieces onto the same needle.After the front sts, cast on 7 sts for armhole, work 83(93)103(113)123(133)143(153) back sts, cast on 7 sts for armhole, work 83(93)103(113)123(133)143(153) front sts.Place a marker for the beginning of round between the first two cables. The round begins with p1.180(200)220(240)260(280)300(320) sts in the body. The 20 st pattern is repeated 9(10)11(12)13(14)15(16) times on each round.
Work cable pattern with all sts until the body measures 28(29)28(29)28(29)28(29) cm / 11(11.5)11(11.5)11(11.5)11(11.5) cm from the armhole or 8 cm / 3.25 in from desired length.
Day 6
Knit 1 round and decrease 2 sts at each cable:*k2tog, k3*, repeat *–* to end of round = 144(160)176(192)208(224)240(256) sts.
Work ribbing in the round for 8 cm / 3.25 in, then bind off in ribbing or using the Italian bind-off.
Day 7
Take the day off.
Part 4
Day 1
Sleeves
Using the larger 40 cm / 16 in circular needle, pick up and knit sts from the armhole. Place removable markers at the armhole to divide the sts into four equal groups. Pick up the same number of sts (or almost the same) from each group (pick up a st from each row and skip every 4th or every 3rd row). Begin at the midpoint of the armhole cast-on and pick up a total of 90(90)90(90)100(100)110(110) sts. Now knit 10 sts. The beginning of round is here. Place marker. Note: The marker is not at the midpoint of the underarm, it’s 10 sts away from it.
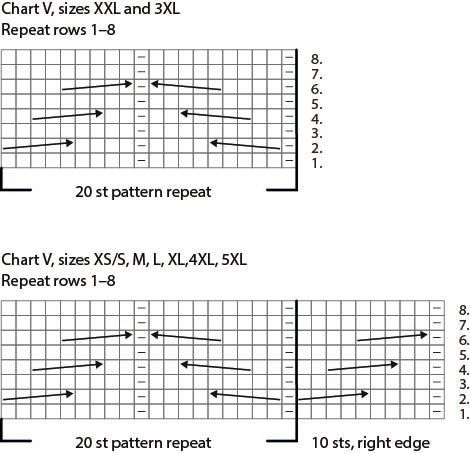
Work cable pattern in the round beginning on row 1 of chart V.
Sizes XXL(3XL): Repeat the 20 st pattern 5(5) times.
Sizes XS/S(M)L(XL)4XL(5XL): work the 10 sts at the right end, repeat the 20 st pattern 4(4)4(4)5(5) times.Note:You won’t end with a full pattern repeat. There are 2 identical cables next to each other at the beginning of round.
Work rows 2–8.
Day 2
Repeat rows 1–8.
Day 3
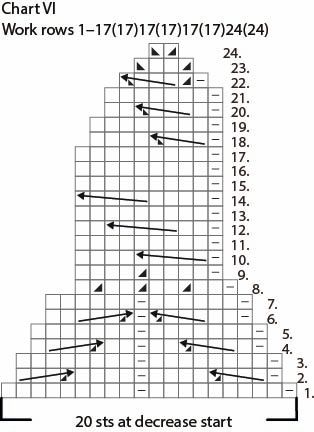
Keep working the cable pattern and begin decreases: work next round (row 1 of chart V) to last 20 sts, place marker.Between the two markers (= centre of underarm), work decreases following chart VI and the instructions for your size; with all other sts, work cable pattern following chart V.
Sizes S(M)L(XL)XXL(3XL): work rows 1–17 of chart VI.1 cable decreased = 80(80)80(80)90(90) sts.
Sizes 4XL(5XL): work rows 1–24 of chart VI.On the next round, p2tog at the end.2 cables decreased = 90(90) sts.
Days 4, 5 and 6. Work 13–14 cm / 5–5.5 in each day.
Keep working the cable pattern. Note: On sizes XXL(3XL)4XL(5XL), you won’t end with a full pattern repeat. There are 2 identical cables next to each other at the beginning of round. When the sleeve measures 39(39)40(40)41(41)42(42) cm / 15.25(15.25)15.75(15.75)16.25(16.25)16.5(16.5) in from the underarm or 8 cm / 3.25 in from desired length, switch to the smaller double-pointed needles. Work 1 round, decreasing 3 sts at each cable: *k2tog, k1, k2tog, k1, k2tog, k2*, repeat *–* to end of round = 56(56)56(56)63(63)63(63) sts. At the beginning of the next round, decrease 0(0)0(0)1(1)1(1) st = 56(56)56(56)62(62)62(62) sts.
Work ribbing in the round for 8 cm / 3.25 in, then bind off in ribbing or using the Italian bind-off.
Day 7
Take the day off.
Part 5
Knit the other sleeve in the same manner. Work following the schedule of Part 4.
Part 6
Days 1, 2, 3 and 4
Maintenance break! Use these days to catch up if you’ve fallen behind schedule. There’s still plenty of time!
Day 5
Armhole border (slipover version only)
Using the smaller circular needle, pick up and knit sts from the armhole. Begin at the armhole cast-on and pick up 3 sts per 4 rows. Knit 1 round, then bind off knitwise.
Neck border
Using the smaller circular needle, pick up and knit sts from the neck opening. Pick up 1 st from each st in the back neckline and centre front neckline; pick up 1 st from every other row in the vertical front sections. Approx. 90 sts on the needles. Knit 1 round, evenly decreasing so that you have 80(80)80(80)84(84)88(88) sts in total.
Work ribbing in the round for 4 cm / 1.5 in (slipover) or 18 cm / 7 in (sweater). Bind off in ribbing or using the Italian bind-off.
Day 6
Finishing
Weave in ends. Mist until damp. Pin to measurements wrong side up. Steam lightly using a wool setting. Allow to dry overnight.
AND YOU’RE DONE!
Kaamos KAL, Kaamos Cottage
Size(s)
XS/S(M)L(XL)XXL(3XL)4XL(5XL) Sample sizes: sweater L, vest XL
Finished dimensions
body circumference 100(110)120(130)140(150)160(170) cm
length 62(63)67(68)71(72)75(76) cm
inner sleeve length 47(47)48(48)49(49)50(50) cm
Yarn demand
Novita Hygge Chunky (273) brittlegill 800(900)950(1000)1050(1100)1150(1200) g for the sweater (060) sand 500(550)600(650)700(750)800(850) g for the vest Note! Yarn selections are according to the sweater's demand
Needles and other supplies
Circular needles (80 cm and 40 cm) 6 mm or size needed to obtain gauge, double-pointed needles 5 mm and circular needle (40 cm) 5 mm for the neck Other supplies Stitch markers and cable needle
Gauge 19 sts and 21 rows in cable pattern (blocked) = 10 cm x 10 cm / 4 in x 4 in
Stitch patterns Cable pattern (flat):follow the chart and instructions. Stockinette stitch in the round: knit all rounds. Ribbing in the round: *k1, p1*, repeat *–*.
Note The sweater is knitted seamlessly from neckline to hem.In the sweater version, the stitches for the top-down sleeves are picked up from the armholes. The garment is finished with a neck border and armhole borders (slipover version only).
Abbreviations and techniques
st(s) = stitch(es)
k = knit stitch
p = purl stitch
RS = right side
WS = wrong side
*–* = repeat section as instructed
M1R = make one right: pick up the strand of yarn between the sts onto the left needle from the back and knit it through the front loop.
M1L = make one left: pick up the strand of yarn between the sts onto the left needle from the front and knit it through the back loop.
M1RP = make one right purl: pick up the strand of yarn between the sts onto the left needle from the back and purl it through the front loop.
M1LP = make one left purl: pick up the strand of yarn between the sts onto the left needle from the front and purl it through the back loop.
Part 1
Days 1, 2 and 3. Work 7–17 rows each day.
Back
Cast on 41 sts for the neckline.Begin the cable pattern on row 1 of chart I (WS).
Row 1 (WS): p10, k1, p9, k1, p9, k1, p10.
Begin increases at the shoulder:
Row 2 (RS): k2, PM (place marker), M1L, k3, right-leaning cable (slip 2 sts onto cable needle and hold in back, k3, k2 from cable needle), p1, left-leaning cable (slip 3 sts onto cable needle and hold in front, k2, k3 from cable needle), k4, p1, k4, right-leaning cable, p1, left-leaning cable, k3, M1R, PM, k2 = 43 sts.
Row 3 (WS): p2, SM (slip marker), M1RP, p9, k1, p9, k1, p9, k1, p9, M1LP, SM, p2 = 45 sts.
Row 4 (RS): k2, SM, M1L, p1, k2, right-leaning cable, k2, p1, k2, left-leaning cable, k2, p1, k2, right-leaning cable, k2, p1, k2, left-leaning cable, k2, p1, M1R, SM, k2 = 47 sts.
You have now worked rows 1–4 of chart I.Work following the chart, increasing 1 st at both ends (2 sts from the edge) on each row.Work the increased sts following the cable pattern.When you have the 9 sts for the next cable at the edge of the piece, work the cables on the same rows as before but in the opposite direction compared to the adjacent cable.Always p1 between the cables (= k1 on WS rows).Repeat the increases 21(21)31(31)41(41)51(51) times in total. Finish after a RS row.83(83)103(103)123(123)143(143) sts now on the needles, 2(2)3(3)4(4)5(5) cables at the slanted edge + 2 edge sts.
Days 4 and 5. Work 12–14 rows each day.
Place removable markers (shoulder markers) at both ends of the piece (on last row worked).Resume the cable pattern on row 7(7)1(1)3(3)5(5) of chart II.Work the 2 sts at the left end, repeat the 20 st pattern 4(4)5(5)6(6)7(7) times, work the st at the right end.Keep working the cable pattern until you have repeated the 8-row pattern 6(6)7(7)9(9)10(10) times in total after the cast-on edge. Finish after row 8.The next row is a WS row.
Day 6.
Sizes XS/S(L)XXL(4XL): work 10 more rows of the cable pattern.
Sizes M(XL)3XL(5XL): begin increases for the armhole: p1, M1R, work cable pattern to last st, M1L, p1.Repeat the increases on every other row 5 times in total.10 sts increased.Work the increased sts in stockinette st.
83(93)103(113)123(133)143(153) sts in the back.Leave the sts on hold.
Day 7.
Take the day off.
Part 2
Days 1, 2 and 3. Work 30–32 rows each day.
Right front
Use the larger needles. With RS facing and the cast-on edge up,pick up and knit sts from the slanted section of the right back shoulder.Begin at the shoulder marker and go towards the neck, picking up 1 st from each row. The outermost shoulder st is a selvedge st.Pick up 23(23)33(33)43(43)53(53) sts in total.
Begin the cable pattern on row 1 of chart III: (WS) work 11 sts, place marker, work as shown for your size, work the edge st.Work rows 2–3. On row 4, begin increases: work to marker, M1R, slip marker, work 11 sts.Repeat the increases 4 times on every 4th row and then 5 times on every other row = 33(33)43(43)53(53)63(63) sts. Note: When you have enough sts for the next cable, work the cables on the same rows as before but in the opposite direction compared to the adjacent cable.The last row is a WS row.Leave the sts on hold but do not break yarn.
Left front
Join a new ball of yarn and use the larger needles. With RS facing and the cast-on edge up,pick up and knit sts from the slanted section of the left back shoulder.Begin at the neck edge and go toward the shoulder marker.Pick up 1 st from each row. The outermost shoulder st is a selvedge st.Pick up 23(23)33(33)43(43)53(53) sts in total.
Begin the cable pattern on row 1 of chart IV:work the edge st, work as shown for your size, place marker, work 11 sts.Work rows 2–3. On row 4, begin increases: work 11 sts, SM, M1L, work to end.Repeat the increases 4 times on every 4th row and then 5 times on every other row = 33(33)43(43)53(53)63(63) sts. Note: When you have enough sts for the next cable, work the cables on the same rows as before but in the opposite direction compared to the adjacent cable.The last row is a WS row.Break yarn.
Days 4, 5 and 6. Work 15–17 rows each day.
Front
Place both fronts on the same needle and keep working the cable pattern.Work 33(33)43(43)53(53)63(63) sts (right front), cast on 17 sts, work 33(33)43(43)53(53)63(63) sts (left front) = 83(83)103(103)123(123)143(143) sts.Keep working the cable pattern until you have repeated the 8-row pattern 8(8)9(9)10(10)11(11) times in total after the pick-up edge. Finish after row 8.The next row is a WS row. Note: The front is significantly longer than the back at the armhole edge.
Sizes XS/S(L)XXL(4XL): work cable pattern for 10 more rows.The last row is a RS row.
Sizes M(XL)3XL(5XL): work the WS row, then begin increases for the armhole: p1, M1R, work cable pattern to last st, M1L, p1.Repeat the increases on every other row 5 times in total.10 sts increased.
83(93)103(113)123(133)143(153) sts in the front.
Day 7.
Take the day off.
Part 3
Days 1, 2, 3, 4 and 5. Work 5–5.5 cm / 2–2.25 in each day.
Body
Make sure you finished after the same row in the front and back.Place the front and back pieces onto the same needle.After the front sts, cast on 7 sts for armhole, work 83(93)103(113)123(133)143(153) back sts, cast on 7 sts for armhole, work 83(93)103(113)123(133)143(153) front sts.Place a marker for the beginning of round between the first two cables. The round begins with p1.180(200)220(240)260(280)300(320) sts in the body. The 20 st pattern is repeated 9(10)11(12)13(14)15(16) times on each round.
Work cable pattern with all sts until the body measures 28(29)28(29)28(29)28(29) cm / 11(11.5)11(11.5)11(11.5)11(11.5) cm from the armhole or 8 cm / 3.25 in from desired length.
Day 6
Knit 1 round and decrease 2 sts at each cable:*k2tog, k3*, repeat *–* to end of round = 144(160)176(192)208(224)240(256) sts.
Work ribbing in the round for 8 cm / 3.25 in, then bind off in ribbing or using the Italian bind-off.
Day 7
Take the day off.
Part 4
Day 1
Sleeves
Using the larger 40 cm / 16 in circular needle, pick up and knit sts from the armhole. Place removable markers at the armhole to divide the sts into four equal groups. Pick up the same number of sts (or almost the same) from each group (pick up a st from each row and skip every 4th or every 3rd row). Begin at the midpoint of the armhole cast-on and pick up a total of 90(90)90(90)100(100)110(110) sts. Now knit 10 sts. The beginning of round is here. Place marker. Note: The marker is not at the midpoint of the underarm, it’s 10 sts away from it.
Work cable pattern in the round beginning on row 1 of chart V.
Sizes XXL(3XL): Repeat the 20 st pattern 5(5) times.
Sizes XS/S(M)L(XL)4XL(5XL): work the 10 sts at the right end, repeat the 20 st pattern 4(4)4(4)5(5) times.Note:You won’t end with a full pattern repeat. There are 2 identical cables next to each other at the beginning of round.
Work rows 2–8.
Day 2
Repeat rows 1–8.
Day 3
Keep working the cable pattern and begin decreases: work next round (row 1 of chart V) to last 20 sts, place marker.Between the two markers (= centre of underarm), work decreases following chart VI and the instructions for your size; with all other sts, work cable pattern following chart V.
Sizes S(M)L(XL)XXL(3XL): work rows 1–17 of chart VI.1 cable decreased = 80(80)80(80)90(90) sts.
Sizes 4XL(5XL): work rows 1–24 of chart VI.On the next round, p2tog at the end.2 cables decreased = 90(90) sts.
Days 4, 5 and 6. Work 13–14 cm / 5–5.5 in each day.
Keep working the cable pattern. Note: On sizes XXL(3XL)4XL(5XL), you won’t end with a full pattern repeat. There are 2 identical cables next to each other at the beginning of round. When the sleeve measures 39(39)40(40)41(41)42(42) cm / 15.25(15.25)15.75(15.75)16.25(16.25)16.5(16.5) in from the underarm or 8 cm / 3.25 in from desired length, switch to the smaller double-pointed needles. Work 1 round, decreasing 3 sts at each cable: *k2tog, k1, k2tog, k1, k2tog, k2*, repeat *–* to end of round = 56(56)56(56)63(63)63(63) sts. At the beginning of the next round, decrease 0(0)0(0)1(1)1(1) st = 56(56)56(56)62(62)62(62) sts.
Work ribbing in the round for 8 cm / 3.25 in, then bind off in ribbing or using the Italian bind-off.
Day 7
Take the day off.
Part 5
Knit the other sleeve in the same manner. Work following the schedule of Part 4.
Part 6
Days 1, 2, 3 and 4
Maintenance break! Use these days to catch up if you’ve fallen behind schedule. There’s still plenty of time!
Day 5
Armhole border (slipover version only)
Using the smaller circular needle, pick up and knit sts from the armhole. Begin at the armhole cast-on and pick up 3 sts per 4 rows. Knit 1 round, then bind off knitwise.
Neck border
Using the smaller circular needle, pick up and knit sts from the neck opening. Pick up 1 st from each st in the back neckline and centre front neckline; pick up 1 st from every other row in the vertical front sections. Approx. 90 sts on the needles. Knit 1 round, evenly decreasing so that you have 80(80)80(80)84(84)88(88) sts in total.
Work ribbing in the round for 4 cm / 1.5 in (slipover) or 18 cm / 7 in (sweater). Bind off in ribbing or using the Italian bind-off.
Day 6
Finishing
Weave in ends. Mist until damp. Pin to measurements wrong side up. Steam lightly using a wool setting. Allow to dry overnight.
AND YOU’RE DONE!