Apple Pullover Novita Muumitalo
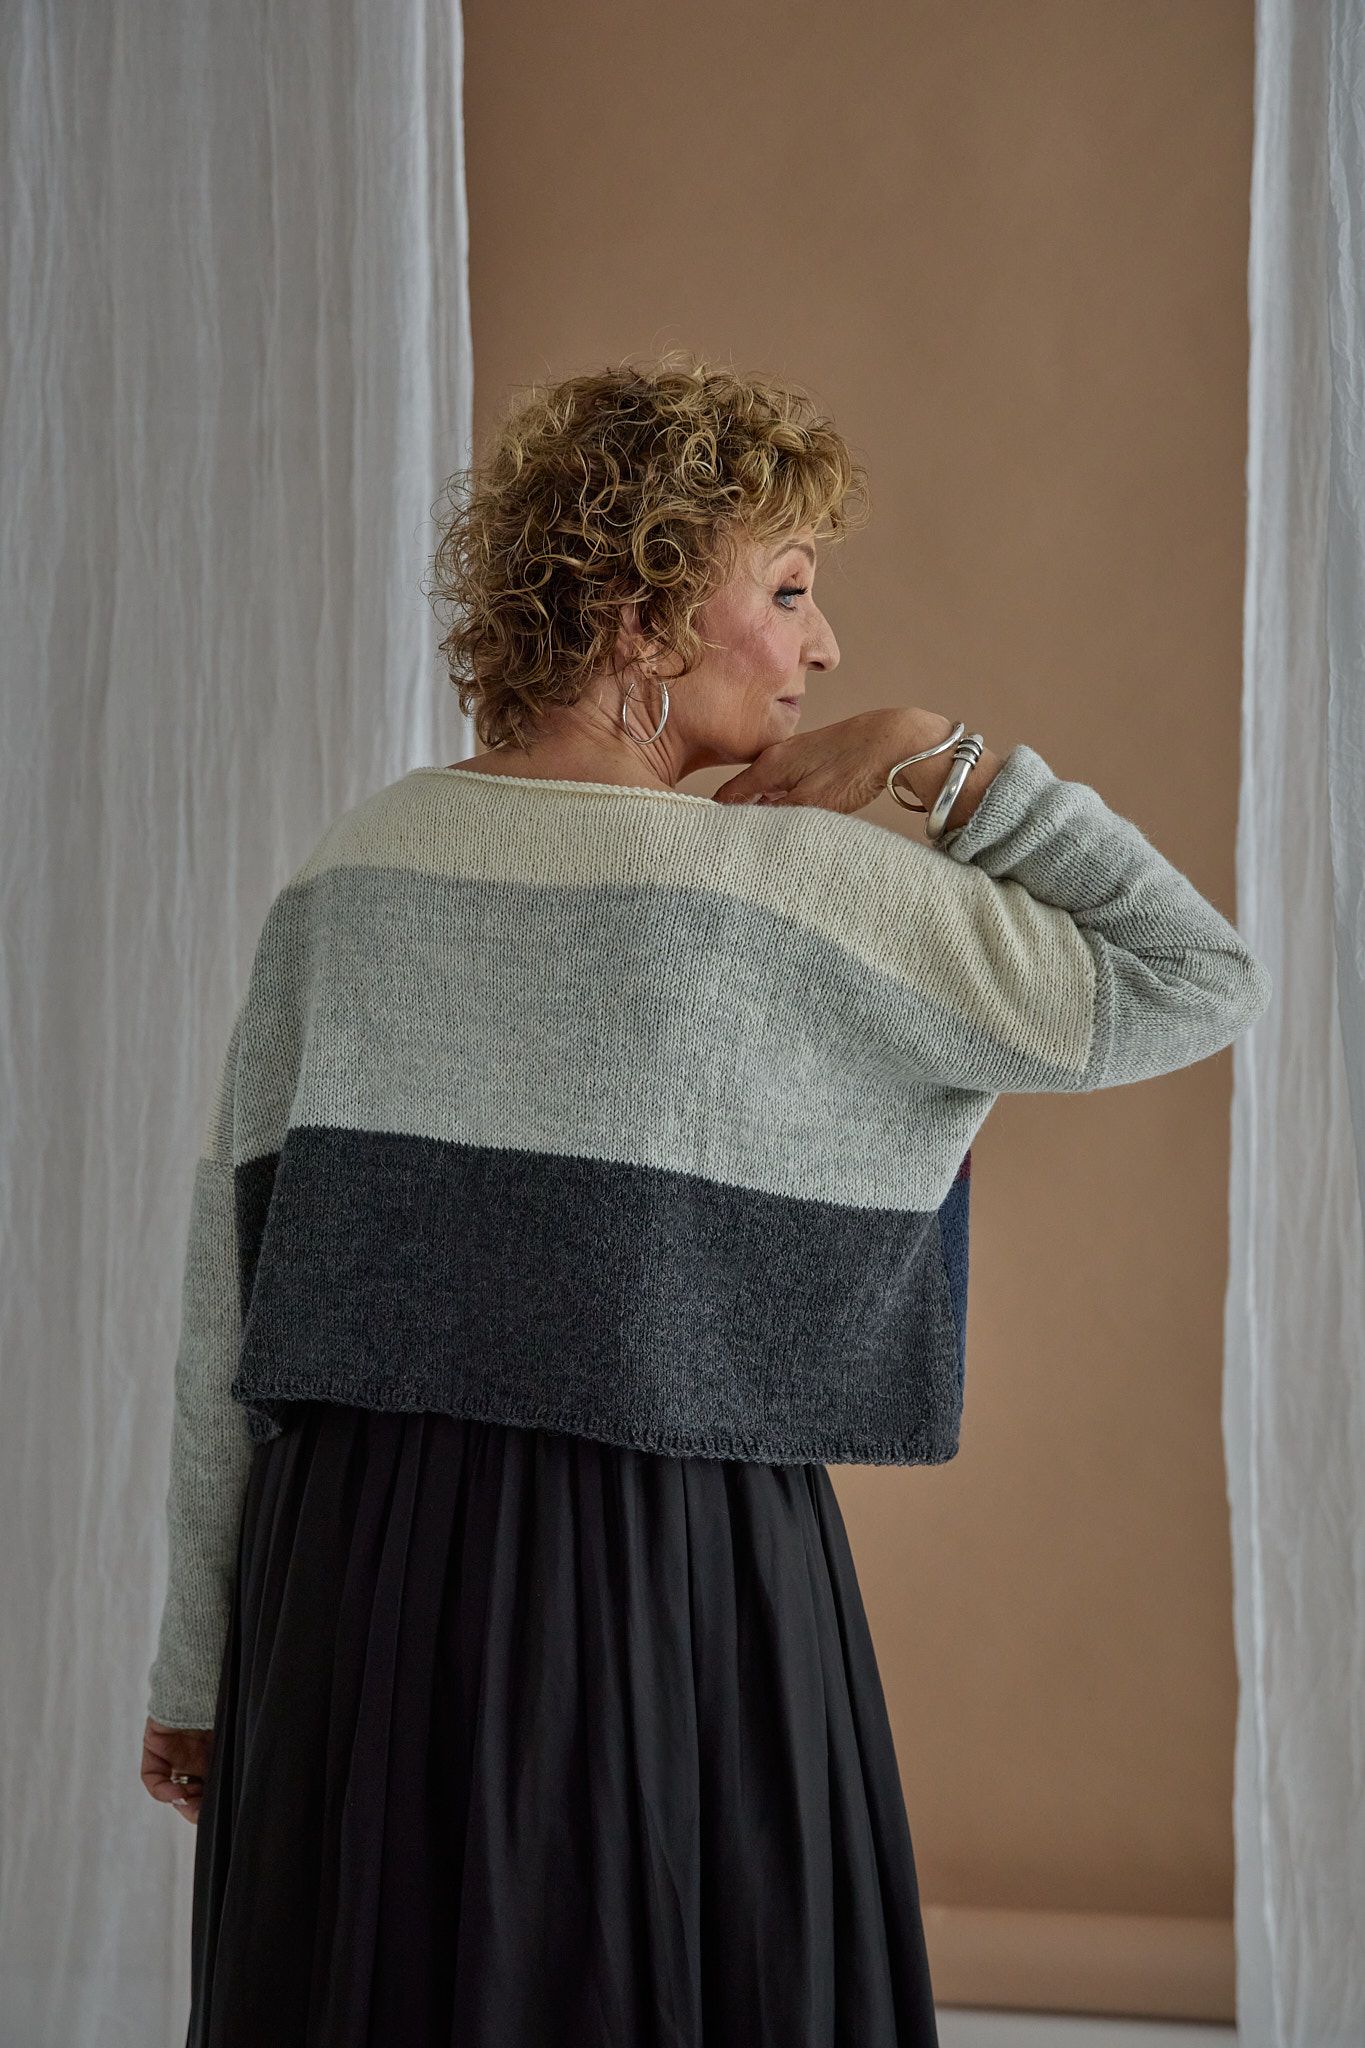
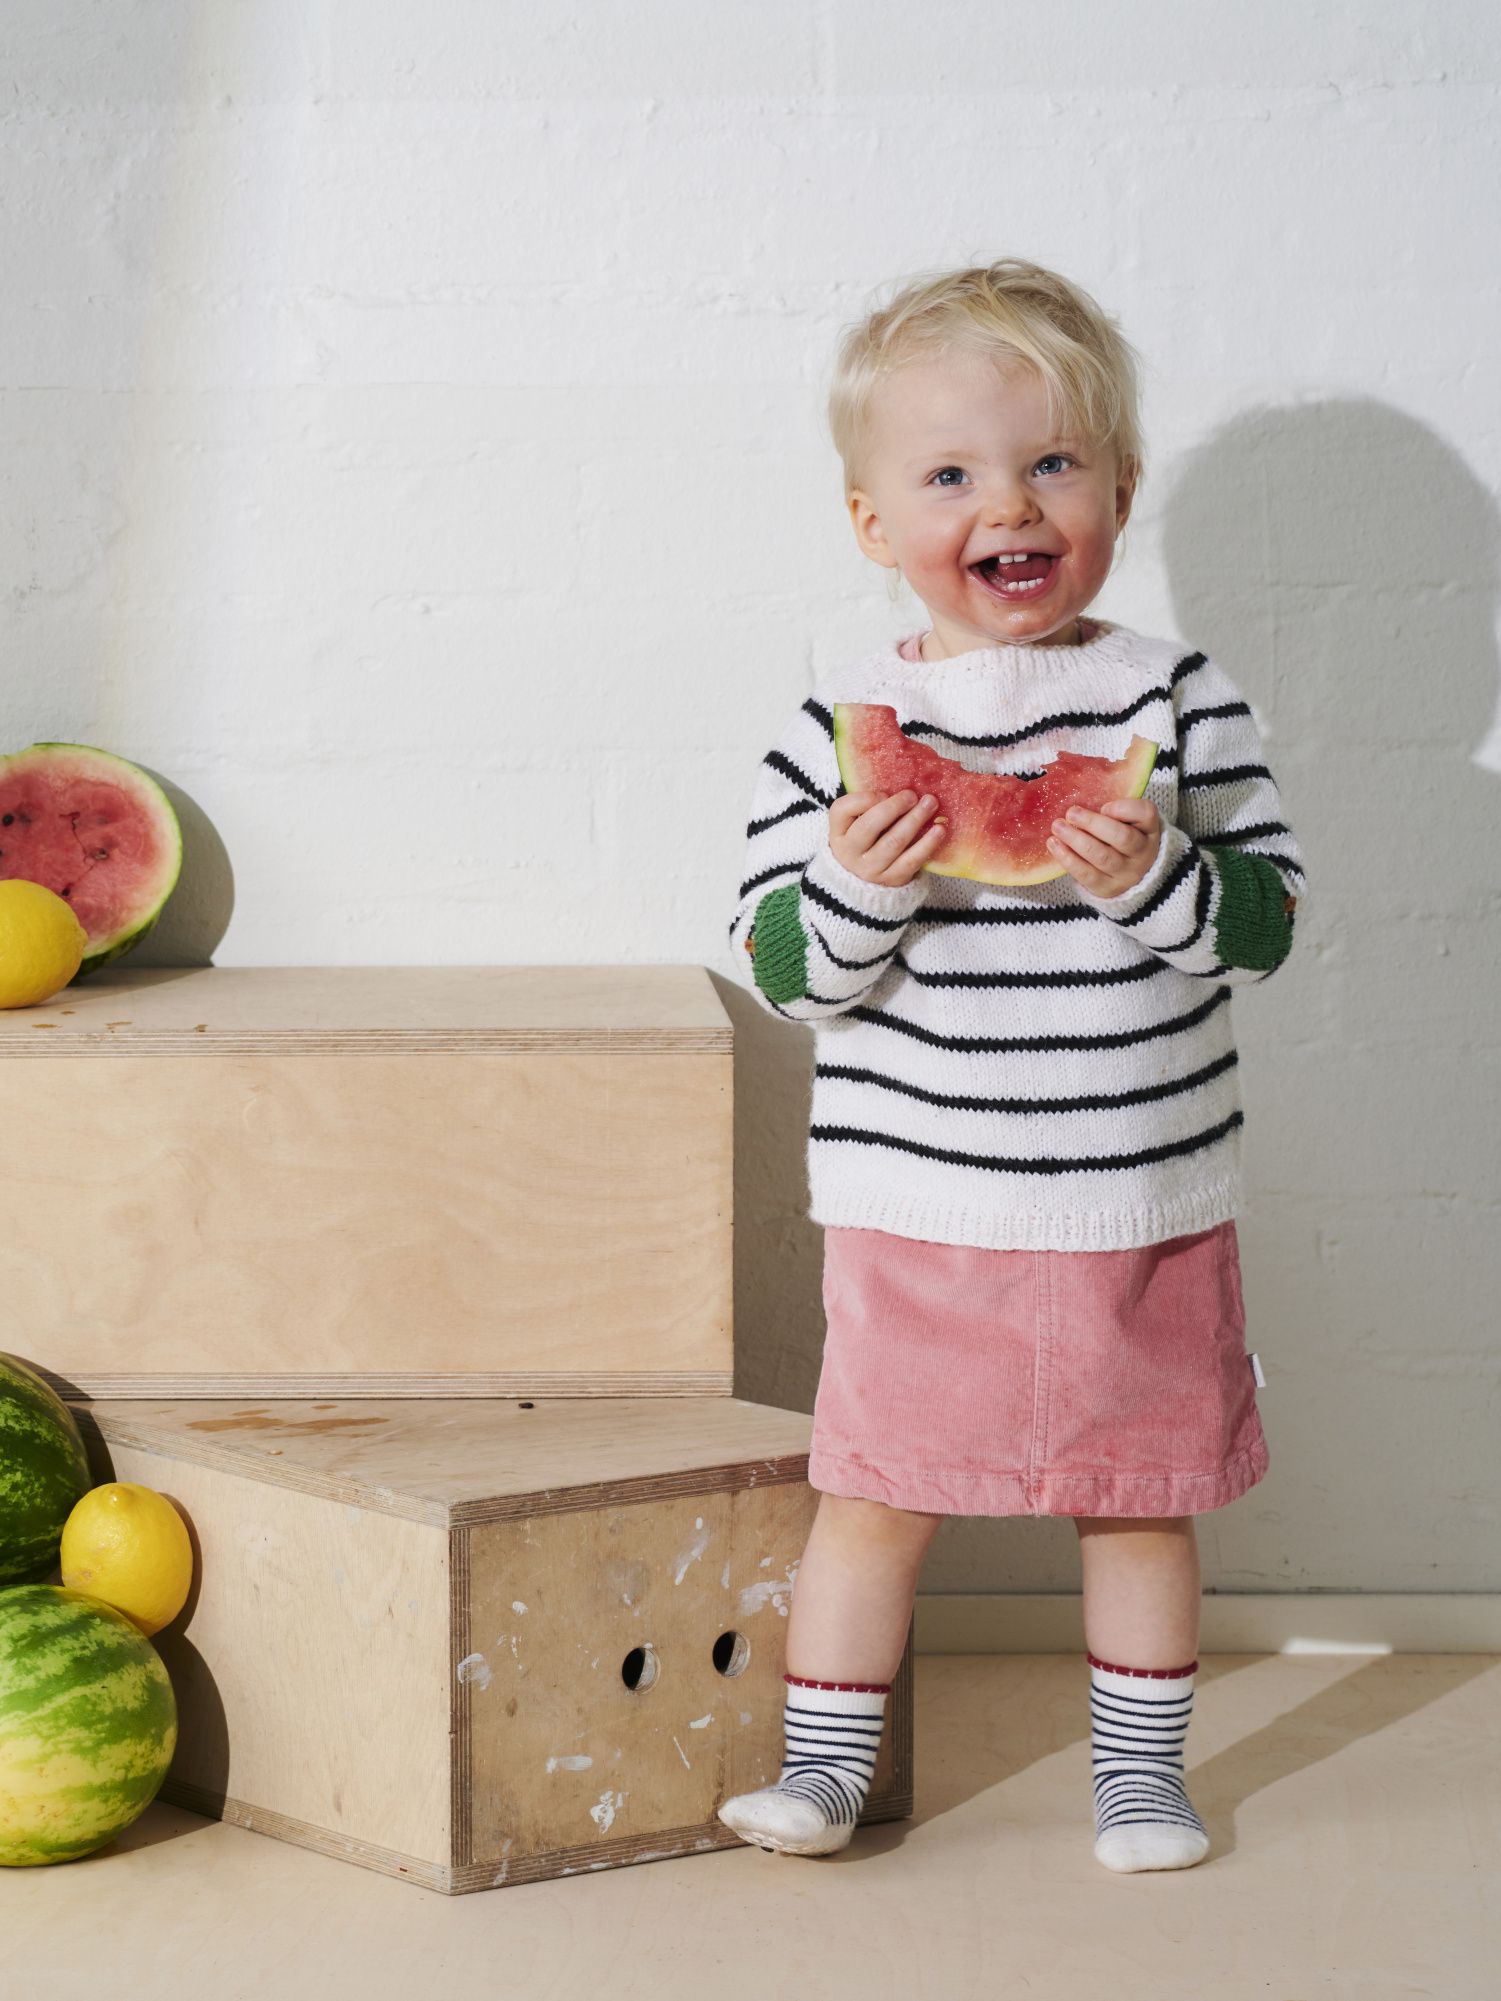
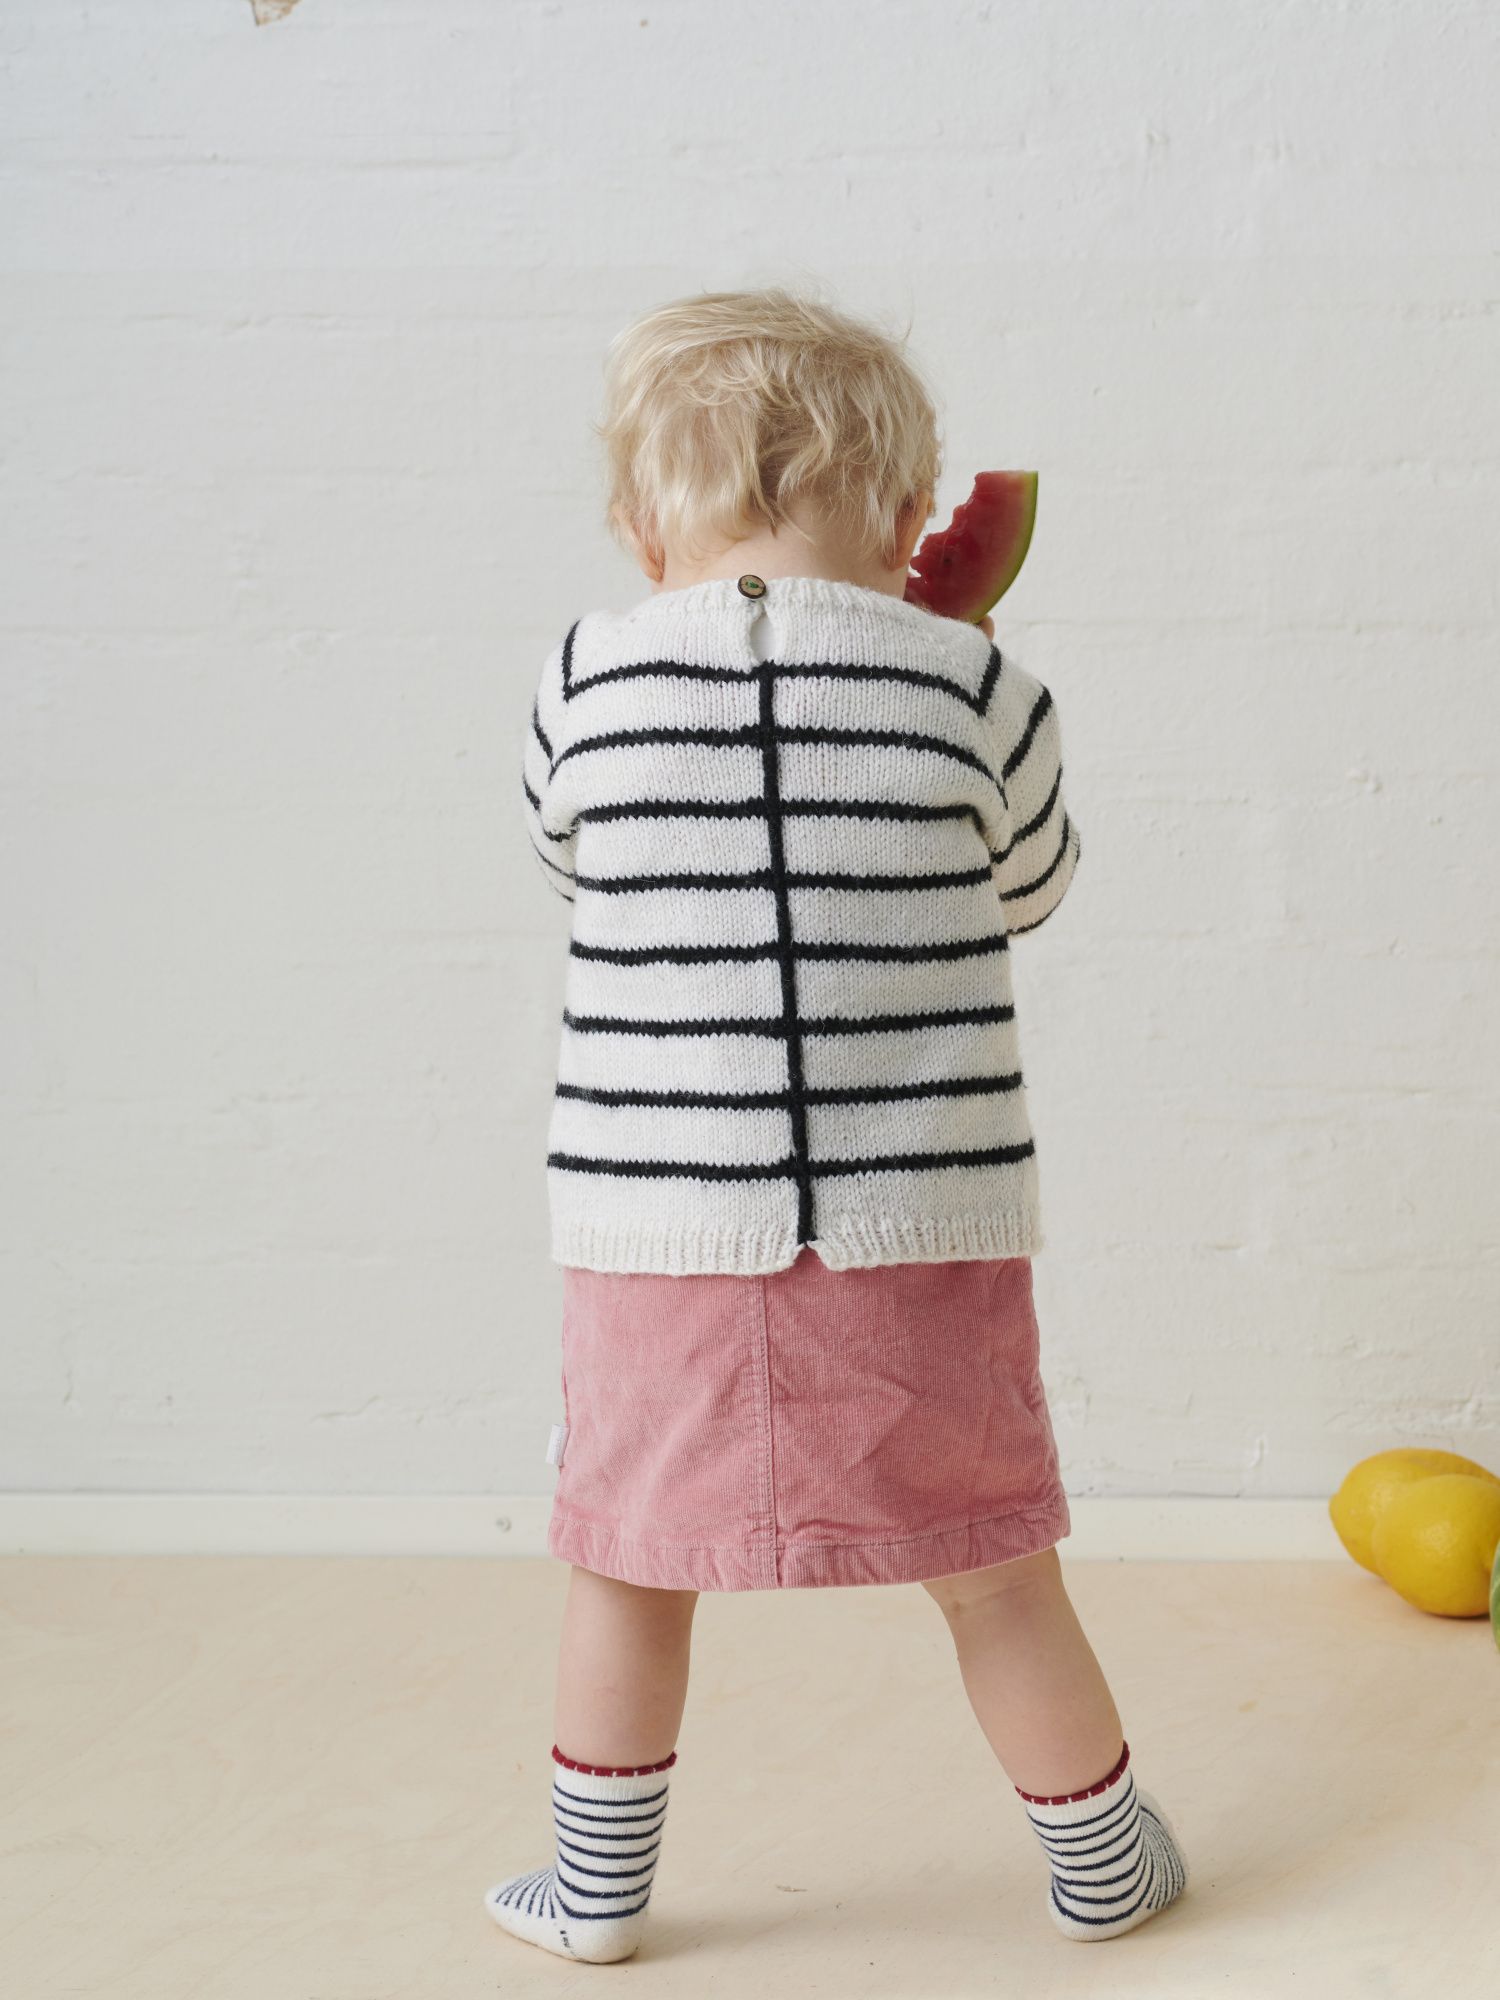
The Apple Pullover is worked from the top down. The rest of the pullover is worked in stripes in the round with a vertical stripe running down the centre back, which conveniently hides the jog usually created by working stripes in the round.
Designer
Amy Philip
Size(s)
0-6 kk (6-12 kk) 1-2 v (2-3 v)
Finished dimensions
Chest Circumference 18/45.5 (20/51) 22/56 (23/58.5) Inch/cmPullover Circumference 20/51 (22/56)25/64 (26/66) Inch/cmPullover length 9.5/24(11.5/29) 13.5/34 (14.5/37) Inch/cmSleeve length (from underarm) 6/15 (6.5/16.5) 8/20.5 (9.5/24) Inch/cmWrist circumference 6/15 (6.5/16.5) 6.75/17(6.75/17) Inch/cm
Yarn demand
Novita Muumitalo (100g/225m) Yarn A: 1 (1, 2, 2) x 100g Moomintroll (007) Yarn B: 1 (1, 1, 1) x 100g Stinky (099) Yarn C: Small quantity of Snufkin (381) Yarn D: Small quantity of Novita Nordic Wool in Squirrel (645)
Needles and other supplies
Needles 3.25mm (UK 10, US 3) 60-80cm circular needles as well as needles suitable for working flat and for working small circumferences in the round. 4mm (UK 8, US 6) 60-80cm circular needles as well as needles suitable for working flat and for working small circumferences in the round. 3mm crochet hook Notions 1 button Tapestry needle Measuring tape Scissors
Finished dimensions
Chest Circumference 18/45.5 (20/51) 22/56 (23/58.5) Inch/cmPullover Circumference 20/51 (22/56)25/64 (26/66) Inch/cmPullover length 9.5/24(11.5/29) 13.5/34 (14.5/37) Inch/cmSleeve length (from underarm) 6/15 (6.5/16.5) 8/20.5 (9.5/24) Inch/cmWrist circumference 6/15 (6.5/16.5) 6.75/17(6.75/17) Inch/cm
Stitch patterns:- Ribbing: *k1, p1*, repeat *-*. On the wrong side rows, knit the knit sts and purl the purl sts.- Stockinette st: knit the right side rows and purl the wrong side rows.- Stockinette stitch in the round: knit all rows.- Ribbing in the round: *k1, p1*, repeat *-*.- Intarsia: all different-coloured fields are knitted with their own ball of yarn. Twist the different strands around each other on the WS to prevent holes at the colour changes. Tension22 stitches and 28 rows in 4€ /10cm over stocking stitch on 4mm needles. NoteThe sweater is knitted top-down, first working flat to create a slit at the neck. The rest of the piece is knitted in stripes in the round, with a vertical stripe running down the centre back. The sleeves are worked flat and the apple patches in intarsia.
Top part of body
Using Yarn A, Cast on 69 (73, 77, 81) on smaller needles (3.25mm) using the long tail method. Do not join to work in the round but work back and forth in 1 x 1 rib for 5 (5, 5, 5) rows. To create a neat edge, k the first st and slip the last st purlwise with yarn in front on all rows.
Change to larger needles (4mm) and continue by working back and forth in stocking stitch while continuing to k the first st and slip the last st purlwise with yarn in front on all rows to create a neat edge.
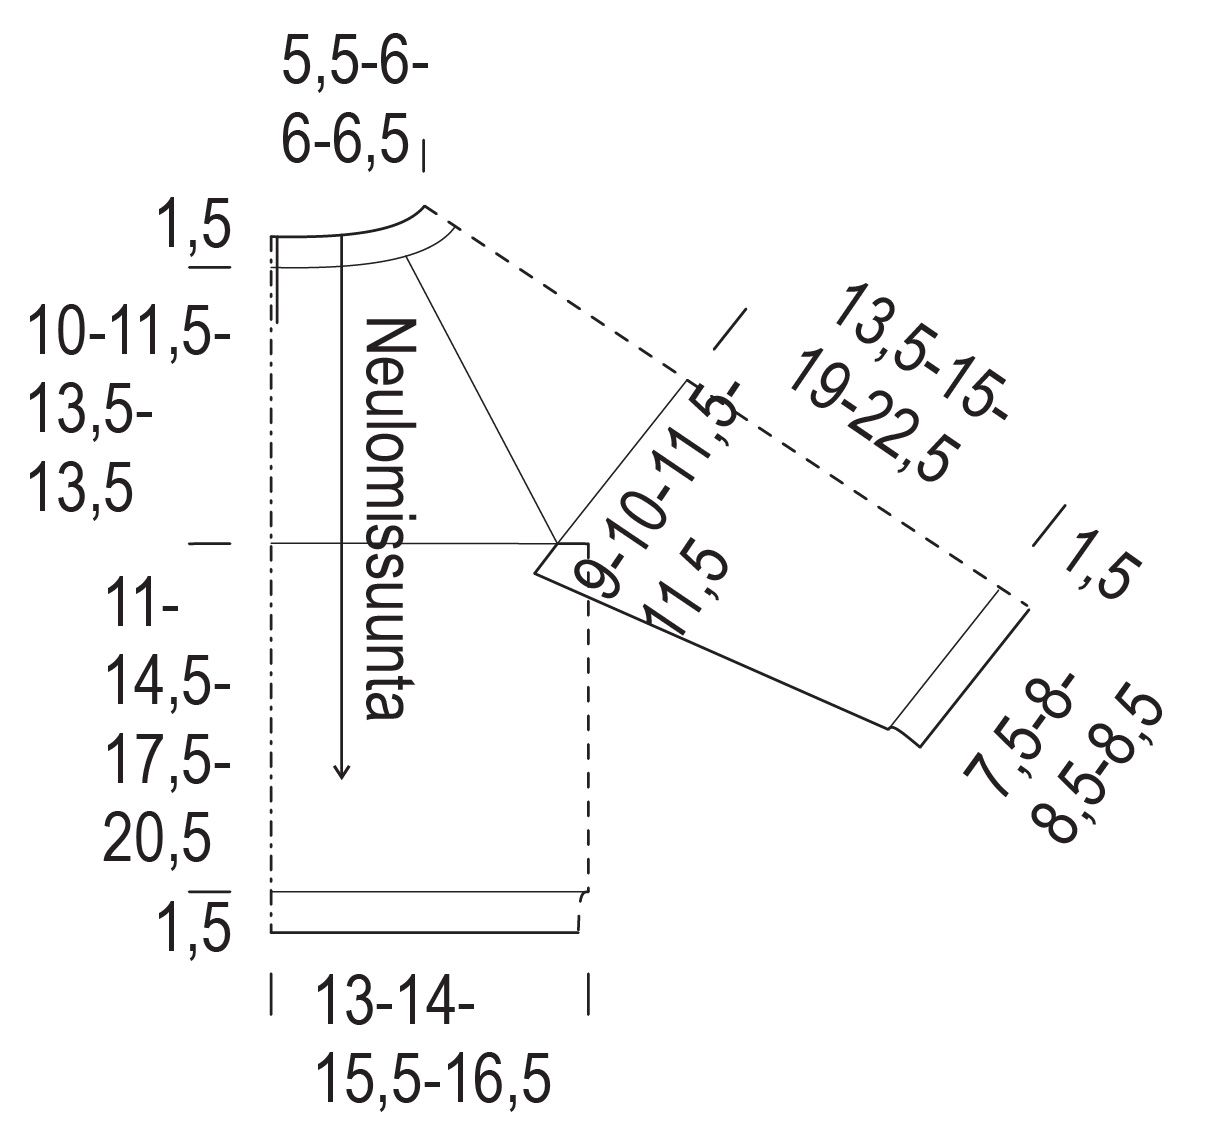
Set up row (WS): mark the raglan sts as follows. p 13 (13, 14, 15 ) for left back opening, PM, p 9 (10, 11, 11) for left sleeve, PM, p 25 (27, 27, 29) for front, PM, p (9, 10, 11, 11) for right sleeve, PM, p 13 (13, 14, 15) for right back opening.
Continue working back and forth in stocking stitch with raglan increases on the RS rows as follows:
Row 1 (RS): [k to marker, M1R, SM, k1, M1L] four times, k to end 8 sts increased, 77 (81, 85, 89) sts.
Row 2 (WS): p to end of row, slipping the markers as you go.
Row 3 (RS): [k to marker, M1R, SM, k1, M1L] four times, k to end. sts increased, 85 (89, 93, 97) sts
Row 4 (WS): p to end of row, slipping the markers as you go.
Row 5 (RS): [k to marker, M1R, SM, k1, M1L] four times, k to end. 8 sts increased 93, (97, 101, 105) sts
Rows 6 (WS): p to end of row, slipping the markers as you go.
Row 7 (RS): [k to marker, M1R, SM, k1, M1L] four times, k to end. 8 sts increased 101 (105, 109, 113) sts
Row 8 (WS): p to end of row, slipping the markers as you go.
Row 9 (RS): [k to marker, M1R, SM, k1, M1L] four times. k to end. 8 sts increased 109 (113, 117, 121) sts. On the next row the stripe sequence begins. The stripe sequence is as follows: 2 rows Yarn B 8 rows Yarn A Row
10 (WS): Change to Yarn B, p to end of row, slipping the markers as you go.
Row 11 (RS): Join the work by knitting the first and last sts together and continue by working in the round, PM to indicate beginning of round, [k to marker, M1R, SM, k1, M1L] four times, k to end. 8 sts increased and 1 st decreased 116 (120, 124, 128) sts remain.
Continue Raglan Shaping in the round and set up vertical stripe down centre back. From this point, all rows begin and end with 1 st purled in Yarn B. This creates a decorative vertical stripe down the centre back of the jumper which hides the jog usually created by knitting stripes in the round. Make sure to twist Yarn A behind Yarn B as you would when working fair isle and pull the strands snug to avoid creating a ladder between the colours.
Set up Row 1: p1 in Yarn B, k till last st, slipping markers as you go, p1 in Yarn B
Set up Row 2: p1 in Yarn B, [k to marker, M1R, SM, K1, M1L] four times, k to last st, p1 in Yarn B. 8 sts increased. 124 (128, 132, 136) sts.
Work Set up Rows 1 and 2 a further 7 (9, 12, 12) times till 180 (200, 228, 232)
Divide Body and Sleeves as follows: p1 in Yarn B, k to marker, remove marker, k1, place next 36 (41, 48, 48) sts on holder for right sleeve, remove marker, CO 4 sts using backward loop method, k to marker, remove marker, k1, place next 36 (41, 48, 48) sts on holder for left sleeve, remove marker, CO 4 sts using backward loop method, k to last st, p1 in Yarn B. 116 (126, 140, 144) sts remain for body.
Continue Body
Continue working in the round in stripe sequence, always purling the first and last stitch with Yarn B until the work measures 8.5 (10.5, 12.5, 13.5) in / 22.5 (27.5, 32.5, 35) cm from centre front.
Change to the smaller needles (3.25mm) and working only in Yarn A, continue by working back and forth, again creating a neat edge by knitting the first st and slipping the last st purlwise with yarn in front on all rows.
Work 5 (5, 5, 5) rows in 1x1 rib. Cast off all sts in rib.
Sleeves (make 2)
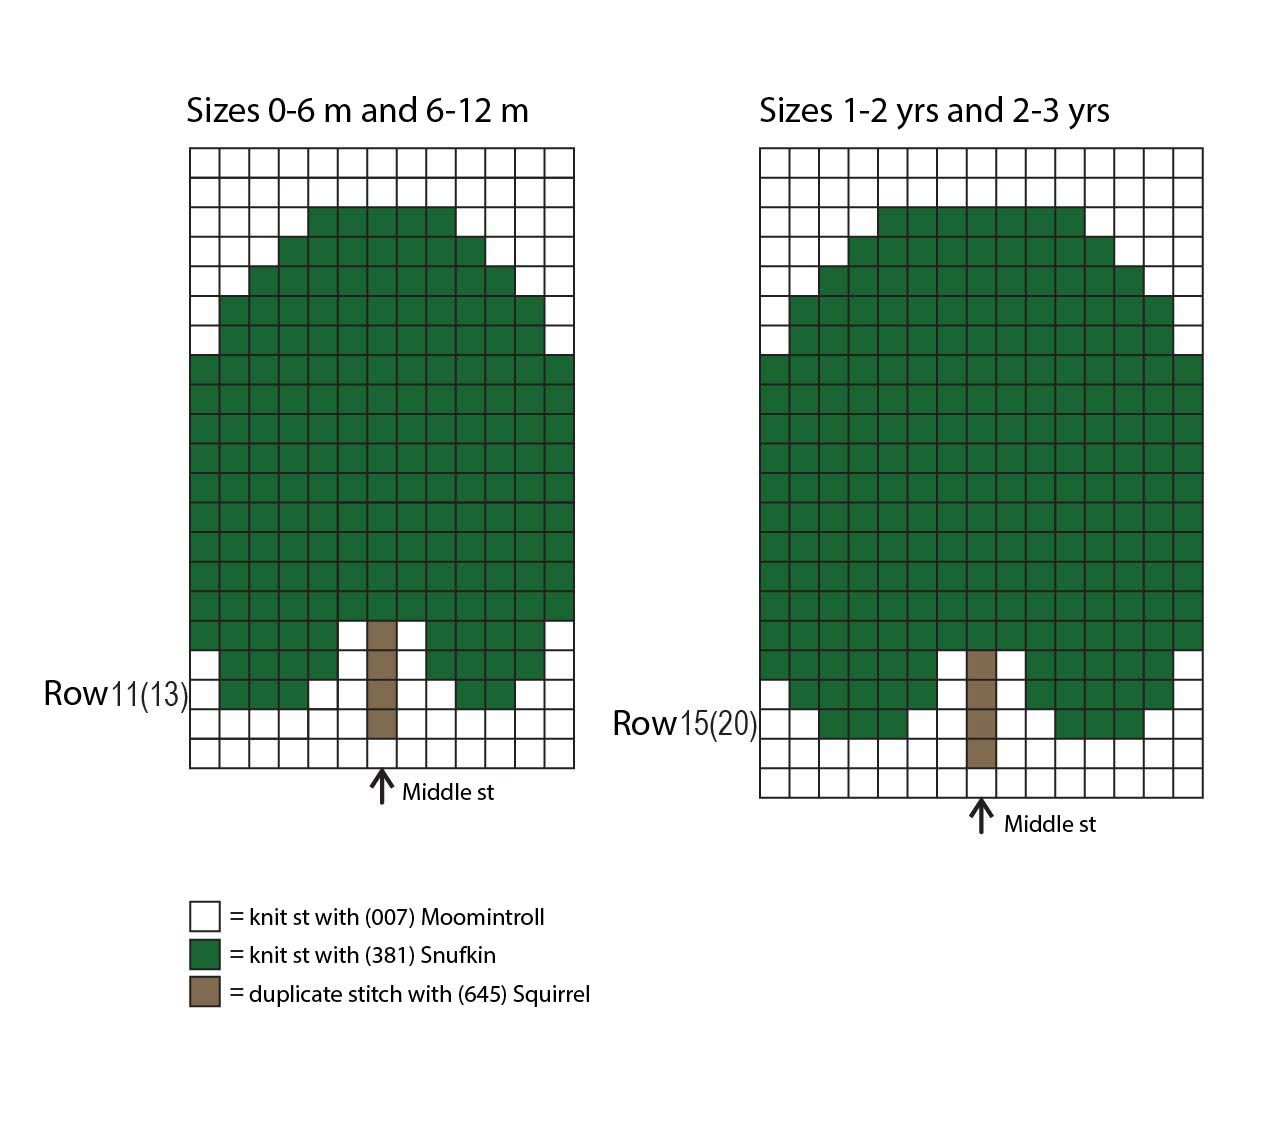
The sleeves are worked flat, going back and forth in stocking stitch following the stripe sequence as set in body, there is no need to restart the stripe sequence, simply start from where you left off when you divided the body and sleeves. Remember to carry Yarn B up the side of the work ready for the next stripe. Mirrored decreases are worked to shape the sleeves, while at the same time, the apple patch is placed and worked in intarsia following the chart. You will be doing three things at once; working in the set stripe sequence as well as both counting when to work the decrease rows and when to place the apple, so we recommend having a notebook handy so can keep a tally to help you remember where you are.
With the front facing and using the larger needed (4mm), start in the centre of the 4 cast on sts at underarms, pick up and knit 2 cast on sts, knit across 36 (41, 48, 48) sleeve sts, pick up and knit the 2 remaining cast on sts at underarms. 40 (45, 52, 52) sts on needle.
Next Row (WS): p
In this next section the sleeve is shaped with mirrored decreases as outlined below while adding the apple patch. Place the apple in the centre of the sleeve on Row 11 (13, 15, 20) (counted from where you have just picked up the previously held sleeve sts).
Next Row: Decrease Row (RS): k2, k2tog, k to last 4, ssk, k2. 2 sts decreased, 38 (43, 50, 50) sts remain.
Repeat this decrease row on 2 (3, 6, 6) following 6th (6th, 4th, 4th) rows till 34 (37, 38, 38) sts remain.
Continue straight in stocking stitch till sleeve measures 5 (5.5, 7, 8.5) in / 13.5 (15, 18.5, 22.5) cm from underarm.
Change to the smaller needles (3.25mm) and work 5 rows in rib. Cast off all sts in rib.
Finishing
Add the stalk to the apple using duplicate stitch following the chart. Seam together sleeves using mattress stitch.
Crochet a loop of chain sts at the top opening at the centre back and sew on a button on the opposite side.
Weave in all the ends and block to measurements.
Apple Pullover Novita Muumitalo
Size(s)
0-6 kk (6-12 kk) 1-2 v (2-3 v)
Finished dimensions
Chest Circumference 18/45.5 (20/51) 22/56 (23/58.5) Inch/cmPullover Circumference 20/51 (22/56)25/64 (26/66) Inch/cmPullover length 9.5/24(11.5/29) 13.5/34 (14.5/37) Inch/cmSleeve length (from underarm) 6/15 (6.5/16.5) 8/20.5 (9.5/24) Inch/cmWrist circumference 6/15 (6.5/16.5) 6.75/17(6.75/17) Inch/cm
Yarn demand
Novita Muumitalo (100g/225m) Yarn A: 1 (1, 2, 2) x 100g Moomintroll (007) Yarn B: 1 (1, 1, 1) x 100g Stinky (099) Yarn C: Small quantity of Snufkin (381) Yarn D: Small quantity of Novita Nordic Wool in Squirrel (645)
Needles and other supplies
Needles 3.25mm (UK 10, US 3) 60-80cm circular needles as well as needles suitable for working flat and for working small circumferences in the round. 4mm (UK 8, US 6) 60-80cm circular needles as well as needles suitable for working flat and for working small circumferences in the round. 3mm crochet hook Notions 1 button Tapestry needle Measuring tape Scissors
Stitch patterns:- Ribbing: *k1, p1*, repeat *-*. On the wrong side rows, knit the knit sts and purl the purl sts.- Stockinette st: knit the right side rows and purl the wrong side rows.- Stockinette stitch in the round: knit all rows.- Ribbing in the round: *k1, p1*, repeat *-*.- Intarsia: all different-coloured fields are knitted with their own ball of yarn. Twist the different strands around each other on the WS to prevent holes at the colour changes. Tension22 stitches and 28 rows in 4€ /10cm over stocking stitch on 4mm needles. NoteThe sweater is knitted top-down, first working flat to create a slit at the neck. The rest of the piece is knitted in stripes in the round, with a vertical stripe running down the centre back. The sleeves are worked flat and the apple patches in intarsia.
Top part of body
Using Yarn A, Cast on 69 (73, 77, 81) on smaller needles (3.25mm) using the long tail method. Do not join to work in the round but work back and forth in 1 x 1 rib for 5 (5, 5, 5) rows. To create a neat edge, k the first st and slip the last st purlwise with yarn in front on all rows.
Change to larger needles (4mm) and continue by working back and forth in stocking stitch while continuing to k the first st and slip the last st purlwise with yarn in front on all rows to create a neat edge.
Set up row (WS): mark the raglan sts as follows. p 13 (13, 14, 15 ) for left back opening, PM, p 9 (10, 11, 11) for left sleeve, PM, p 25 (27, 27, 29) for front, PM, p (9, 10, 11, 11) for right sleeve, PM, p 13 (13, 14, 15) for right back opening.
Continue working back and forth in stocking stitch with raglan increases on the RS rows as follows:
Row 1 (RS): [k to marker, M1R, SM, k1, M1L] four times, k to end 8 sts increased, 77 (81, 85, 89) sts.
Row 2 (WS): p to end of row, slipping the markers as you go.
Row 3 (RS): [k to marker, M1R, SM, k1, M1L] four times, k to end. sts increased, 85 (89, 93, 97) sts
Row 4 (WS): p to end of row, slipping the markers as you go.
Row 5 (RS): [k to marker, M1R, SM, k1, M1L] four times, k to end. 8 sts increased 93, (97, 101, 105) sts
Rows 6 (WS): p to end of row, slipping the markers as you go.
Row 7 (RS): [k to marker, M1R, SM, k1, M1L] four times, k to end. 8 sts increased 101 (105, 109, 113) sts
Row 8 (WS): p to end of row, slipping the markers as you go.
Row 9 (RS): [k to marker, M1R, SM, k1, M1L] four times. k to end. 8 sts increased 109 (113, 117, 121) sts. On the next row the stripe sequence begins. The stripe sequence is as follows: 2 rows Yarn B 8 rows Yarn A Row
10 (WS): Change to Yarn B, p to end of row, slipping the markers as you go.
Row 11 (RS): Join the work by knitting the first and last sts together and continue by working in the round, PM to indicate beginning of round, [k to marker, M1R, SM, k1, M1L] four times, k to end. 8 sts increased and 1 st decreased 116 (120, 124, 128) sts remain.
Continue Raglan Shaping in the round and set up vertical stripe down centre back. From this point, all rows begin and end with 1 st purled in Yarn B. This creates a decorative vertical stripe down the centre back of the jumper which hides the jog usually created by knitting stripes in the round. Make sure to twist Yarn A behind Yarn B as you would when working fair isle and pull the strands snug to avoid creating a ladder between the colours.
Set up Row 1: p1 in Yarn B, k till last st, slipping markers as you go, p1 in Yarn B
Set up Row 2: p1 in Yarn B, [k to marker, M1R, SM, K1, M1L] four times, k to last st, p1 in Yarn B. 8 sts increased. 124 (128, 132, 136) sts.
Work Set up Rows 1 and 2 a further 7 (9, 12, 12) times till 180 (200, 228, 232)
Divide Body and Sleeves as follows: p1 in Yarn B, k to marker, remove marker, k1, place next 36 (41, 48, 48) sts on holder for right sleeve, remove marker, CO 4 sts using backward loop method, k to marker, remove marker, k1, place next 36 (41, 48, 48) sts on holder for left sleeve, remove marker, CO 4 sts using backward loop method, k to last st, p1 in Yarn B. 116 (126, 140, 144) sts remain for body.
Continue Body
Continue working in the round in stripe sequence, always purling the first and last stitch with Yarn B until the work measures 8.5 (10.5, 12.5, 13.5) in / 22.5 (27.5, 32.5, 35) cm from centre front.
Change to the smaller needles (3.25mm) and working only in Yarn A, continue by working back and forth, again creating a neat edge by knitting the first st and slipping the last st purlwise with yarn in front on all rows.
Work 5 (5, 5, 5) rows in 1x1 rib. Cast off all sts in rib.
Sleeves (make 2)
The sleeves are worked flat, going back and forth in stocking stitch following the stripe sequence as set in body, there is no need to restart the stripe sequence, simply start from where you left off when you divided the body and sleeves. Remember to carry Yarn B up the side of the work ready for the next stripe. Mirrored decreases are worked to shape the sleeves, while at the same time, the apple patch is placed and worked in intarsia following the chart. You will be doing three things at once; working in the set stripe sequence as well as both counting when to work the decrease rows and when to place the apple, so we recommend having a notebook handy so can keep a tally to help you remember where you are.
With the front facing and using the larger needed (4mm), start in the centre of the 4 cast on sts at underarms, pick up and knit 2 cast on sts, knit across 36 (41, 48, 48) sleeve sts, pick up and knit the 2 remaining cast on sts at underarms. 40 (45, 52, 52) sts on needle.
Next Row (WS): p
In this next section the sleeve is shaped with mirrored decreases as outlined below while adding the apple patch. Place the apple in the centre of the sleeve on Row 11 (13, 15, 20) (counted from where you have just picked up the previously held sleeve sts).
Next Row: Decrease Row (RS): k2, k2tog, k to last 4, ssk, k2. 2 sts decreased, 38 (43, 50, 50) sts remain.
Repeat this decrease row on 2 (3, 6, 6) following 6th (6th, 4th, 4th) rows till 34 (37, 38, 38) sts remain.
Continue straight in stocking stitch till sleeve measures 5 (5.5, 7, 8.5) in / 13.5 (15, 18.5, 22.5) cm from underarm.
Change to the smaller needles (3.25mm) and work 5 rows in rib. Cast off all sts in rib.
Finishing
Add the stalk to the apple using duplicate stitch following the chart. Seam together sleeves using mattress stitch.
Crochet a loop of chain sts at the top opening at the centre back and sew on a button on the opposite side.
Weave in all the ends and block to measurements.