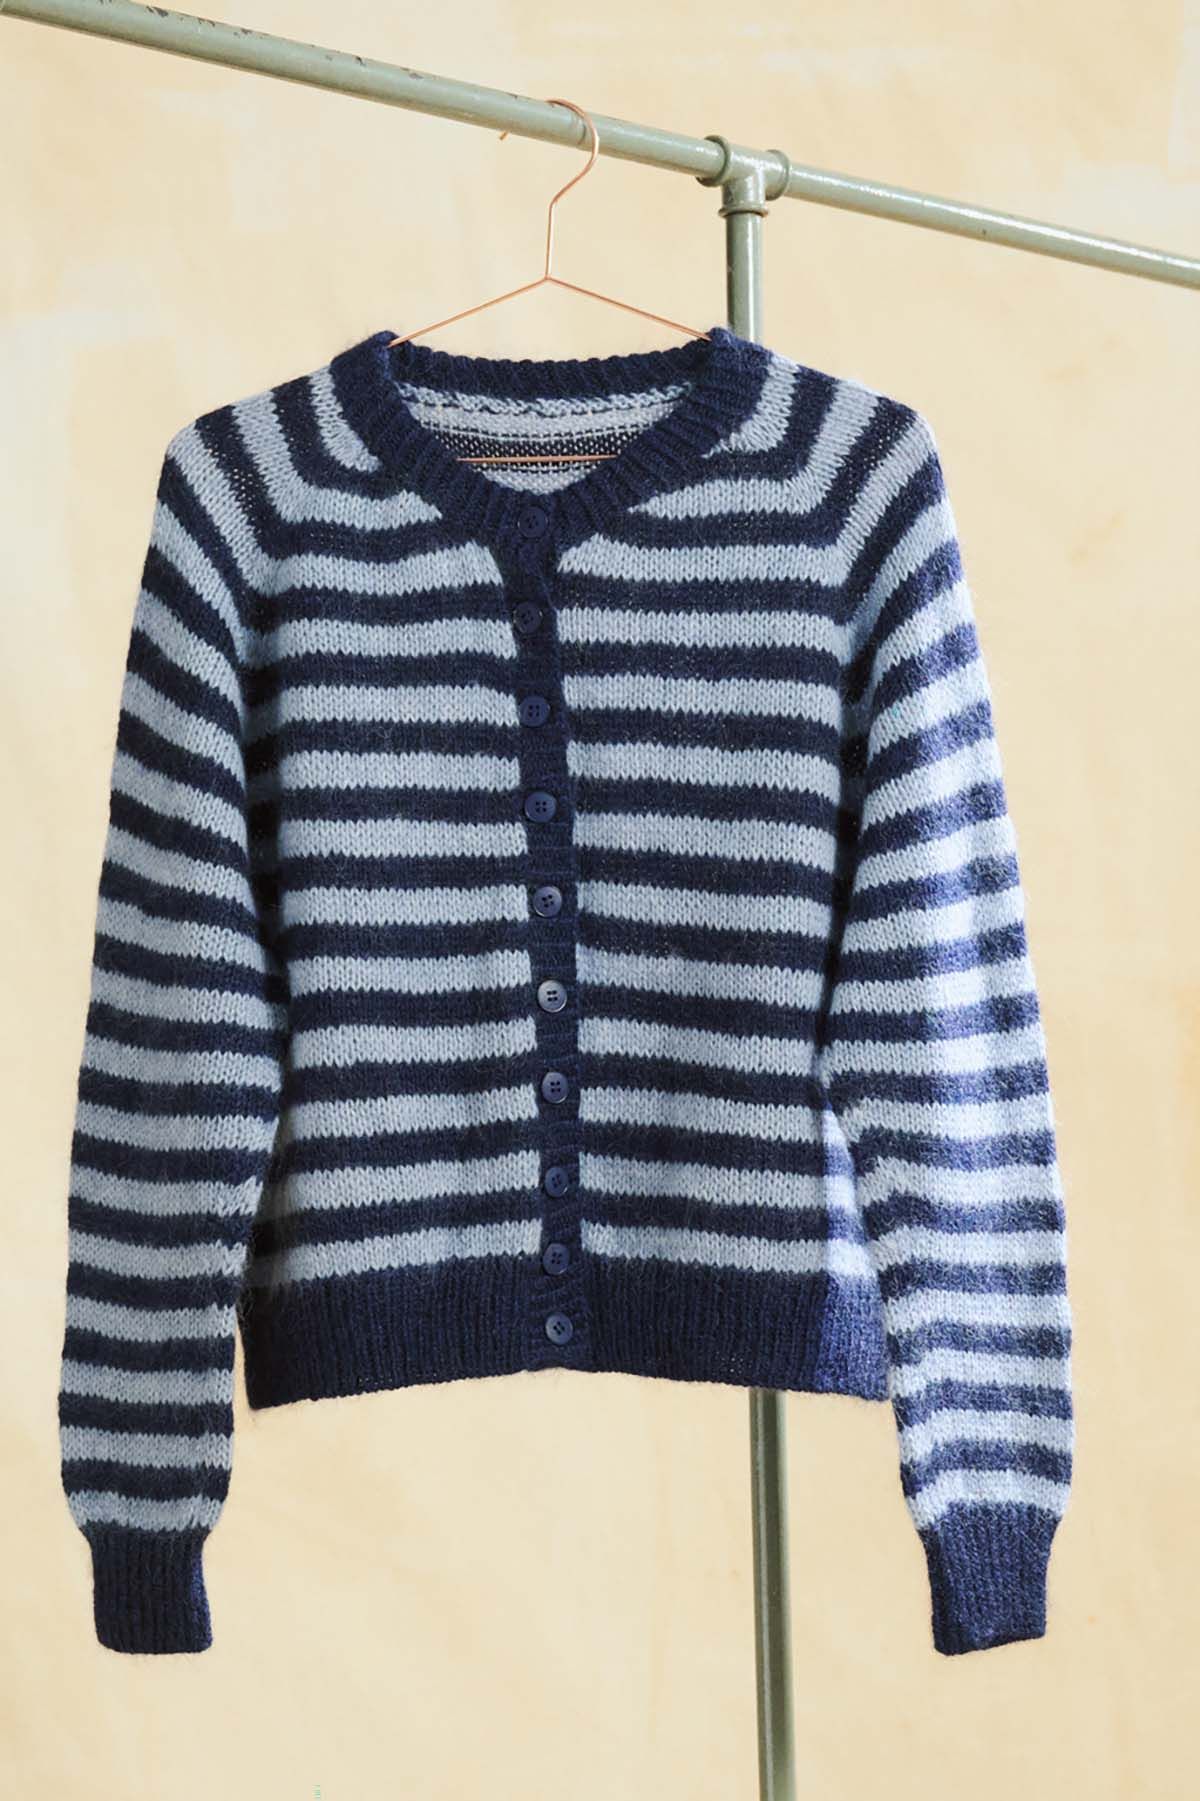
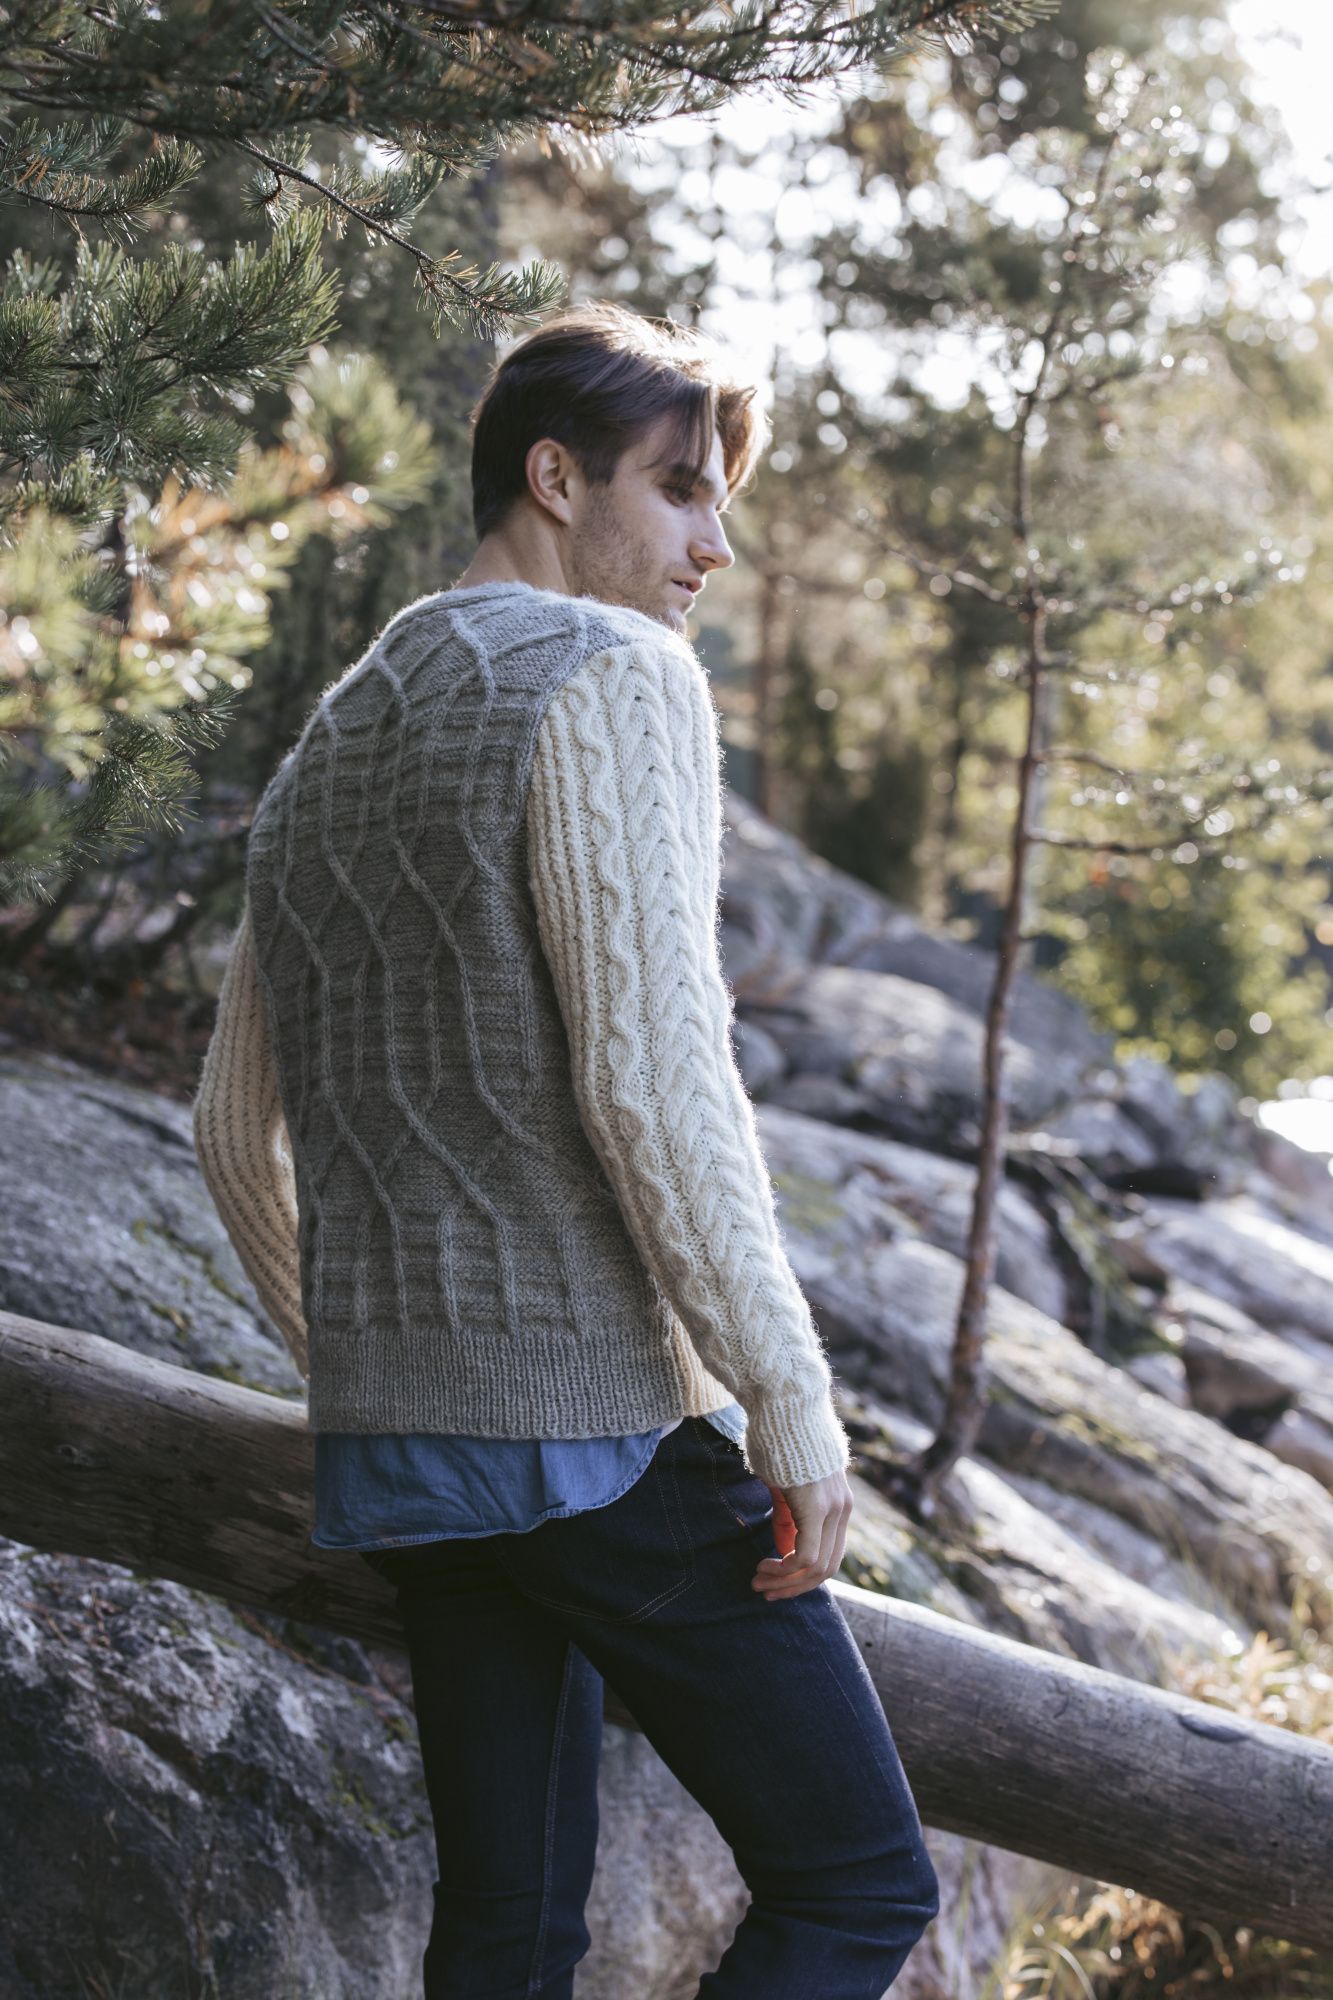
Woodsman cable cardigan Novita Natura
Symmetry is the norm, especially when cables are concerned. Sleeves alike, the back side and half the front are knitted in grey Novita Natura. And to double up the assymmetry, the cable patterns in the front halves are different.
Designer
Varpu Rapeli
Language
Size(s)
S(M)L(XL)XXL
Finished dimensions
body circumference 100(108)116(124)132 cm / 39¼(42½)45¾(48¾)52 in length 65(67)69(71)73 cm / 25½(26½)27¼(28)28¾ in inner sleeve length 47(48)49(50)51 cm / 18½(19)19¼(19¾)20 in
Yarn demand
Novita Natura Off White 350(350)400(400)450 g Clay approx. 300(300)350(350)400 g
Needles and other supplies
Needles: Novita 5 mm (UK 6 / US 8) or size needed to obtain gauge Other supplies: 4 buttons
Finished dimensions
body circumference 100(108)116(124)132 cm / 39¼(42½)45¾(48¾)52 in length 65(67)69(71)73 cm / 25½(26½)27¼(28)28¾ in inner sleeve length 47(48)49(50)51 cm / 18½(19)19¼(19¾)20 in
Stitch patterns:
- Ribbing:
*k1, p1*, repeat *-*. On the wrong side rows
Back
Using Clay cast on 102(110)118(126)134 sts and begin ribbing with k1 (WS). Work ribbing for 8 cm.
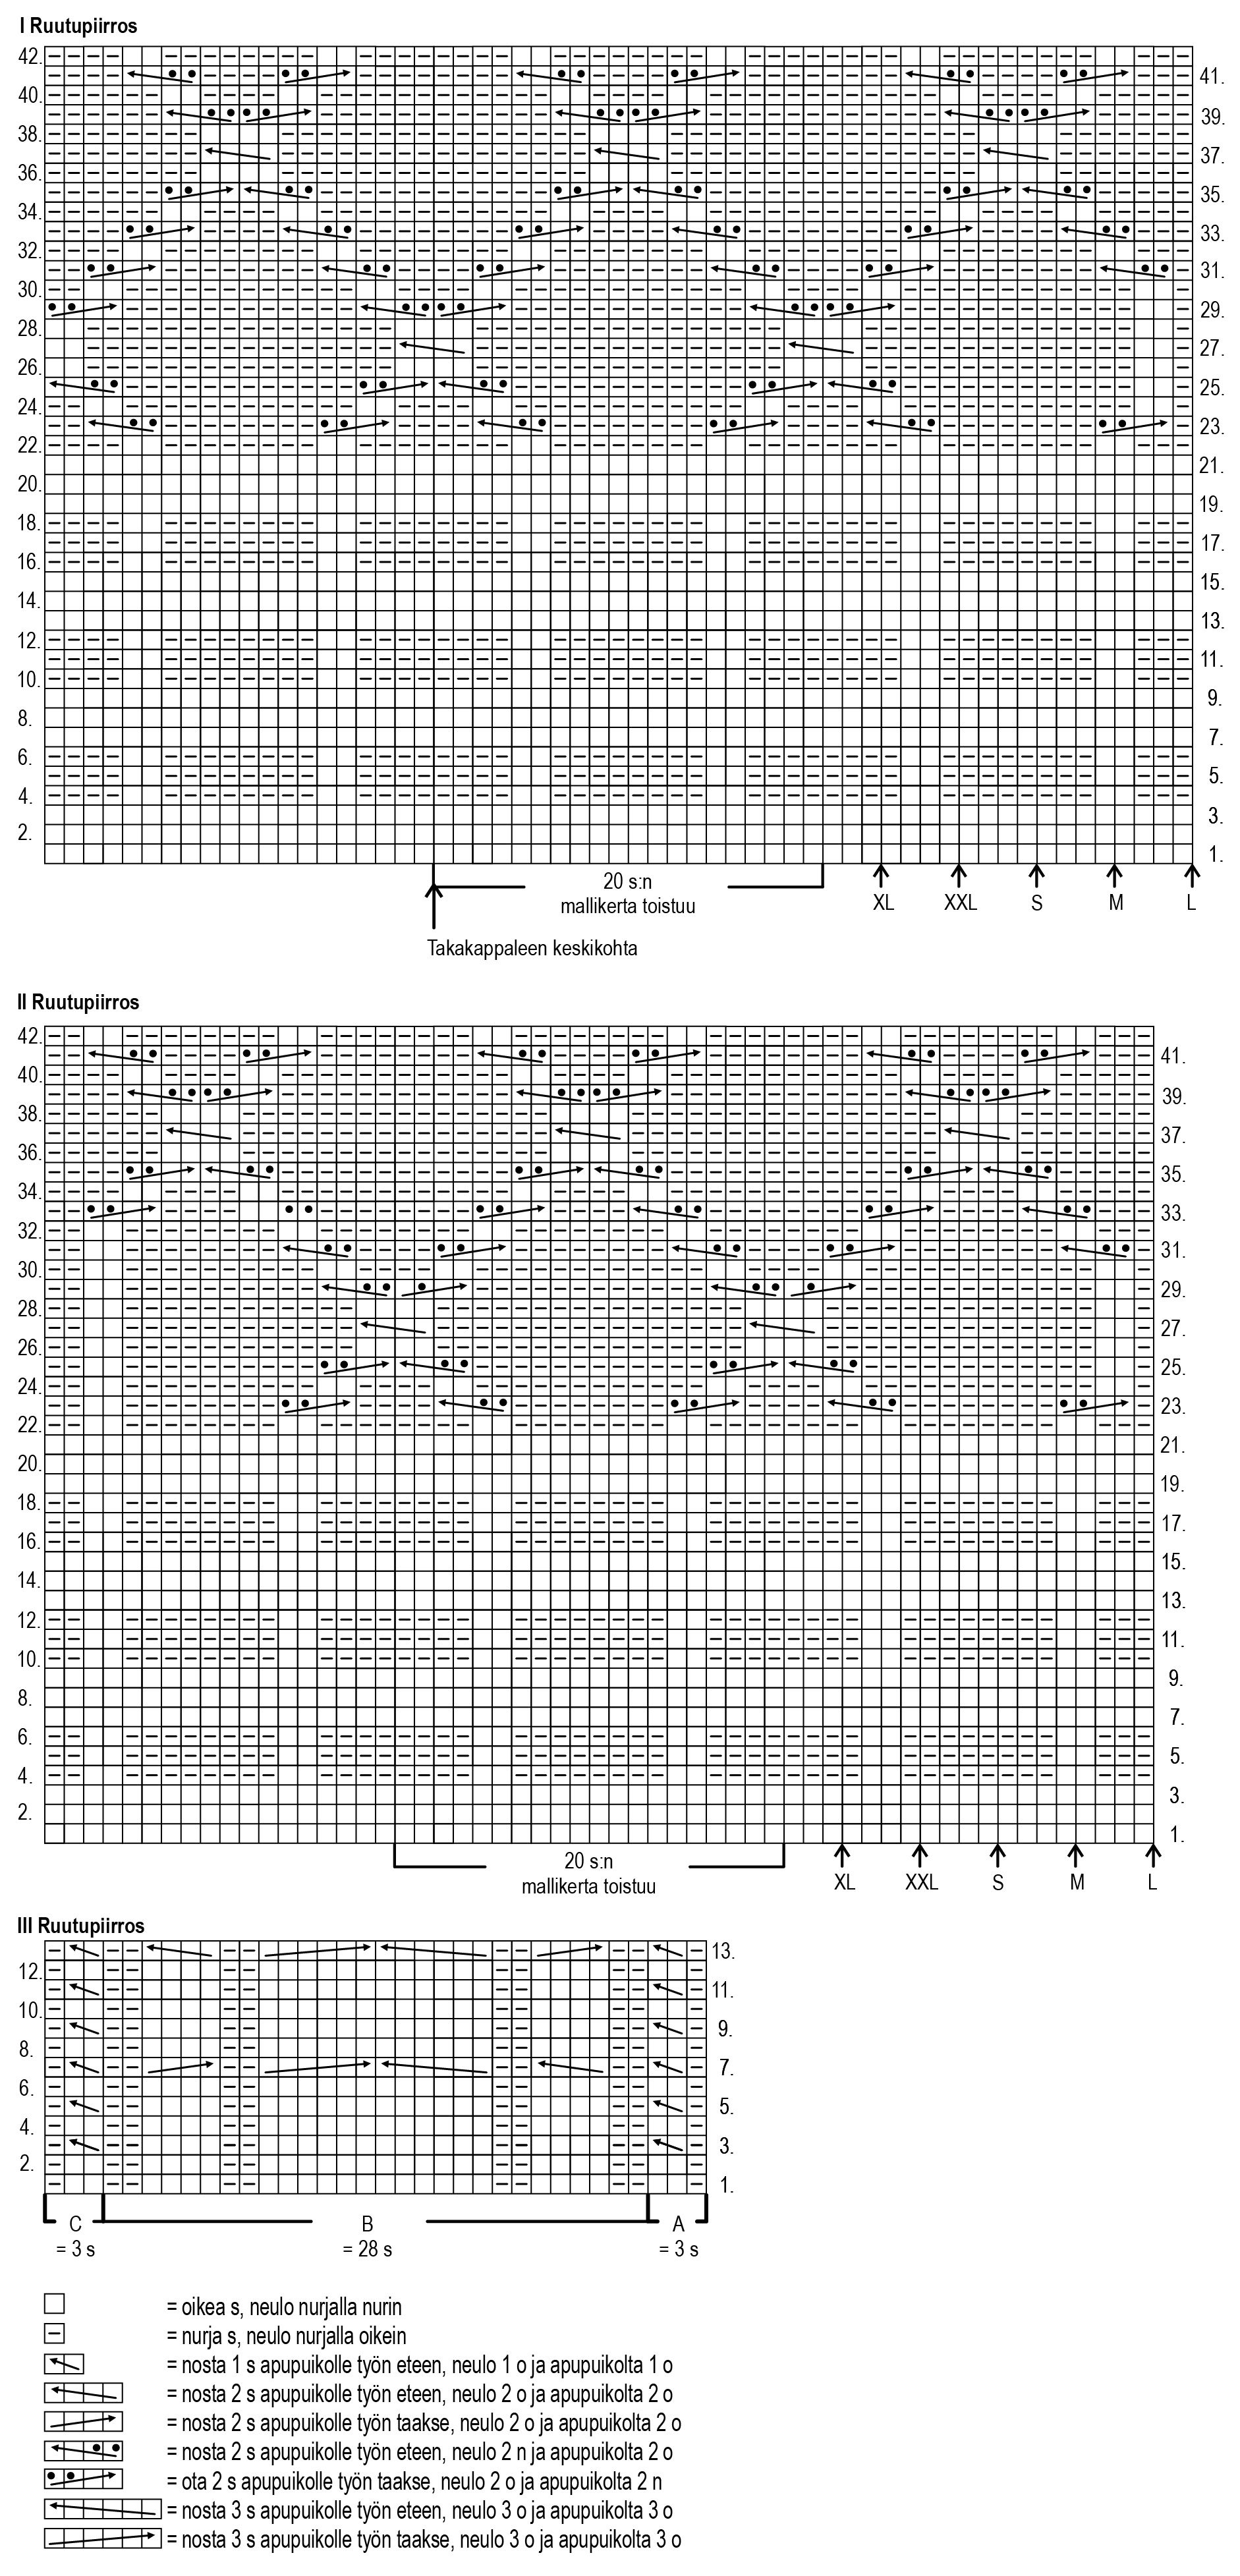
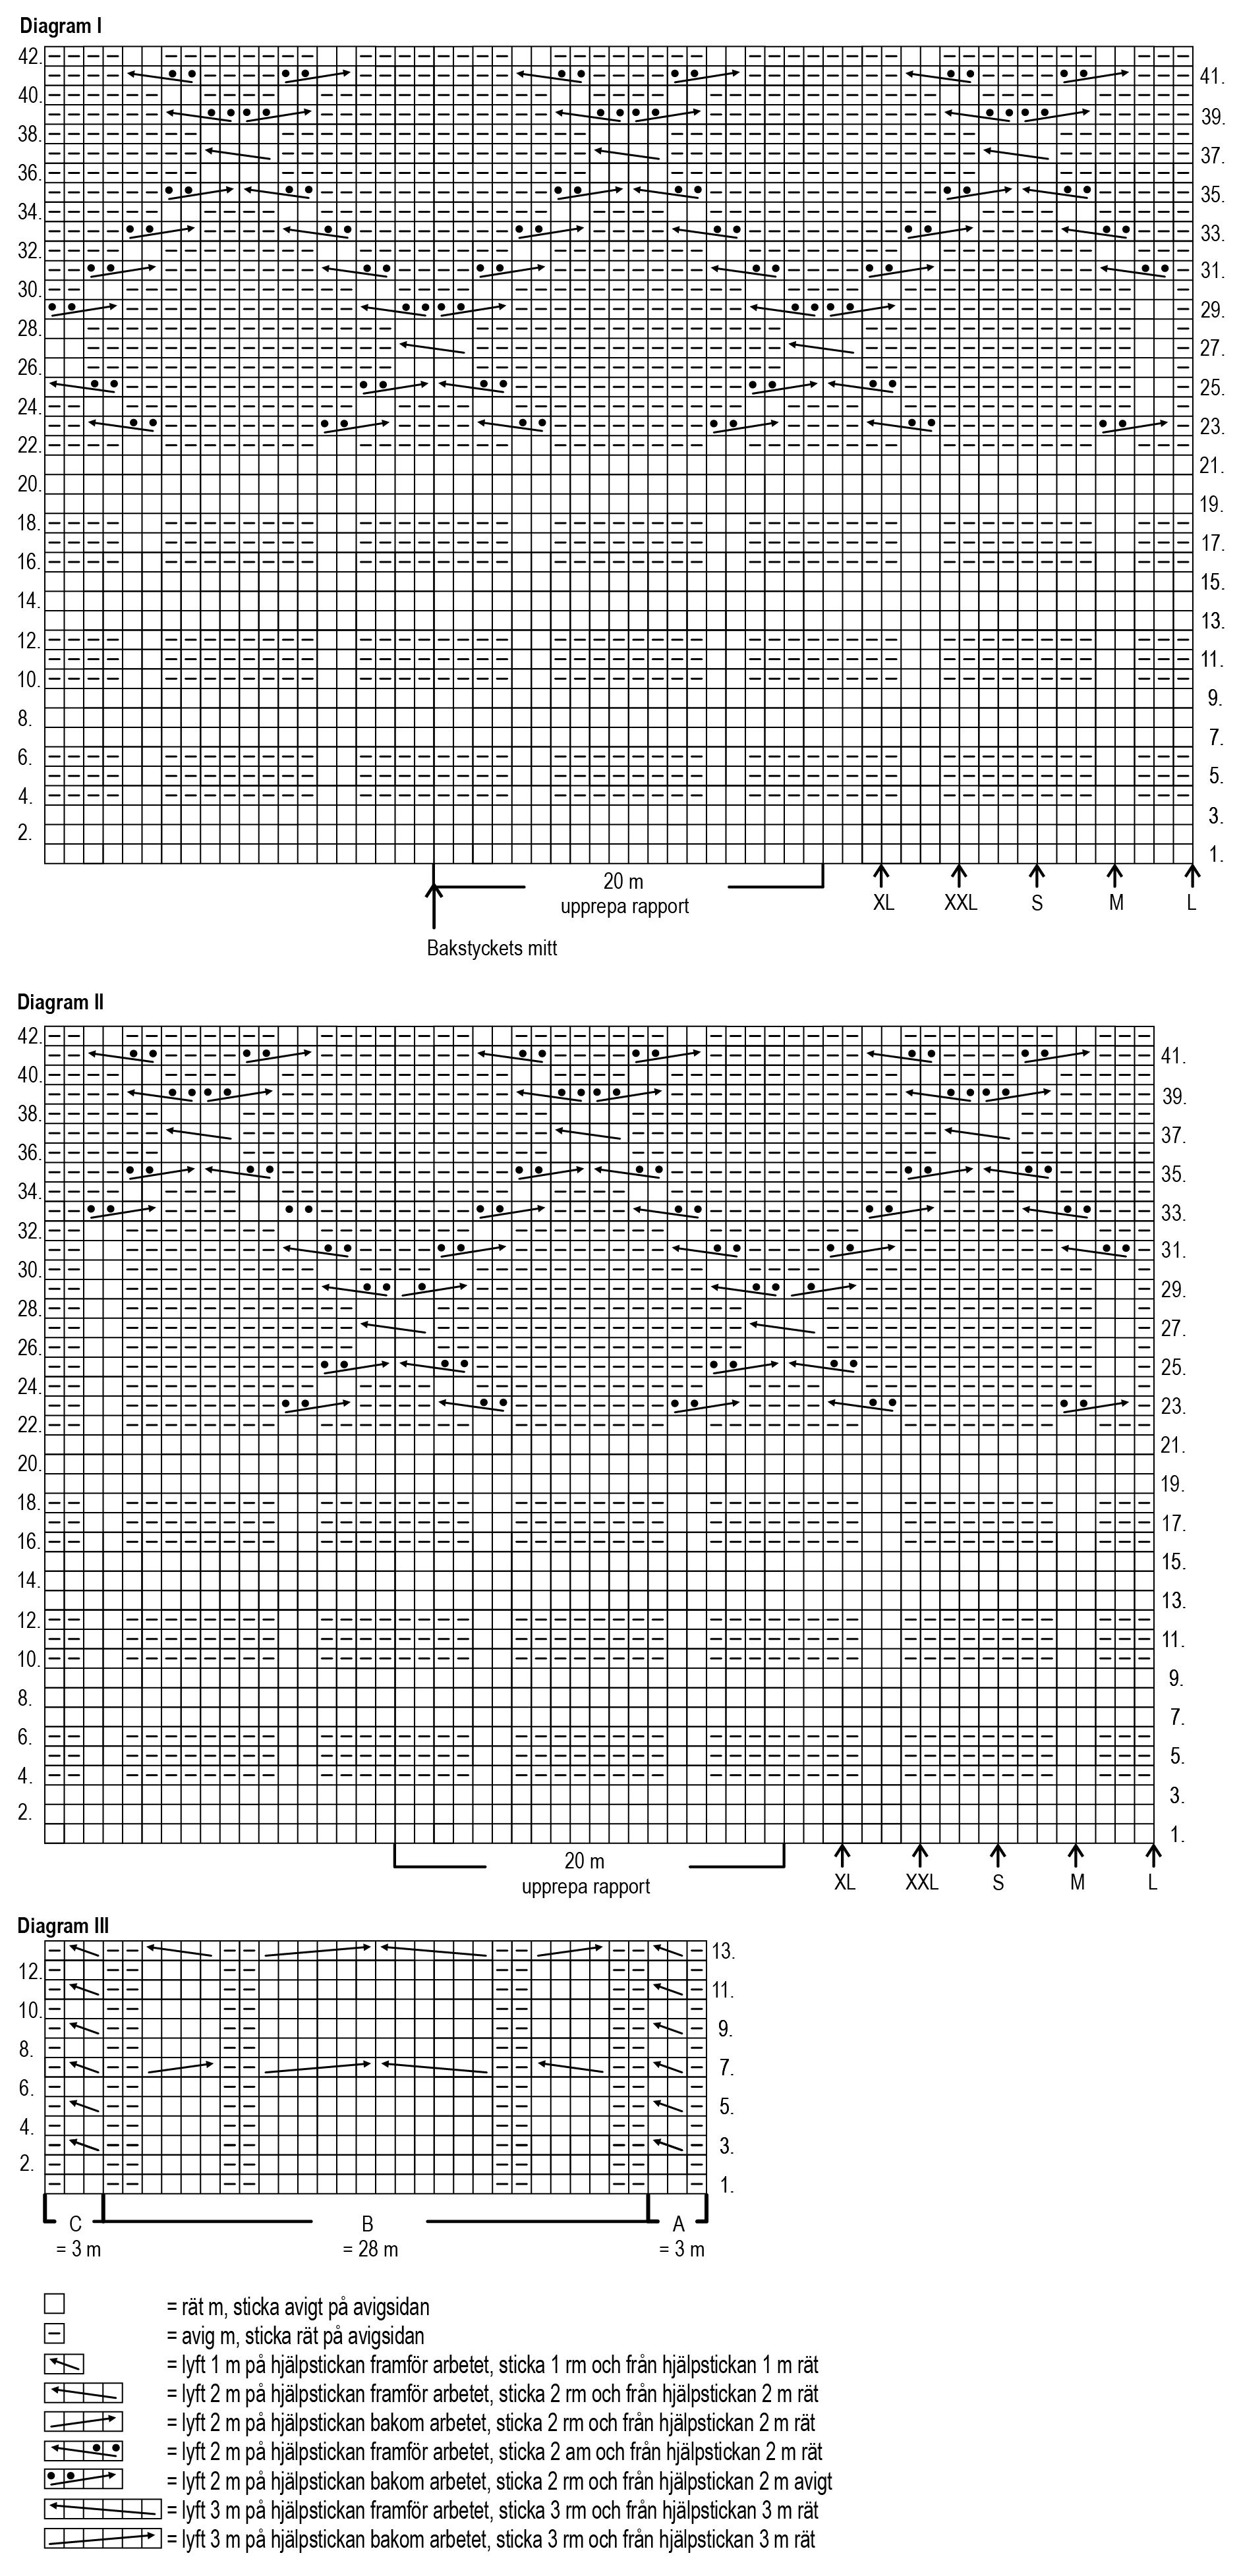
Begin the cable pattern on row 1 of chart I. The starting point for each size is marked with an arrow. Keep repeating the 20 st pattern as needed. Work rows 2-42 of the chart, then keep repeating rows 1-42.
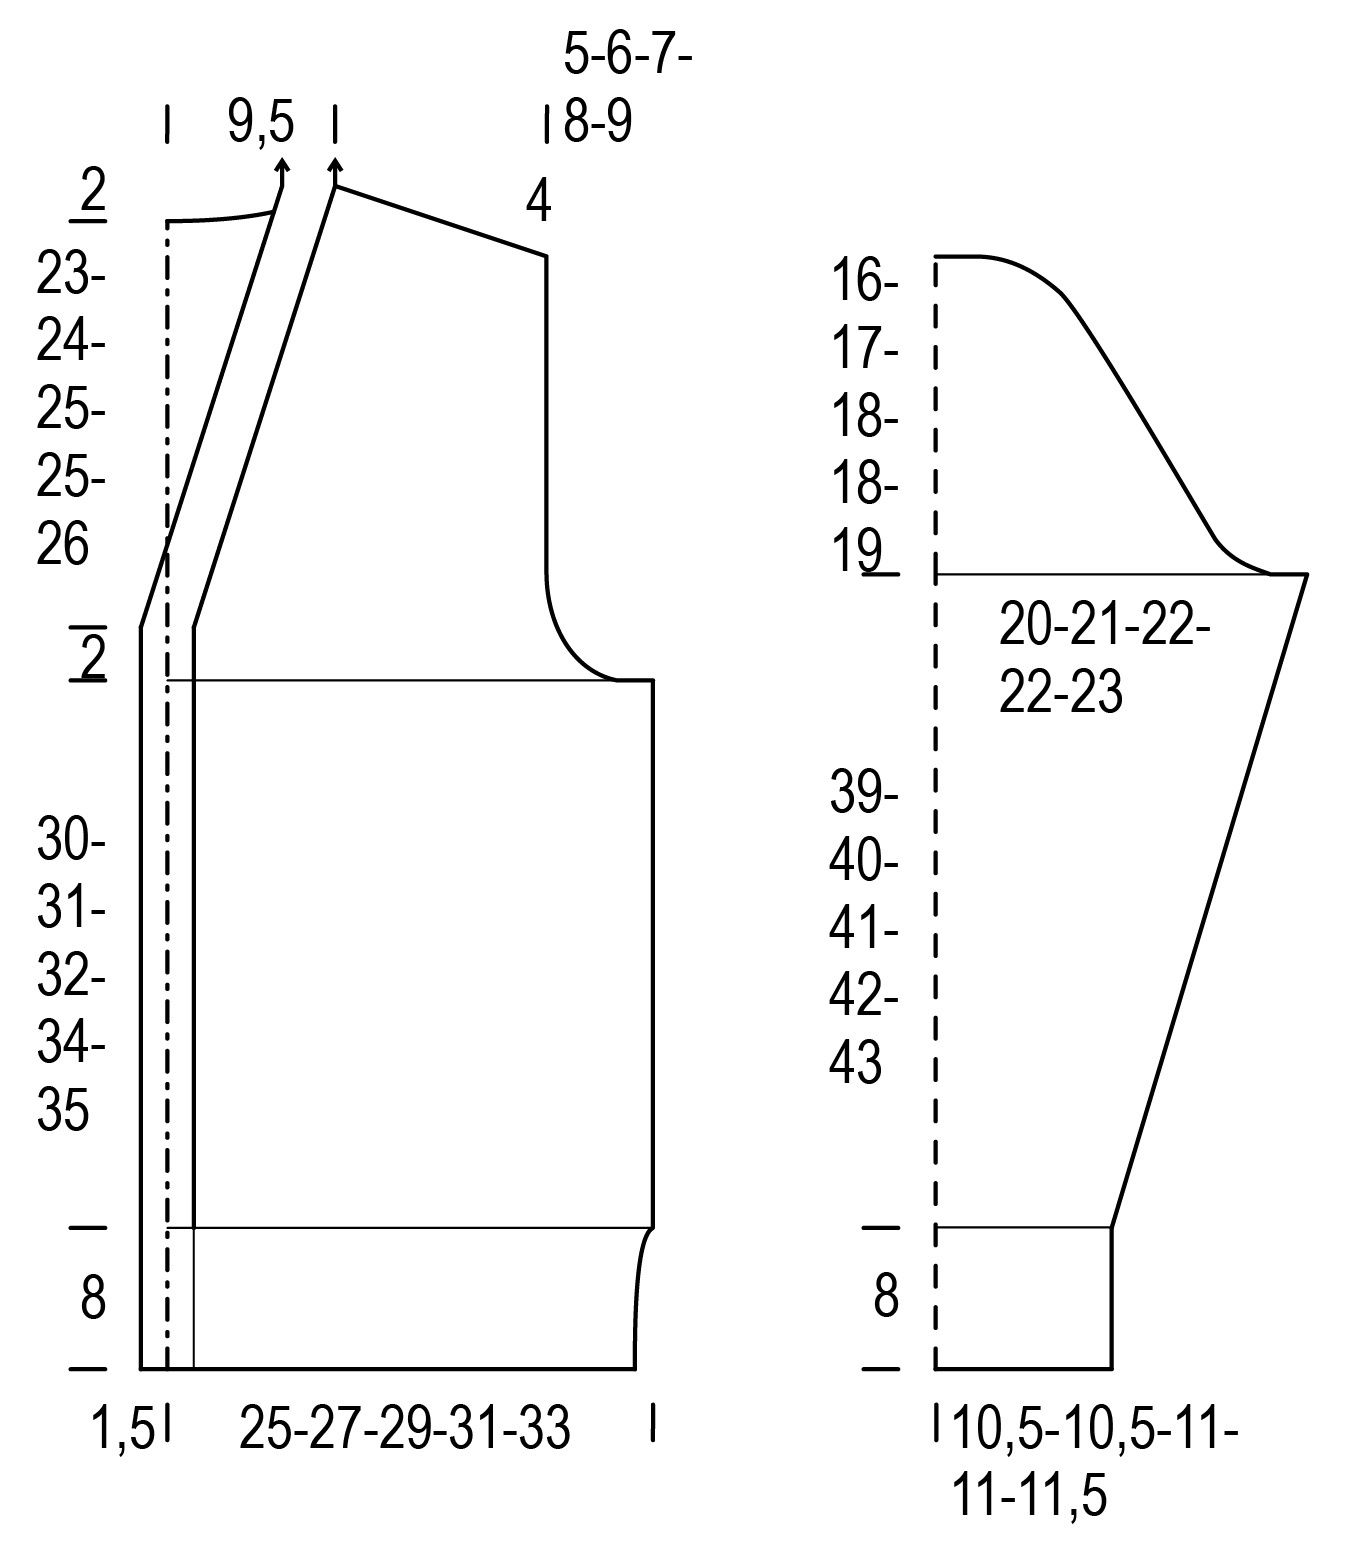
When the piece measures 38(39)40(42)43 cm, on every other row bind off 1x4(4)6(6)8 sts, 1(2)2(3)3x2 sts and 4x1 st at both ends for the armholes = 82(86)90(94)98 sts.
When the armhole measures 23(24)25(25)26 cm, on every other row bind off 3x4 sts and 2x5 sts (1x4 sts and 4x5 sts) 4x5 sts and 1x6 sts (2x5 sts and 3x6 sts) 5x6 sts at both ends.
Note: When the armhole measures 25(26)27(27)28 cm, bind off the middle 28 sts for the neckline. Work one shoulder at a time. On every other row bind off 1x3 sts and 1x2 sts at the neckline edge.
Knit the other side in the same manner.
Left front
Using Clay cast on 57(61)65(69)73 sts and begin ribbing with p1 (WS).
When the ribbing measures 2 cm, make a buttonhole at the left end (front edge): on a RS row work to last 5 sts, yo, work 2 sts together, work to end.
When the ribbing measures approx. 8 cm and you have last worked a WS row, leave 8 sts at the left end on hold for the border. 49(53)57(61)65 sts now on the needles.
Begin the cable pattern on row 1 of chart II. The starting point for each size is marked with an arrow. Repeat the 20 st pattern 1(1)1(2)2 time(s), work the 18 sts at the left end, cast on 1 st = 50(54)58(62)66 sts.
Keep working 1 st at left in garter st. Work rows 2-42 of the chart, then keep repeating rows 1-42.
When the piece measures 38(39)40(42)43 cm, on every other row bind off 1x4(4)6(6)8 sts, 1(2)2(3)3x2 sts and 4x1 st at the right end for the armhole = 40(42)44(46)48 sts.
When the armhole measures 2 cm, begin neckline decreases at the left end: on a RS row work to last 2 sts, k2tog. Repeat the decreases every 2 cm 4(5)6(6)7 more times and then 13(12)11(11)10 times every 1 cm.
When the armhole measures 23(24)25(25)26 cm, on every other row bind off 3x4 sts and 2x5 sts (1x4 sts and 4x5 sts) 4x5 sts and 1x6 sts (2x5 sts and 3x6 sts) 5x6 sts at the right end.
Right front
Using Off White cast on 57(61)65(69)73 sts and begin ribbing with p1 (WS).
When the ribbing measures approx. 8 cm and you have last worked a WS row, leave 8 sts at the right end on hold for the border. 49(53)57(61)65 sts now on the needles.
Begin the cable pattern on row 1 of chart III: cast on 1 st, work 2 sts in reverse stockinette st, work section A 3 times (= 9 sts), section B (= 28 sts), section C 3(4)6(7)8 times [= 9(12)18(21)24 sts], work 1(2)0(1)2 st(s) in reverse stockinette st = 50(54)58(62)66 sts. Keep working 1 st at the right end in garter st. Keep repeating rows 2-13 of the chart.
When the piece measures 38(39)40(42)43 cm, on every other row bind off 1x4(4)6(6)8 sts, 1(2)2(3)3x2 sts and 4x1 st at the left end for the armhole = 40(42)44(46)48 sts.
When the armhole measures 2 cm, begin neckline decreases at the right end: on a RS row k2tog through back loop, work to end. Repeat the decreases every 2 cm 4(5)6(6)7 more times and then 13(12)11(11)10 times every 1 cm.
When the armhole measures 23(24)25(25)26 cm, on every other row bind off 3x4 sts and 2x5 sts (1x4 sts and 4x5 sts) 4x5 sts and 1x6 sts (2x5 sts and 3x6 sts) 5x6 sts at the left end.
Sleeves
Using Off White cast on 44(44)46(46)48 sts and work ribbing for 8 cm.
Begin the cable pattern on row 1 of chart III: work 2(2)0(0)1 st(s) in reverse stockinette st, work section A 2(2)3(3)3 times [= 6(6)9(9)9 sts], section B (= 28 sts), section C 2(2)3(3)3 times [= 6(6)9(9)9 sts], work 2(2)0(0)1 st(s) in reverse stockinette st. Keep repeating rows 2-13 of the chart.
When the piece measures 10 cm, begin increases at both ends as follows:
1st increase row: (RS) work 6(6)4(4)5 sts, increase 1 knit st (= knit the strand of yarn between the sts through the back loop), work to last 6(6)4(4)5 sts, increase 1 knit st, work to end = 46(46)48(48)50 sts.
Work the WS row.
2nd increase row: (RS) work 7(7)5(5)6 sts, increase 1 knit st, work to last 7(7)5(5)6 sts, increase 1 knit st, work to end = 48(48)50(50)52 sts.
Work the WS row.
3rd increase row: (RS) work 8(8)6(6)7 sts, increase 1 purl st (= purl the strand of yarn between the sts through the back loop), work to last 8(8)6(6)7 sts, increase 1 purl st, work to end = 50(50)52(52)54 sts.
Work the WS row.
6 sts increased in 6 rows (approx. 2 cm): a 2 st cable and 1 purl st between the cables at both ends.
Repeat the increases every 4,5(3,5)3,5(3,5)3 cm 5(6)6(6)7 more times = 80(86)88(88)96 sts.
When the piece measures 47(48)49(50)51 cm, on every other row bind off 1x4(4)5(5)7 sts, 1(1)0(0)0x3 sts, 0(0)1(1)1x2 sts, 17(18)20(20)21x1 st and 4x3 sts at both ends. Bind off remaining sts.
Knit the other sleeve in the same manner.
Finishing
Pin to measurements wrong side up, mist and allow to dry. Sew the shoulder seams and side seams.
Border: Place the 8 right front sts (Off White piece) onto the needles and work in ribbing. On the first row cast on 1 st for seaming at the bodice end = 9 sts. Sew the border to the front edge, lightly stretching it. When the border reaches the shoulder, leave the sts on hold.
Place markers for buttons on the border. The topmost button should be at the starting point of the slanted neckline, the lowest one 2 cm from the hem and the other 2 evenly in between.
Now place the 8 left front sts (Clay piece) onto the needles and work in ribbing. On the first row cast on 1 st for seaming at the bodice end = 9 sts. Make buttonholes at the marked spots as established.
Sew the border to the front piece and the back neckline. Stitch or sew the 9 st seam at the right shoulder.
Sew the sleeve seams and attach the sleeves. Sew on the buttons.
Woodsman cable cardigan Novita Natura
Size(s)
S(M)L(XL)XXL
Finished dimensions
body circumference 100(108)116(124)132 cm / 39¼(42½)45¾(48¾)52 in length 65(67)69(71)73 cm / 25½(26½)27¼(28)28¾ in inner sleeve length 47(48)49(50)51 cm / 18½(19)19¼(19¾)20 in
Yarn demand
Novita Natura Off White 350(350)400(400)450 g Clay approx. 300(300)350(350)400 g
Needles and other supplies
Needles: Novita 5 mm (UK 6 / US 8) or size needed to obtain gauge Other supplies: 4 buttons
Stitch patterns:
- Ribbing:
*k1, p1*, repeat *-*. On the wrong side rows
Back
Using Clay cast on 102(110)118(126)134 sts and begin ribbing with k1 (WS). Work ribbing for 8 cm.
Begin the cable pattern on row 1 of chart I. The starting point for each size is marked with an arrow. Keep repeating the 20 st pattern as needed. Work rows 2-42 of the chart, then keep repeating rows 1-42.
When the piece measures 38(39)40(42)43 cm, on every other row bind off 1x4(4)6(6)8 sts, 1(2)2(3)3x2 sts and 4x1 st at both ends for the armholes = 82(86)90(94)98 sts.
When the armhole measures 23(24)25(25)26 cm, on every other row bind off 3x4 sts and 2x5 sts (1x4 sts and 4x5 sts) 4x5 sts and 1x6 sts (2x5 sts and 3x6 sts) 5x6 sts at both ends.
Note: When the armhole measures 25(26)27(27)28 cm, bind off the middle 28 sts for the neckline. Work one shoulder at a time. On every other row bind off 1x3 sts and 1x2 sts at the neckline edge.
Knit the other side in the same manner.
Left front
Using Clay cast on 57(61)65(69)73 sts and begin ribbing with p1 (WS).
When the ribbing measures 2 cm, make a buttonhole at the left end (front edge): on a RS row work to last 5 sts, yo, work 2 sts together, work to end.
When the ribbing measures approx. 8 cm and you have last worked a WS row, leave 8 sts at the left end on hold for the border. 49(53)57(61)65 sts now on the needles.
Begin the cable pattern on row 1 of chart II. The starting point for each size is marked with an arrow. Repeat the 20 st pattern 1(1)1(2)2 time(s), work the 18 sts at the left end, cast on 1 st = 50(54)58(62)66 sts.
Keep working 1 st at left in garter st. Work rows 2-42 of the chart, then keep repeating rows 1-42.
When the piece measures 38(39)40(42)43 cm, on every other row bind off 1x4(4)6(6)8 sts, 1(2)2(3)3x2 sts and 4x1 st at the right end for the armhole = 40(42)44(46)48 sts.
When the armhole measures 2 cm, begin neckline decreases at the left end: on a RS row work to last 2 sts, k2tog. Repeat the decreases every 2 cm 4(5)6(6)7 more times and then 13(12)11(11)10 times every 1 cm.
When the armhole measures 23(24)25(25)26 cm, on every other row bind off 3x4 sts and 2x5 sts (1x4 sts and 4x5 sts) 4x5 sts and 1x6 sts (2x5 sts and 3x6 sts) 5x6 sts at the right end.
Right front
Using Off White cast on 57(61)65(69)73 sts and begin ribbing with p1 (WS).
When the ribbing measures approx. 8 cm and you have last worked a WS row, leave 8 sts at the right end on hold for the border. 49(53)57(61)65 sts now on the needles.
Begin the cable pattern on row 1 of chart III: cast on 1 st, work 2 sts in reverse stockinette st, work section A 3 times (= 9 sts), section B (= 28 sts), section C 3(4)6(7)8 times [= 9(12)18(21)24 sts], work 1(2)0(1)2 st(s) in reverse stockinette st = 50(54)58(62)66 sts. Keep working 1 st at the right end in garter st. Keep repeating rows 2-13 of the chart.
When the piece measures 38(39)40(42)43 cm, on every other row bind off 1x4(4)6(6)8 sts, 1(2)2(3)3x2 sts and 4x1 st at the left end for the armhole = 40(42)44(46)48 sts.
When the armhole measures 2 cm, begin neckline decreases at the right end: on a RS row k2tog through back loop, work to end. Repeat the decreases every 2 cm 4(5)6(6)7 more times and then 13(12)11(11)10 times every 1 cm.
When the armhole measures 23(24)25(25)26 cm, on every other row bind off 3x4 sts and 2x5 sts (1x4 sts and 4x5 sts) 4x5 sts and 1x6 sts (2x5 sts and 3x6 sts) 5x6 sts at the left end.
Sleeves
Using Off White cast on 44(44)46(46)48 sts and work ribbing for 8 cm.
Begin the cable pattern on row 1 of chart III: work 2(2)0(0)1 st(s) in reverse stockinette st, work section A 2(2)3(3)3 times [= 6(6)9(9)9 sts], section B (= 28 sts), section C 2(2)3(3)3 times [= 6(6)9(9)9 sts], work 2(2)0(0)1 st(s) in reverse stockinette st. Keep repeating rows 2-13 of the chart.
When the piece measures 10 cm, begin increases at both ends as follows:
1st increase row: (RS) work 6(6)4(4)5 sts, increase 1 knit st (= knit the strand of yarn between the sts through the back loop), work to last 6(6)4(4)5 sts, increase 1 knit st, work to end = 46(46)48(48)50 sts.
Work the WS row.
2nd increase row: (RS) work 7(7)5(5)6 sts, increase 1 knit st, work to last 7(7)5(5)6 sts, increase 1 knit st, work to end = 48(48)50(50)52 sts.
Work the WS row.
3rd increase row: (RS) work 8(8)6(6)7 sts, increase 1 purl st (= purl the strand of yarn between the sts through the back loop), work to last 8(8)6(6)7 sts, increase 1 purl st, work to end = 50(50)52(52)54 sts.
Work the WS row.
6 sts increased in 6 rows (approx. 2 cm): a 2 st cable and 1 purl st between the cables at both ends.
Repeat the increases every 4,5(3,5)3,5(3,5)3 cm 5(6)6(6)7 more times = 80(86)88(88)96 sts.
When the piece measures 47(48)49(50)51 cm, on every other row bind off 1x4(4)5(5)7 sts, 1(1)0(0)0x3 sts, 0(0)1(1)1x2 sts, 17(18)20(20)21x1 st and 4x3 sts at both ends. Bind off remaining sts.
Knit the other sleeve in the same manner.
Finishing
Pin to measurements wrong side up, mist and allow to dry. Sew the shoulder seams and side seams.
Border: Place the 8 right front sts (Off White piece) onto the needles and work in ribbing. On the first row cast on 1 st for seaming at the bodice end = 9 sts. Sew the border to the front edge, lightly stretching it. When the border reaches the shoulder, leave the sts on hold.
Place markers for buttons on the border. The topmost button should be at the starting point of the slanted neckline, the lowest one 2 cm from the hem and the other 2 evenly in between.
Now place the 8 left front sts (Clay piece) onto the needles and work in ribbing. On the first row cast on 1 st for seaming at the bodice end = 9 sts. Make buttonholes at the marked spots as established.
Sew the border to the front piece and the back neckline. Stitch or sew the 9 st seam at the right shoulder.
Sew the sleeve seams and attach the sleeves. Sew on the buttons.