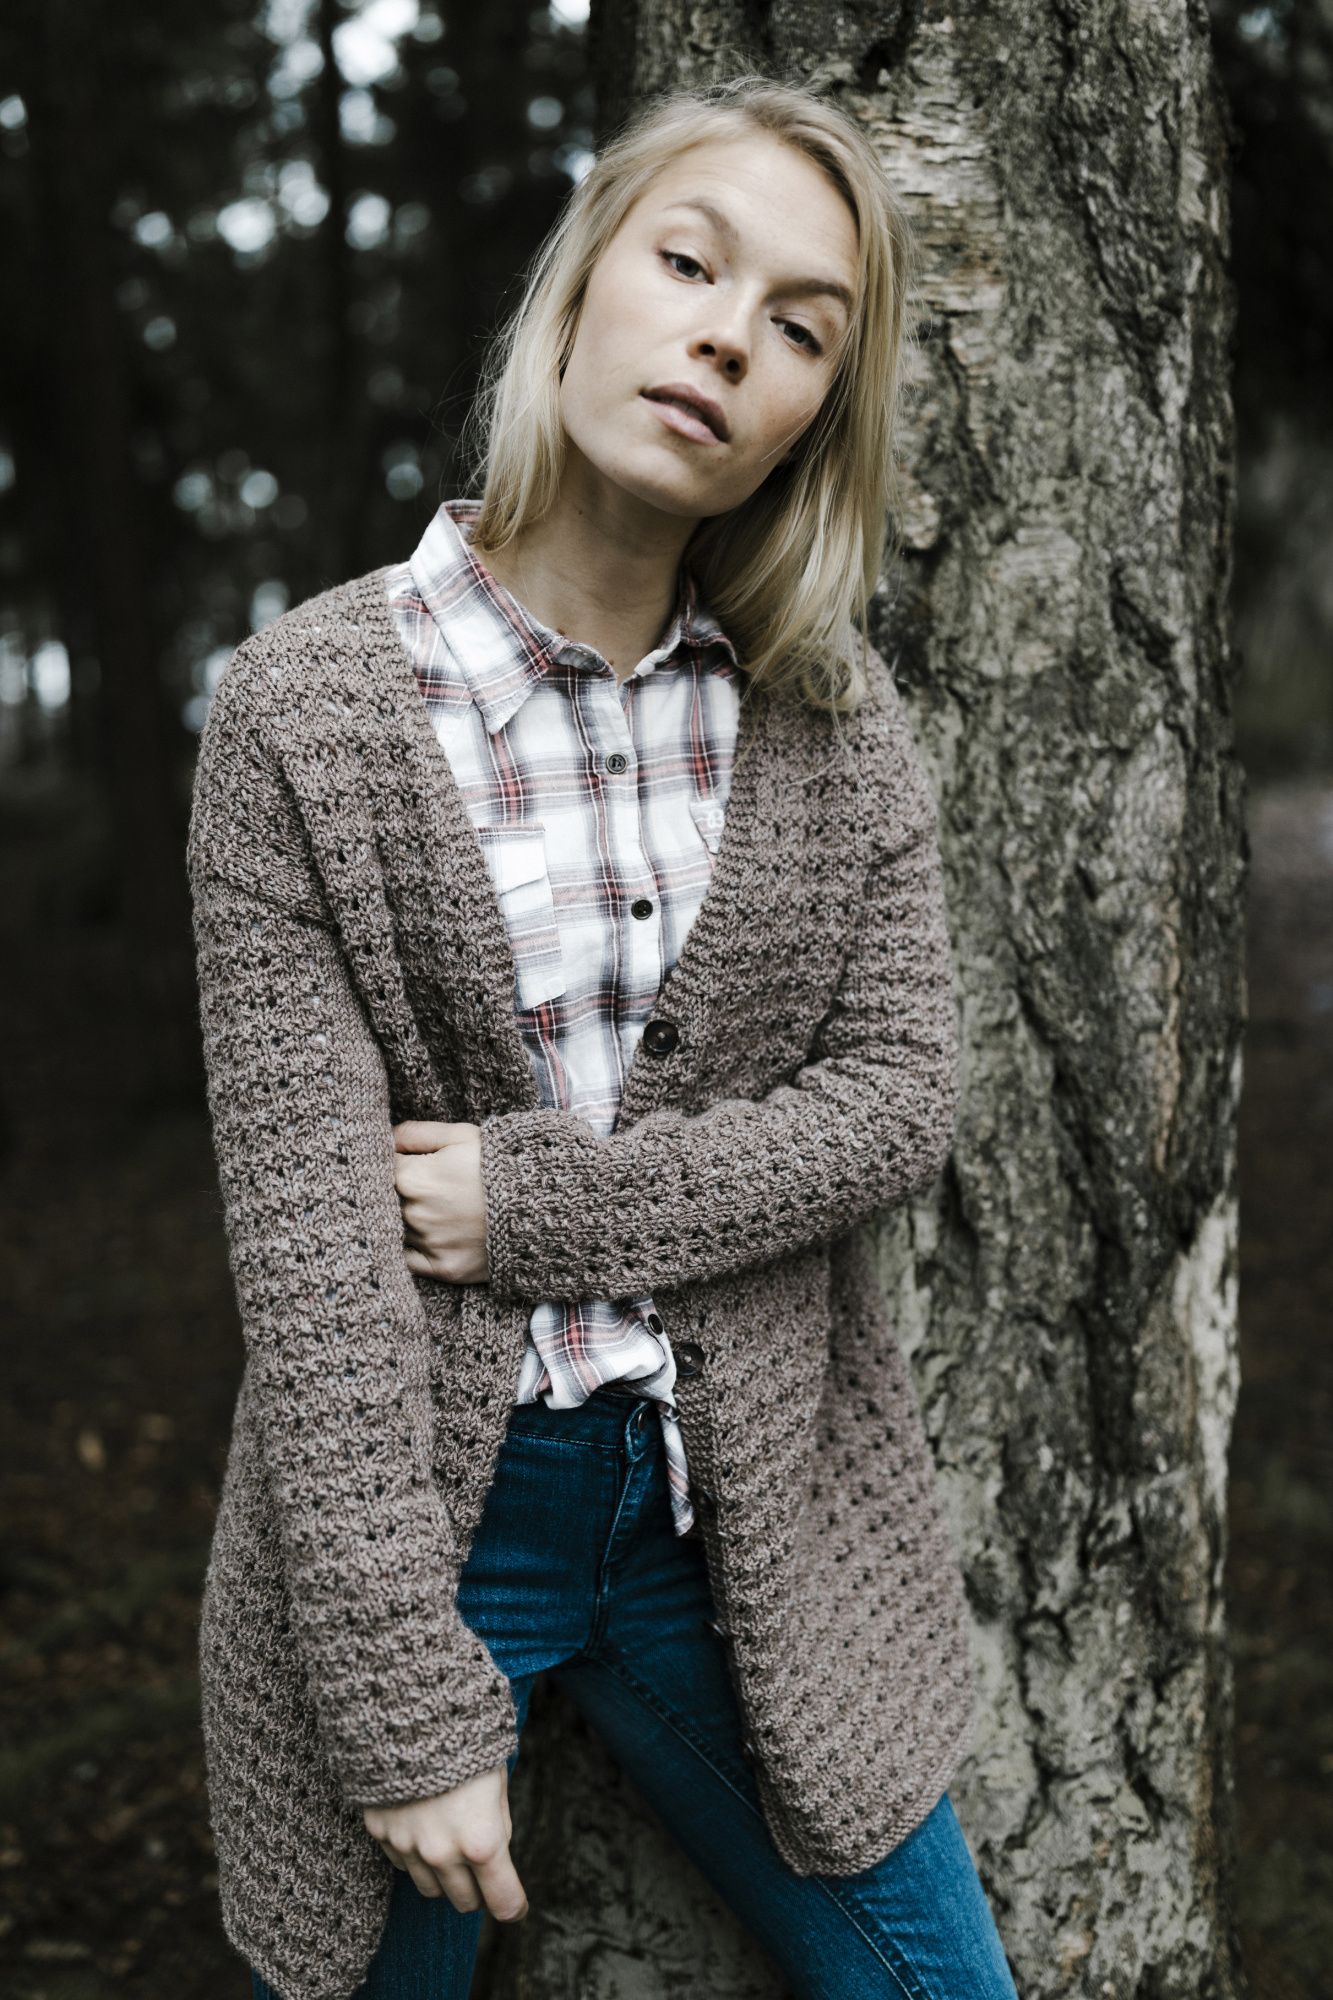
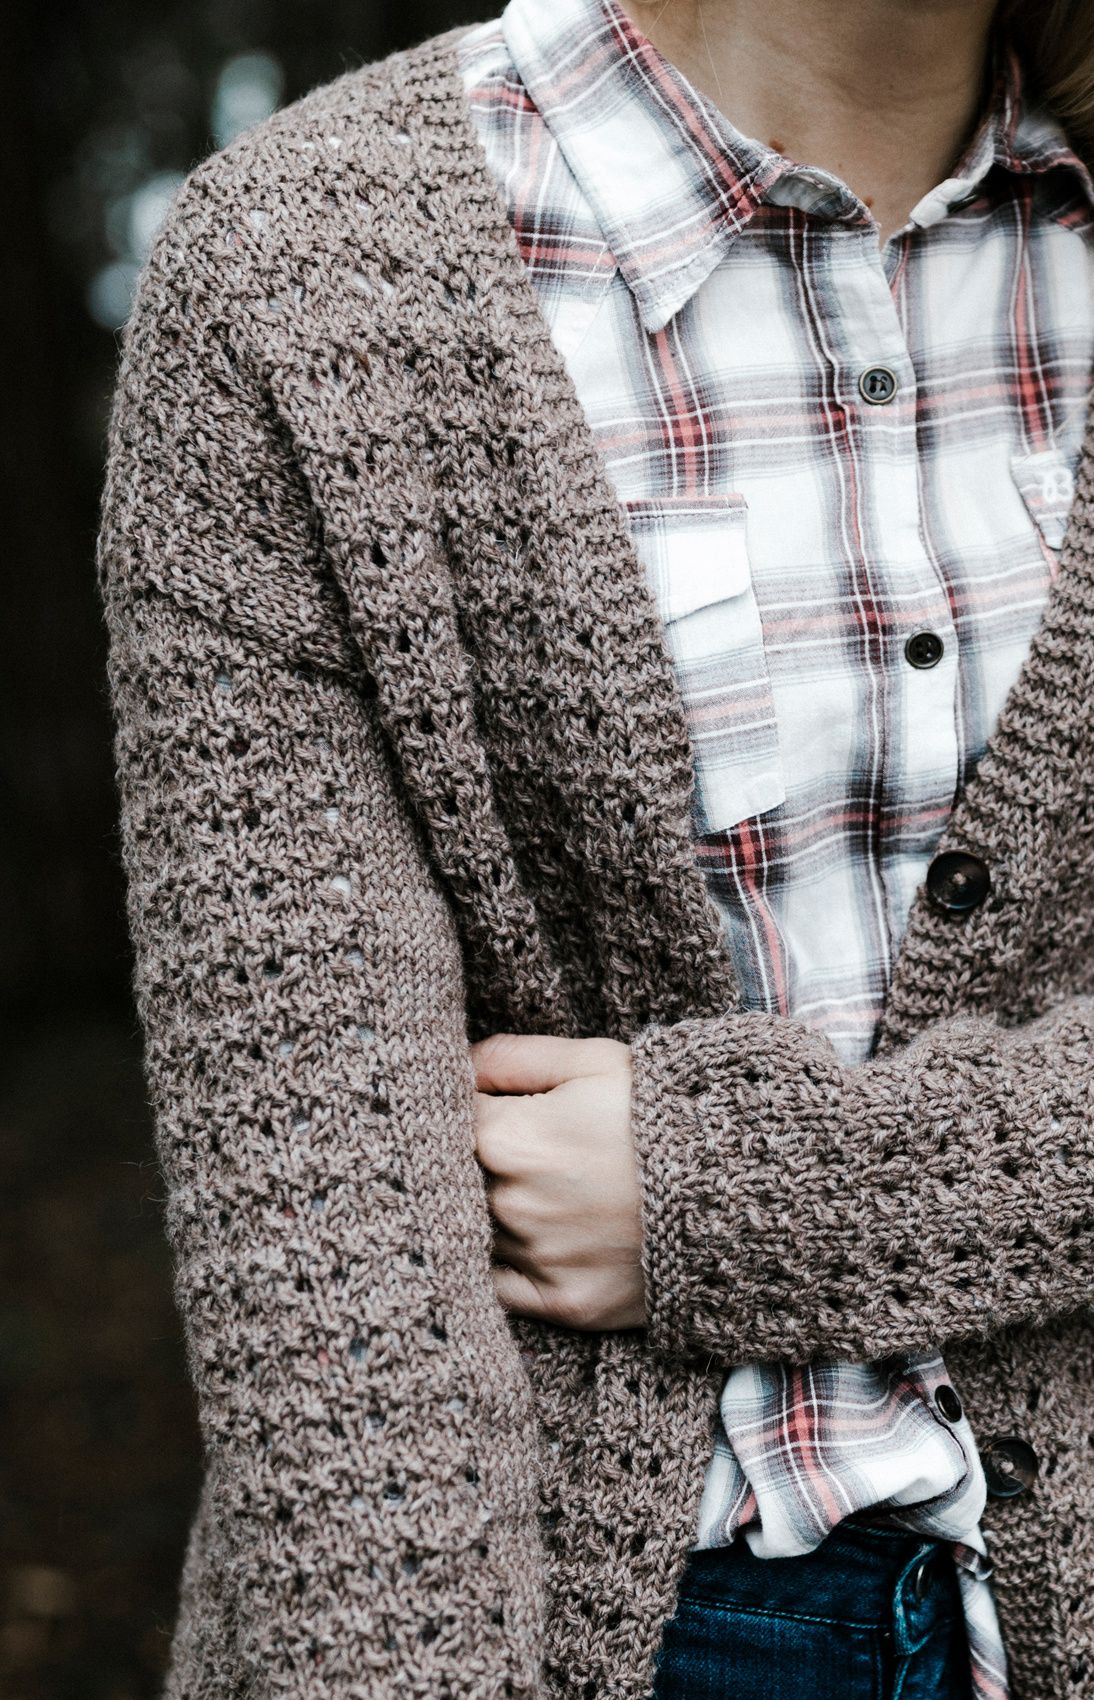
Women's Cardigan Novita 7 Veljestä
This multi-purpose cardigan has a loose, relaxed fit, and the sizes go up to 3XL. Knitted from Novita 7 Vel-jestä.
Designer
Lea Petäjä
Size(s)
XS/S(M)L(XL)XXL(XXXL)
Finished dimensions
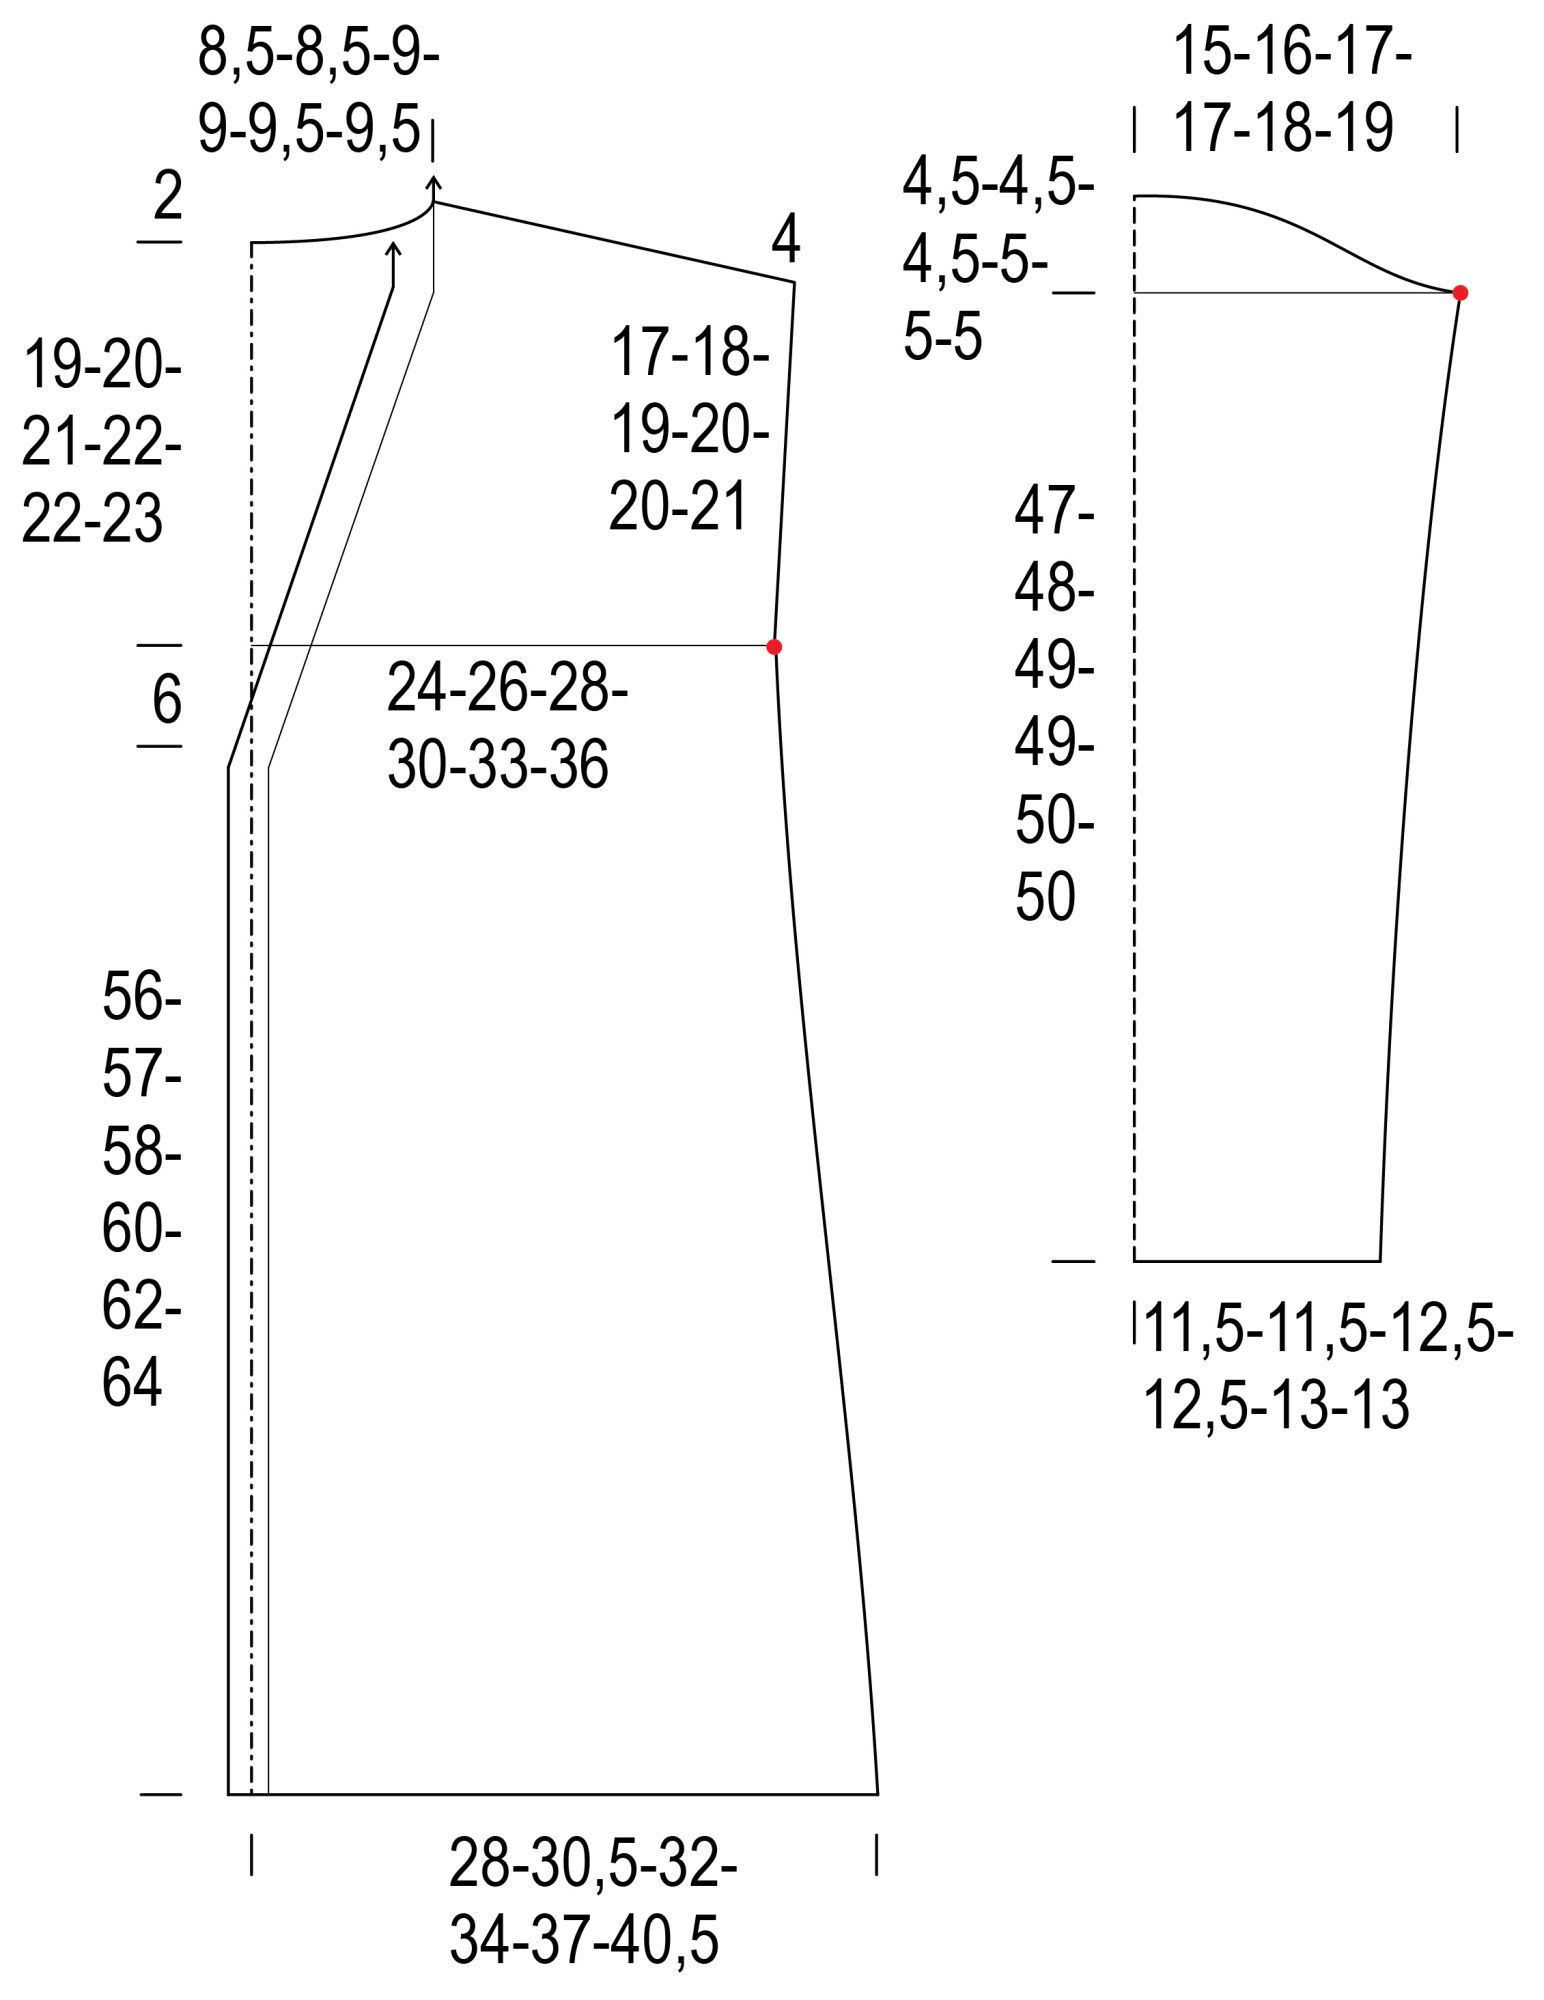
Body circumference 96(104)112(120)132(144) cm Length of the cardigan 83(85)87(90)92(95) cm Inner sleeve length 47(48)49(49)50(50) cm
Yarn demand
Novita 7 Veljestä (069) Rye porridge 650(700)750(800)850(900) g
Needles and other supplies
Needles: - Novita 4½ mm or the size needed to obtain correct gauge. Other materials: - 6 buttons
Finished dimensions
Body circumference 96(104)112(120)132(144) cm Length of the cardigan 83(85)87(90)92(95) cm Inner sleeve length 47(48)49(49)50(50) cm
Stitch patterns:
- Garter stitch:
Knit all rows.
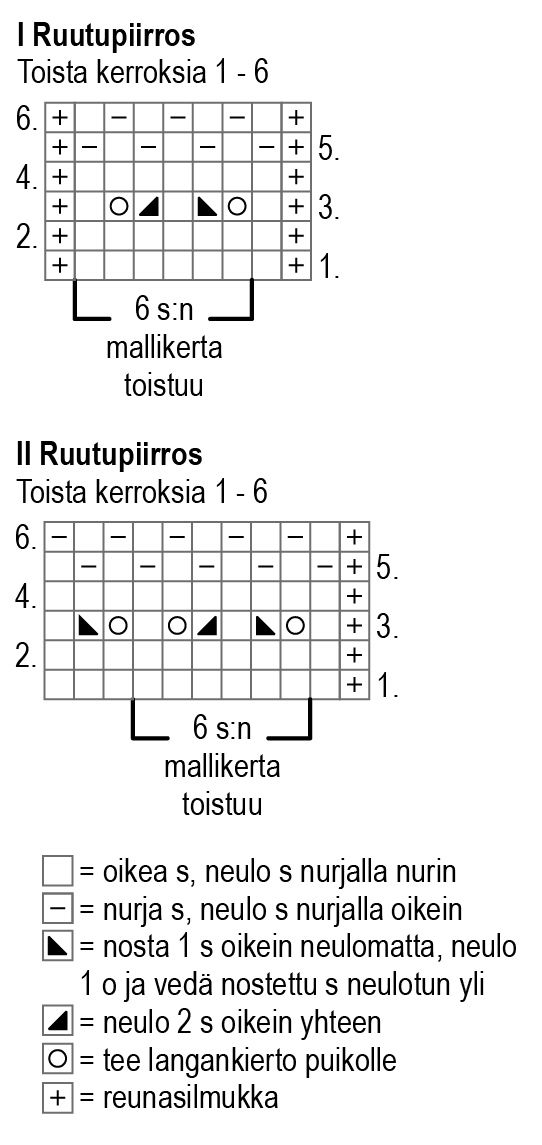
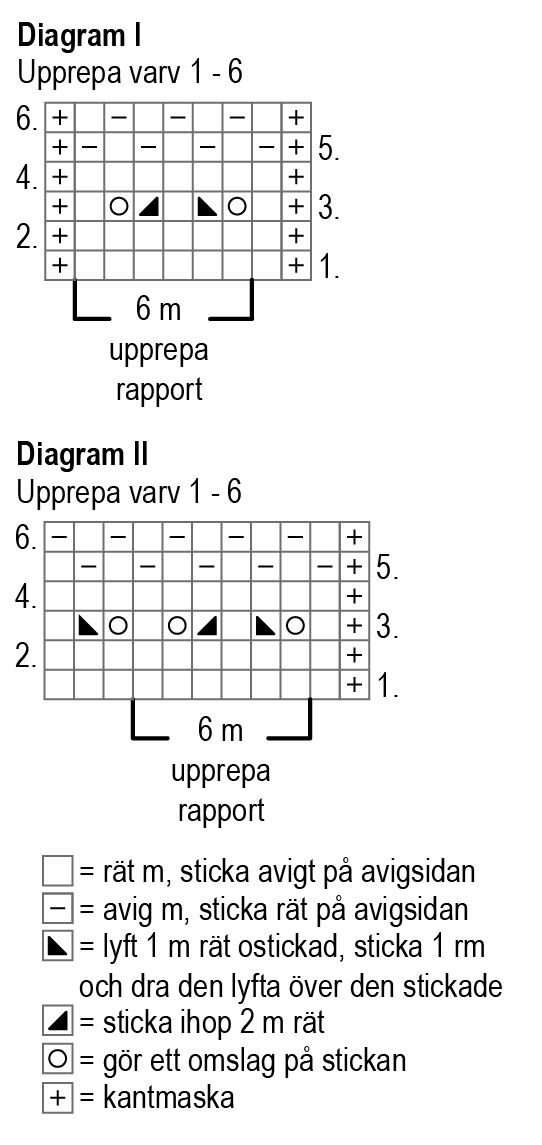
- Lace pattern:
Knit according to the chart and the written instructions.
- Stockinette stitch:
On the right side (RS) rows, knit all sts. On the wrong side (WS) rows
The Back
Cast on 99(105)111(117)129(141) sts and knit 3 rows in garter stitch.
Begin the lace from row 1 of chart I: knit 2 sts from the right end of the chart, repeat the 6 st pattern repeat 16(17)18(19)21(23) times and k1 from the left end of the chart. Keep repeating rows 1-6 of the chart.
When the piece measures 6(6)7(7)8(8) cm, decrease 1 st on both ends. Repeat the decreases every 6 cm for 7 more times = 83(89)95(101)113(125) sts.
When the piece measures 62(63)64(66)68(70) cm, mark the lower part of the armhole on both ends of the piece, using e.g. scrap yarn of a different color.
When the armhole measures 4 cm, increase 1 st next to the outermost st on both ends = pick up the strand between 2 sts and knit it through the back loop. Repeat the increases when you have knitted 8(8)9(9)10(10) cm more = 87(93)99(105)117(129) sts.
When the armhole measures 17(18)19(20)20(21) cm, bind off for the shoulder on both ends on every 2nd row 4x5(5)6(6)7(9) sts and 1x9(12)10(13)14(12) sts.
Note: When the armhole measures 19(20)21(22)22(23) cm, securely bind off for the neckline the center 25(25)27(27)29(29) sts and switch to working one side of the neckline at a time. After working 2 rows, bind of 1x2 sts on the neckline edge.
Knit the other side of the neckline to match.
Left Front
Cast on 51(54)57(60)66(72) sts and work 3 rows in garter stitch.
Begin the lace from row 1 of chart II: k2 from the right end of the chart, repeat the 6 st pattern repeat 7(8)8(9)10(11) times, knit 3(0)3(0)0(0) sts from the left end of the chart, k4. In the front edge (= the left end of the piece) work 4 sts in garter stitch and for the lace keep repeating rows 1-6 of the chart.
When the piece measures 6(6)7(7)8(8) cm, decrease 1 st on the right end of the piece. Repeat the decrease every 6 cm for 7 more times = 43(46)49(52)58(64) sts.
When the piece measures 56(57)58(60)62(64) cm, decrease 1 st on the front edge: knit through the RS row until 5 sts remain, k2tog, k3. Repeat the decreases in the same way every 1 cm for 3 more times and then every 2 cm 8(8)9(9)10(10) times.
Note: When the piece measures 62(63)64(66)68(70) cm, mark the lower part of the armhole on both ends of the piece, using e.g. scrap yarn of a different colour.
When the armhole measures 4 cm, increase 1 st next to the outermost st on the right end of the piece = pick up the strand between the 2 first sts and knit it through the back loop. Continue knitting for 8(8)9(9)10(10) cm and then repeat the increase.
When the armhole measures 17(18)19(20)20(21) cm, bind off for the shoulder on the right end of the piece every 2nd row 4x5(5)6(6)7(9) sts and 1x9(12)10(13)14(12) sts. 4 border sts remain on the needles. Increase 1 st (= seam allowance) on the shoulder edge. Continue working in garter st with these 5 sts for approx. half the width of the neckline on the back piece (when stretched lightly). Bind off.
Next, mark the places for the buttons onto the front piece. The top button is placed where the neckline decreases begun and the rest of the buttons evenly below that one, each button approx. 9 cm from the previous one.
Right front
Knit as the left front but reverse all the shapings (mirror image). Make the buttonholes to match the marked button places: beginning from the front edge, k1, k2tog, yarn over, knit to end.
Make the decreases for the neckline as follows: slip one, knit one, pass slipped stitch over (= the slip knit pass decrease).
Sleeves
Cast on 41(41)45(45)47(47) sts and work 3 rows in garter stitch.
Begin the lace from row 1 of chart I: knit 3(3)2(2)3(3), repeat the 6 st pattern repeat 6(6)7(7)7(7) times, knit 2(2)1(1)2(2). Work in stockinette stitch on both ends of the piece and for the lace repeat rows 1-6 of the chart.
When the piece measures 11(13)14(13)10(14) cm, increase 1 st on both ends. Repeat the increase every 6(5)5(4)5(4) cm for 5(6)6(8)7(8) more times = 53(55)59(63)63(65) sts. Work the increased sts according to the lace pattern.
When the piece measures 47(48)49(49)50(50) cm, bind off on both ends of the piece on every 2nd row 1x3(3)5(5)5(6) sts, 4(4)4(5)5(5)x2 sts, 1x3 sts and 1x4 sts. Bind off the remaining sts.
Knit the other sleeve to match.
Finishing
Lay the pieces to measurements wrong side up on a surface, mist with a spray bottle and allow to dry.
Sew the shoulder seams. Sew the middle back seam of the neckline border and attach the border to the neckline of the back piece. Attach the sleeves according to the red marks on the pattern.
Sew the side seams and the sleeve seams. Sew the buttons onto the front edge.
Women's Cardigan Novita 7 Veljestä
Size(s)
XS/S(M)L(XL)XXL(XXXL)
Finished dimensions
Body circumference 96(104)112(120)132(144) cm Length of the cardigan 83(85)87(90)92(95) cm Inner sleeve length 47(48)49(49)50(50) cm
Yarn demand
Novita 7 Veljestä (069) Rye porridge 650(700)750(800)850(900) g
Needles and other supplies
Needles: - Novita 4½ mm or the size needed to obtain correct gauge. Other materials: - 6 buttons
Stitch patterns:
- Garter stitch:
Knit all rows.
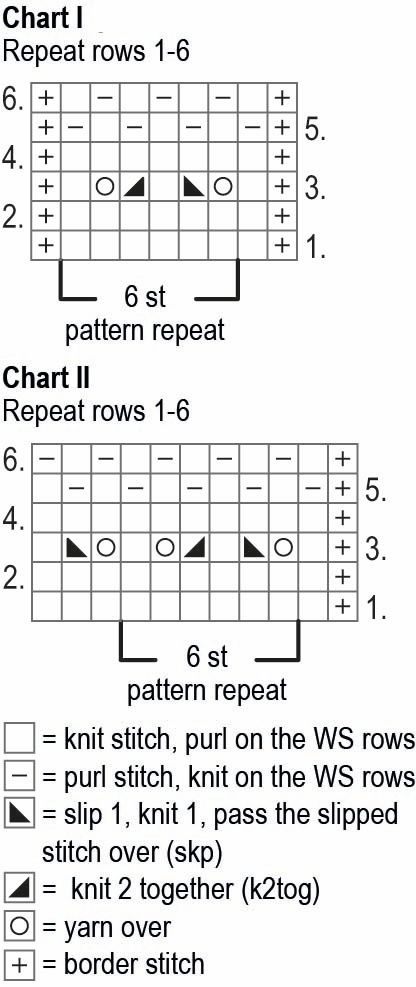
- Lace pattern:
Knit according to the chart and the written instructions.
- Stockinette stitch:
On the right side (RS) rows, knit all sts. On the wrong side (WS) rows
The Back
Cast on 99(105)111(117)129(141) sts and knit 3 rows in garter stitch.
Begin the lace from row 1 of chart I: knit 2 sts from the right end of the chart, repeat the 6 st pattern repeat 16(17)18(19)21(23) times and k1 from the left end of the chart. Keep repeating rows 1-6 of the chart.
When the piece measures 6(6)7(7)8(8) cm, decrease 1 st on both ends. Repeat the decreases every 6 cm for 7 more times = 83(89)95(101)113(125) sts.
When the piece measures 62(63)64(66)68(70) cm, mark the lower part of the armhole on both ends of the piece, using e.g. scrap yarn of a different color.
When the armhole measures 4 cm, increase 1 st next to the outermost st on both ends = pick up the strand between 2 sts and knit it through the back loop. Repeat the increases when you have knitted 8(8)9(9)10(10) cm more = 87(93)99(105)117(129) sts.
When the armhole measures 17(18)19(20)20(21) cm, bind off for the shoulder on both ends on every 2nd row 4x5(5)6(6)7(9) sts and 1x9(12)10(13)14(12) sts.
Note: When the armhole measures 19(20)21(22)22(23) cm, securely bind off for the neckline the center 25(25)27(27)29(29) sts and switch to working one side of the neckline at a time. After working 2 rows, bind of 1x2 sts on the neckline edge.
Knit the other side of the neckline to match.
Left Front
Cast on 51(54)57(60)66(72) sts and work 3 rows in garter stitch.
Begin the lace from row 1 of chart II: k2 from the right end of the chart, repeat the 6 st pattern repeat 7(8)8(9)10(11) times, knit 3(0)3(0)0(0) sts from the left end of the chart, k4. In the front edge (= the left end of the piece) work 4 sts in garter stitch and for the lace keep repeating rows 1-6 of the chart.
When the piece measures 6(6)7(7)8(8) cm, decrease 1 st on the right end of the piece. Repeat the decrease every 6 cm for 7 more times = 43(46)49(52)58(64) sts.
When the piece measures 56(57)58(60)62(64) cm, decrease 1 st on the front edge: knit through the RS row until 5 sts remain, k2tog, k3. Repeat the decreases in the same way every 1 cm for 3 more times and then every 2 cm 8(8)9(9)10(10) times.
Note: When the piece measures 62(63)64(66)68(70) cm, mark the lower part of the armhole on both ends of the piece, using e.g. scrap yarn of a different colour.
When the armhole measures 4 cm, increase 1 st next to the outermost st on the right end of the piece = pick up the strand between the 2 first sts and knit it through the back loop. Continue knitting for 8(8)9(9)10(10) cm and then repeat the increase.
When the armhole measures 17(18)19(20)20(21) cm, bind off for the shoulder on the right end of the piece every 2nd row 4x5(5)6(6)7(9) sts and 1x9(12)10(13)14(12) sts. 4 border sts remain on the needles. Increase 1 st (= seam allowance) on the shoulder edge. Continue working in garter st with these 5 sts for approx. half the width of the neckline on the back piece (when stretched lightly). Bind off.
Next, mark the places for the buttons onto the front piece. The top button is placed where the neckline decreases begun and the rest of the buttons evenly below that one, each button approx. 9 cm from the previous one.
Right front
Knit as the left front but reverse all the shapings (mirror image). Make the buttonholes to match the marked button places: beginning from the front edge, k1, k2tog, yarn over, knit to end.
Make the decreases for the neckline as follows: slip one, knit one, pass slipped stitch over (= the slip knit pass decrease).
Sleeves
Cast on 41(41)45(45)47(47) sts and work 3 rows in garter stitch.
Begin the lace from row 1 of chart I: knit 3(3)2(2)3(3), repeat the 6 st pattern repeat 6(6)7(7)7(7) times, knit 2(2)1(1)2(2). Work in stockinette stitch on both ends of the piece and for the lace repeat rows 1-6 of the chart.
When the piece measures 11(13)14(13)10(14) cm, increase 1 st on both ends. Repeat the increase every 6(5)5(4)5(4) cm for 5(6)6(8)7(8) more times = 53(55)59(63)63(65) sts. Work the increased sts according to the lace pattern.
When the piece measures 47(48)49(49)50(50) cm, bind off on both ends of the piece on every 2nd row 1x3(3)5(5)5(6) sts, 4(4)4(5)5(5)x2 sts, 1x3 sts and 1x4 sts. Bind off the remaining sts.
Knit the other sleeve to match.
Finishing
Lay the pieces to measurements wrong side up on a surface, mist with a spray bottle and allow to dry.
Sew the shoulder seams. Sew the middle back seam of the neckline border and attach the border to the neckline of the back piece. Attach the sleeves according to the red marks on the pattern.
Sew the side seams and the sleeve seams. Sew the buttons onto the front edge.