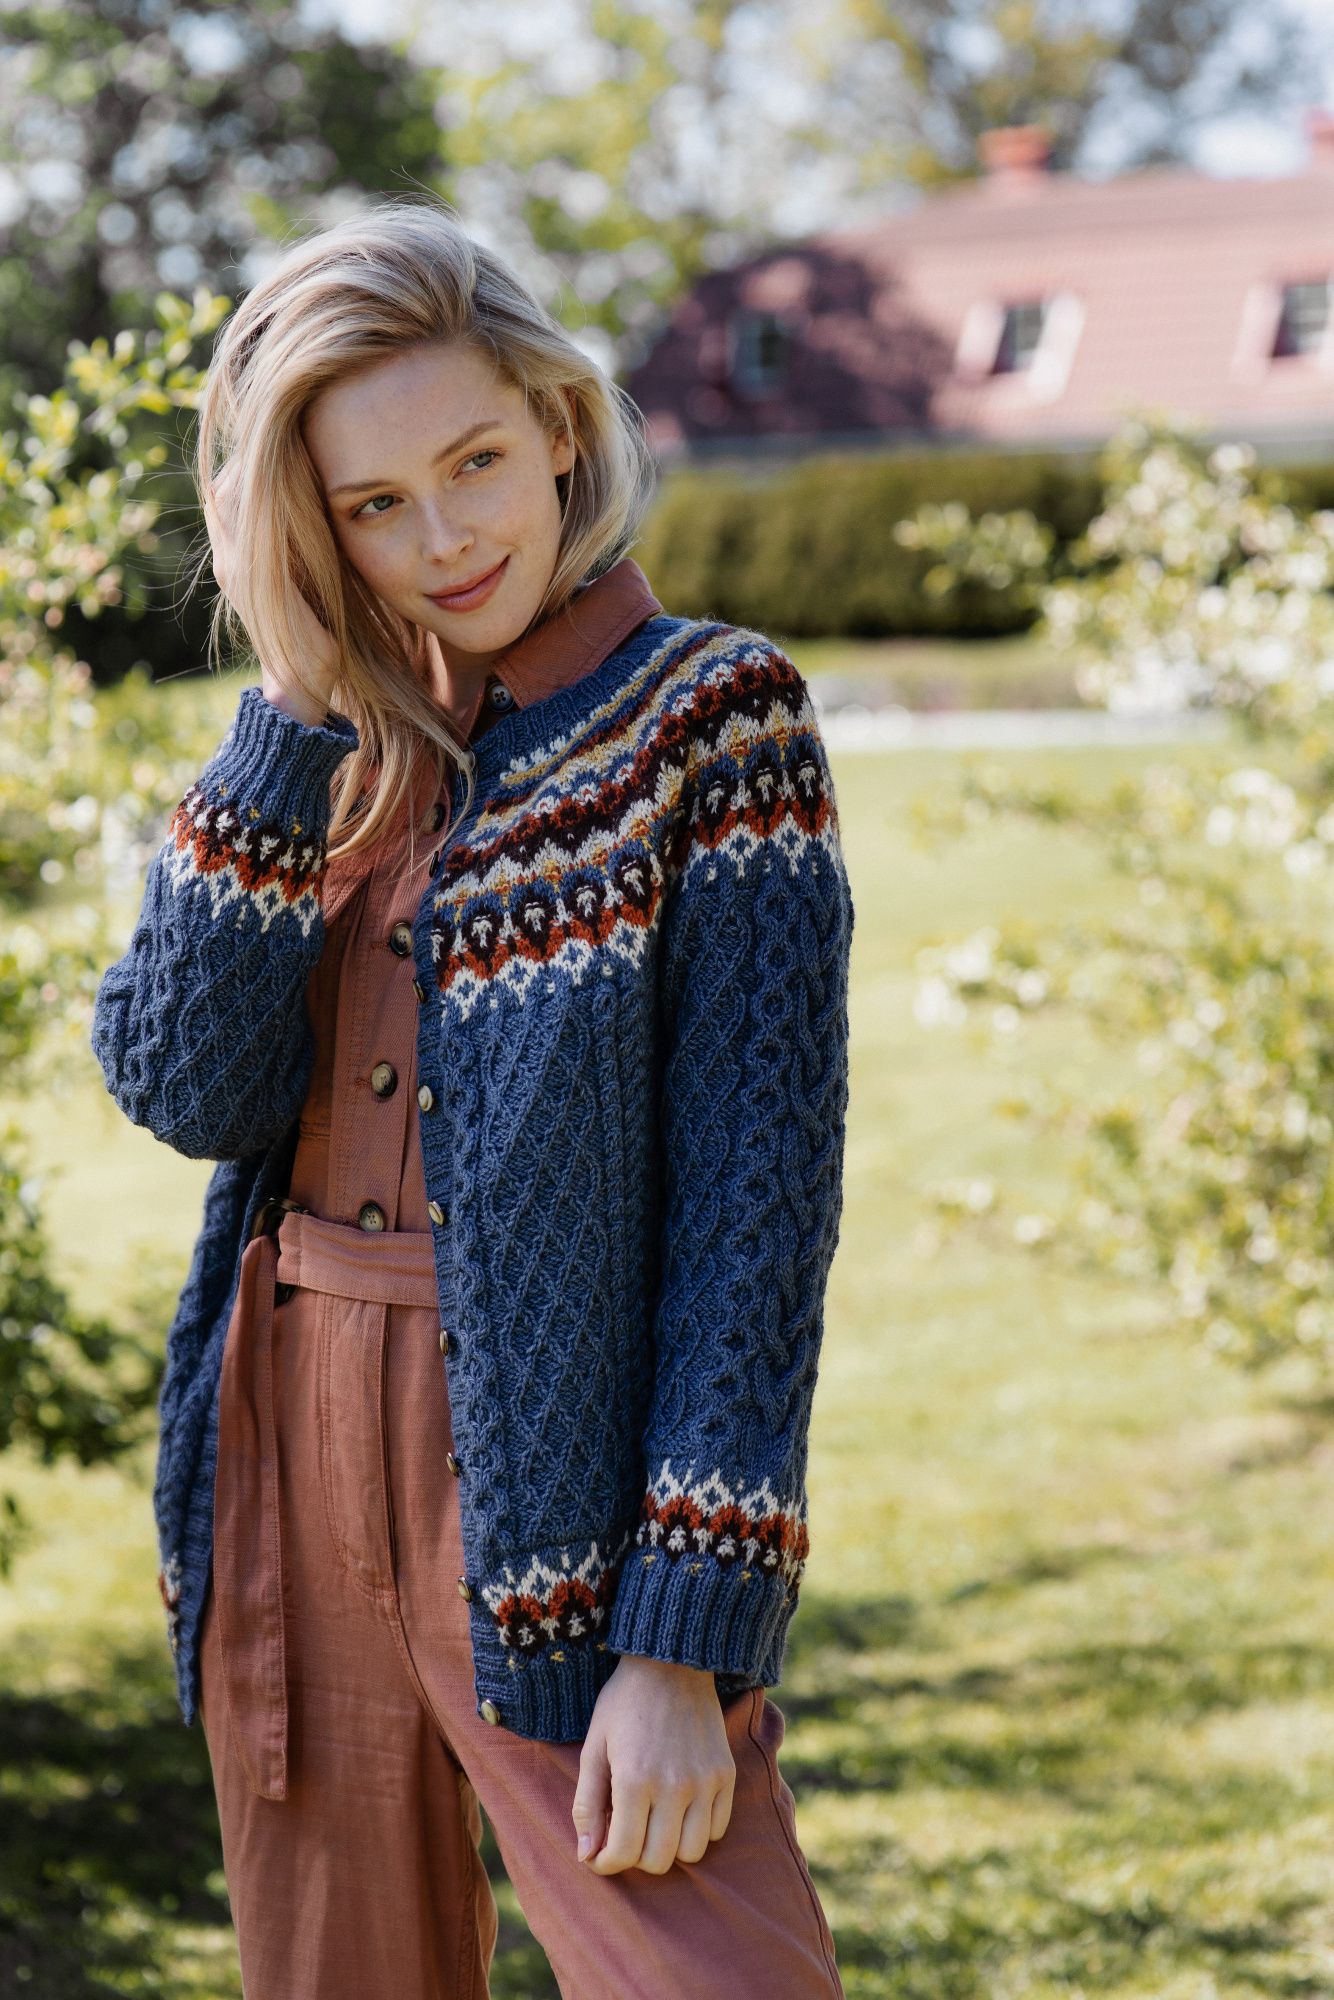

Karheikko Cardigan Novita Nalle
This top-down cardigan from Novita Nalle yarn features six different colors in the yoke, sleeves and hem. Working your way down, the intricate cable pattern requires constant attention. A challenging but rewarding project for the more seasoned knitter.
Designer
Sisko Sälpäkivi
Language
Size(s)
S/M(L)XL(XXL)
Finished dimensions
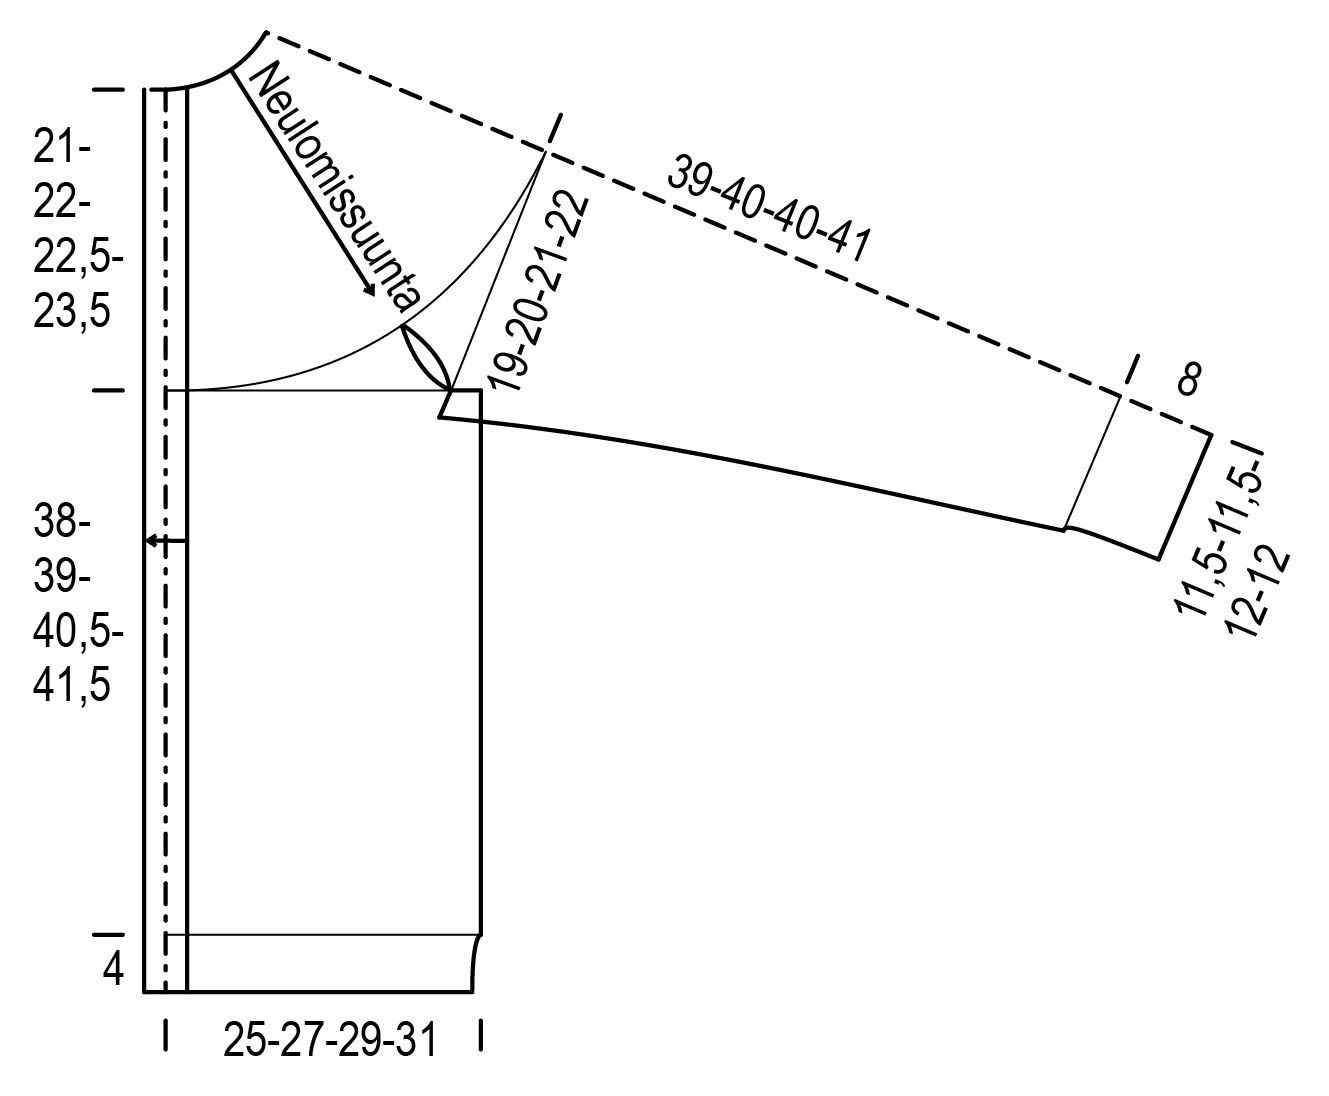
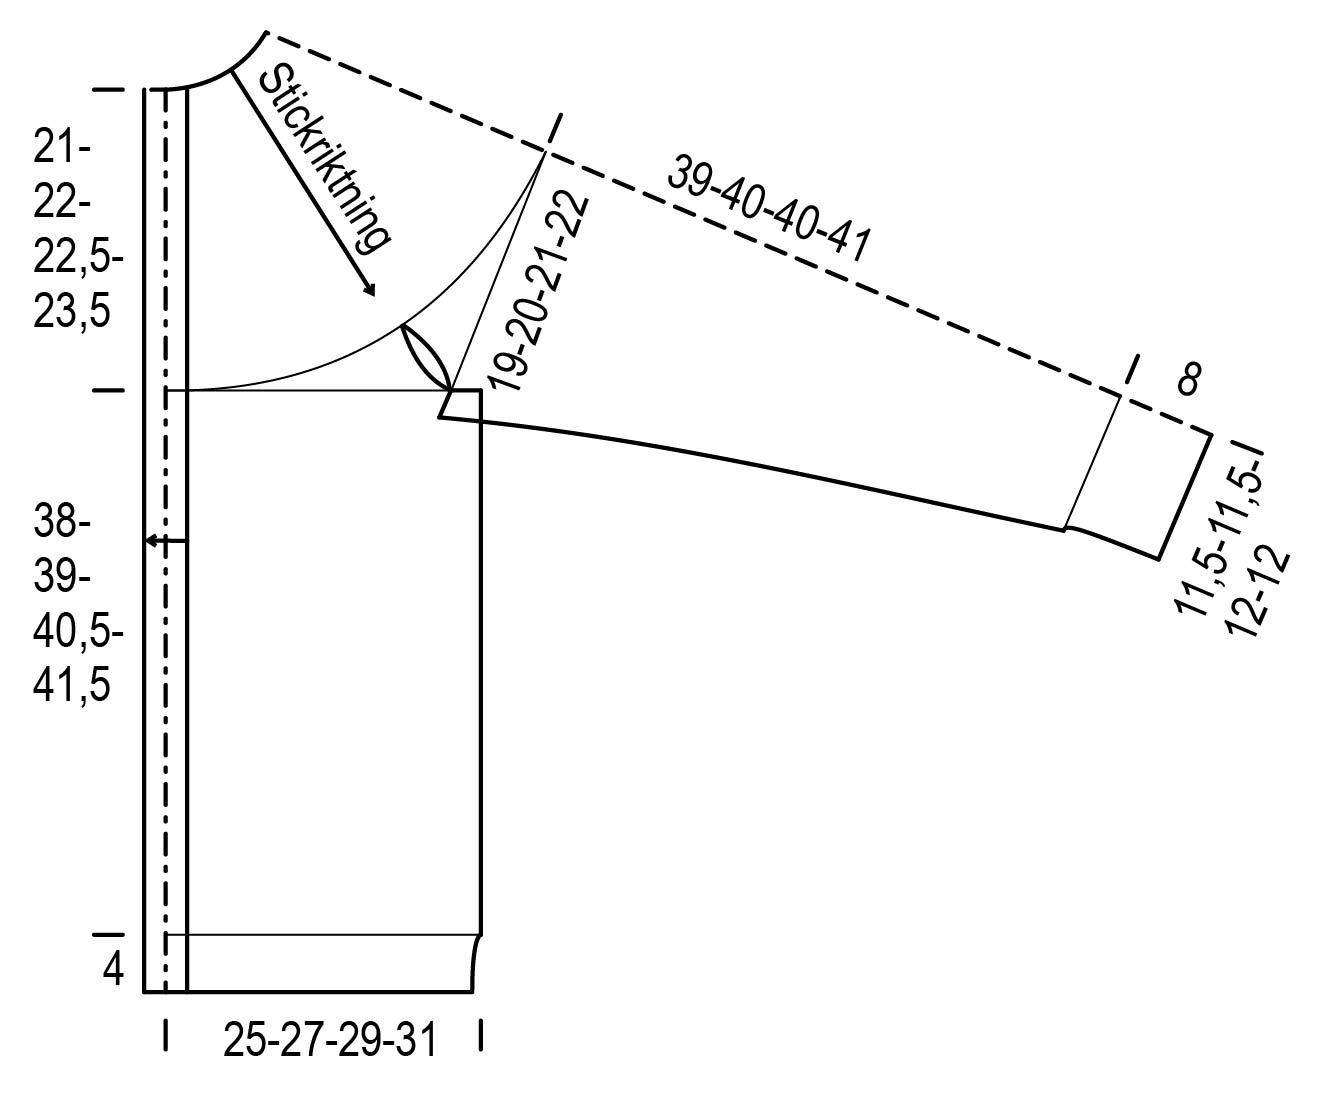
body circumference 100(108)116(124) cm / 39¼(42½)45¾(48¾) in middle back length 63(65)67(69) cm / 24¾(25½)26½(27¼) in inner sleeve length 47(48)48(49) cm / 18½(19)19(19¼) in
Yarn demand
Novita Nalle (160) Jeans 500(550)600(650) g, (694) Bark 50(50)<100(<100) g, (641) Maple 50(50)50(50) g, (061) Linen 50(50)50(50) g, (010) Off White 50(50)50(50) g and (285) Saffron 50(50)50(50) g
Needles and other supplies
Circular needles (80 cm / 32 in) Novita 3½ mm (UK 9½ / US 4) and 4 mm (UK 8 / US 6) or sizes needed for gauge; 3½ mm and 4 mm double-pointed needles for the sleeves Other supplies 9 buttons
Finished dimensions
body circumference 100(108)116(124) cm / 39¼(42½)45¾(48¾) in middle back length 63(65)67(69) cm / 24¾(25½)26½(27¼) in inner sleeve length 47(48)48(49) cm / 18½(19)19(19¼) in
Stitch patterns
- Stockinette stitch: knit the right side rows and purl the wrong side rows.
- Ribbing: *k2, p2*, repeat *-*. On WS rows
Yoke
Using Jeans and the smaller circular needle, cast on 100(100)104(104) sts and begin ribbing on the WS: p3, *k2, p2*, repeat *-*, k2, p3. Work ribbing for 8(8)10(10) rows.
Purl the WS row, evenly increasing 19(25)27(33) sts = 119(125)131(137) sts.
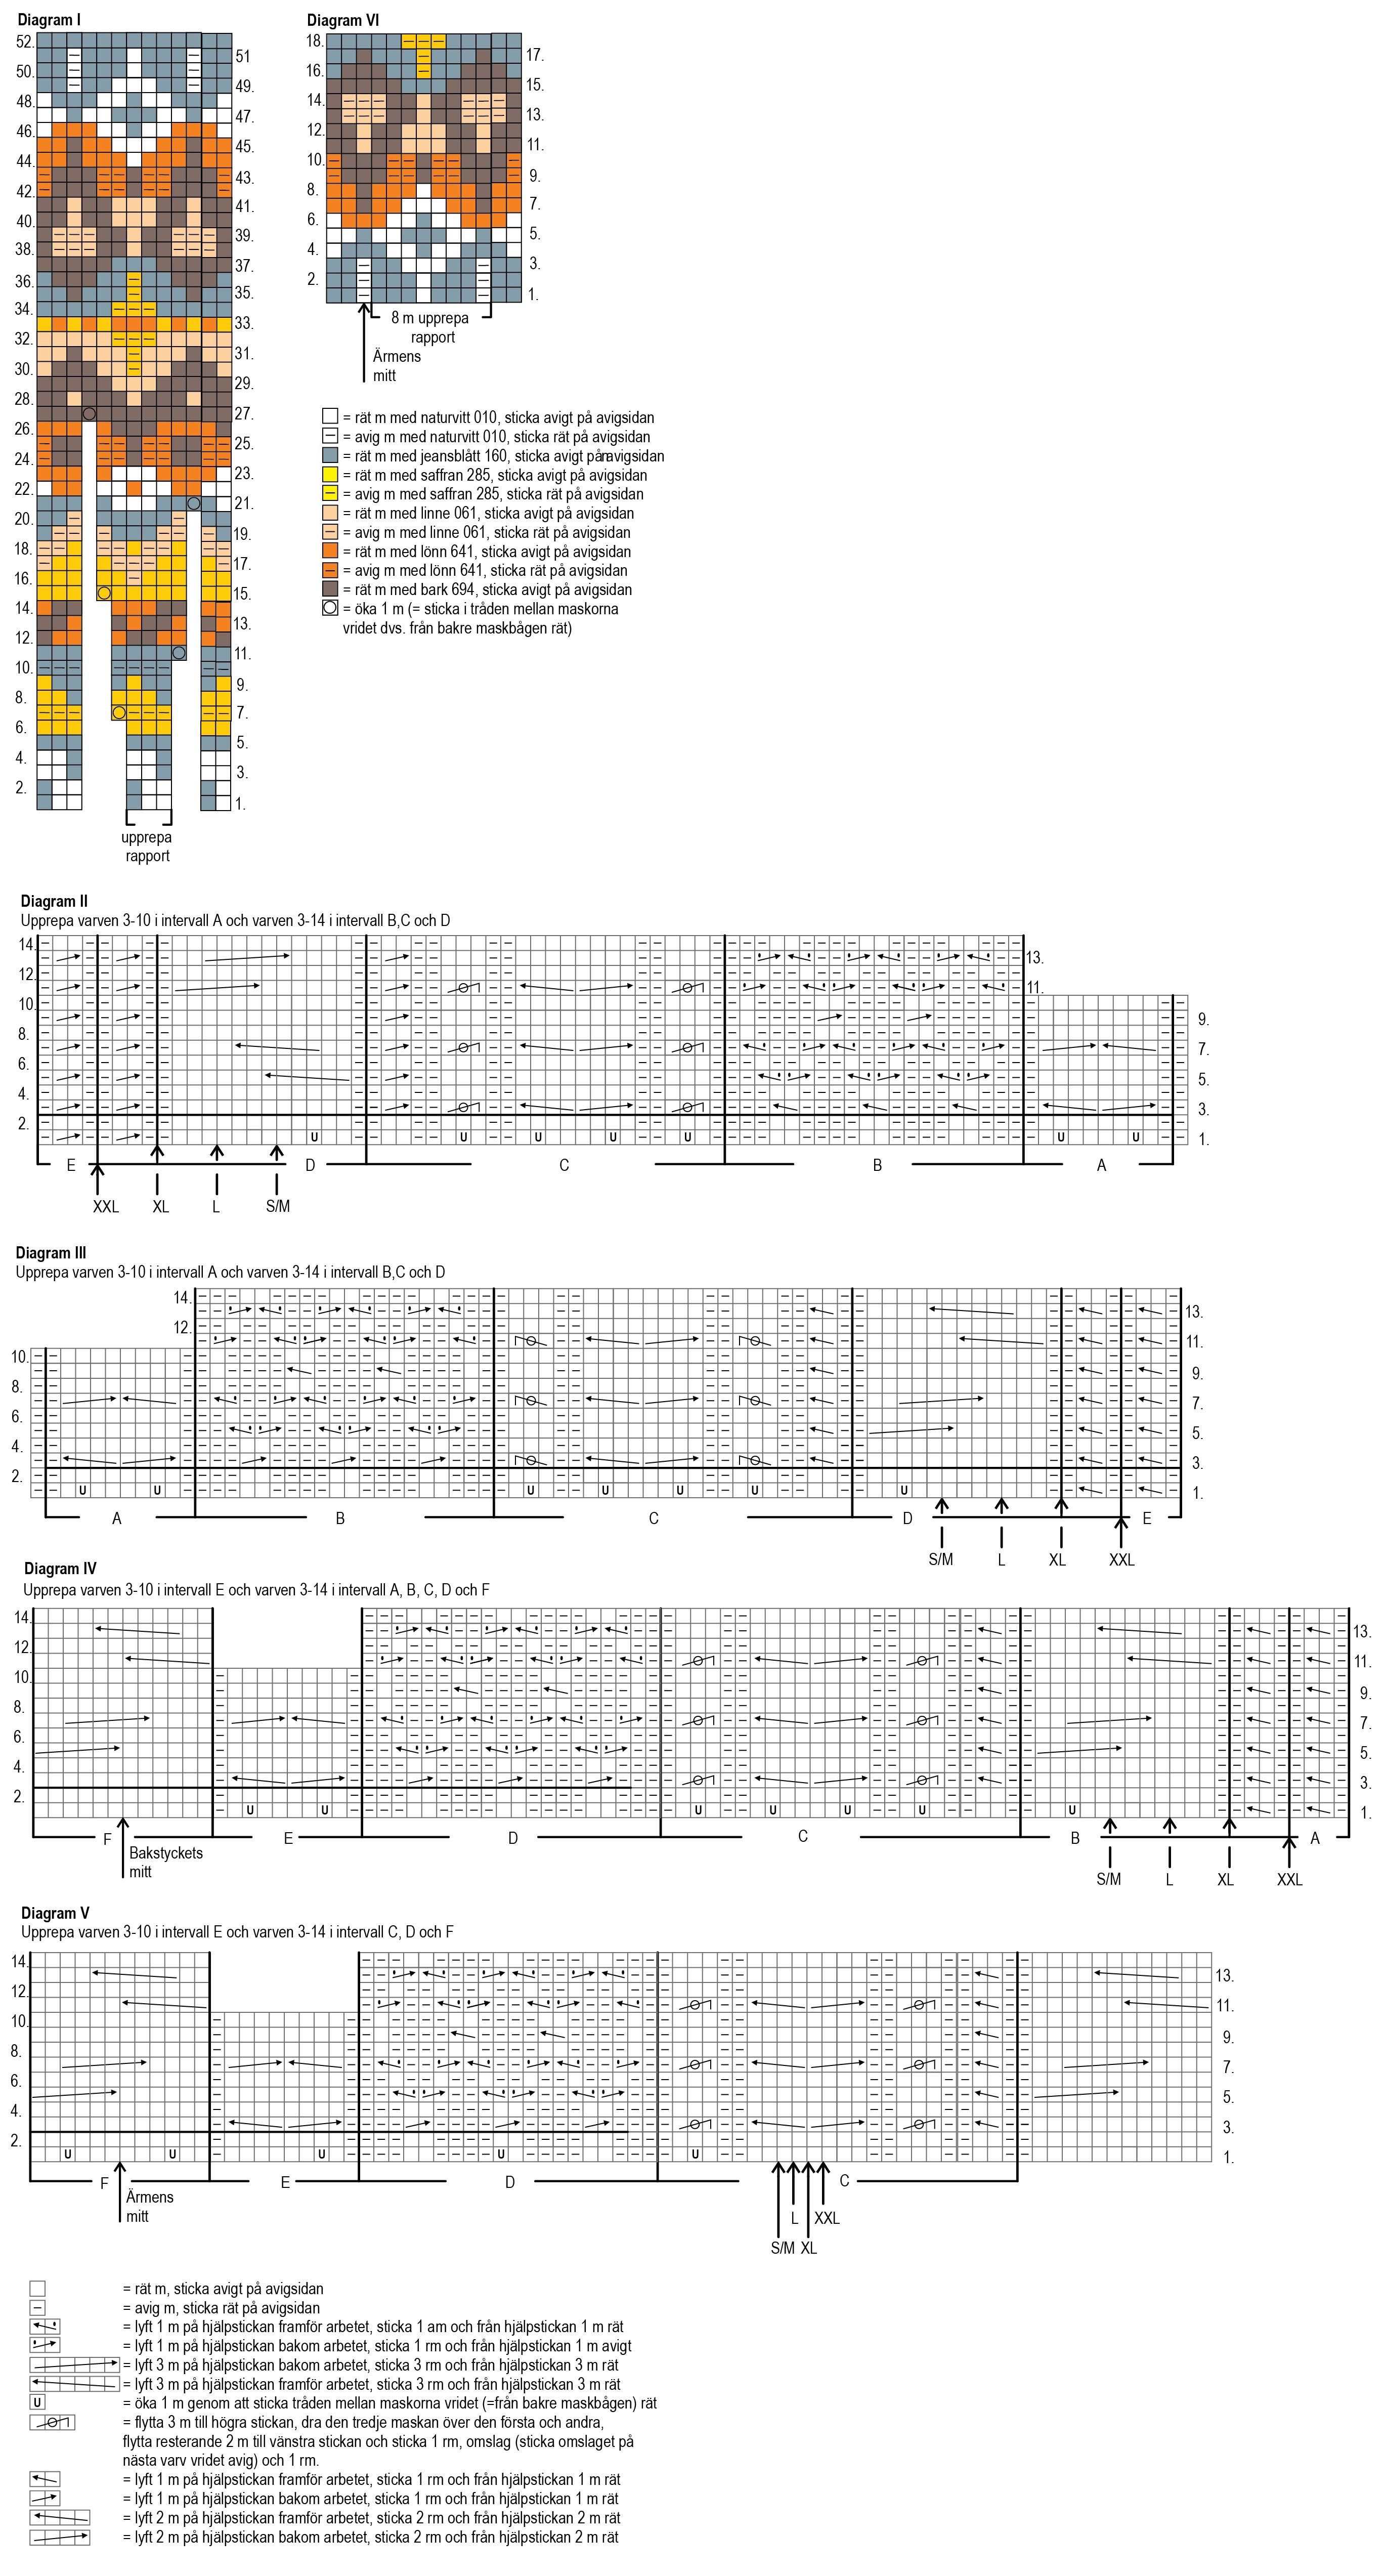
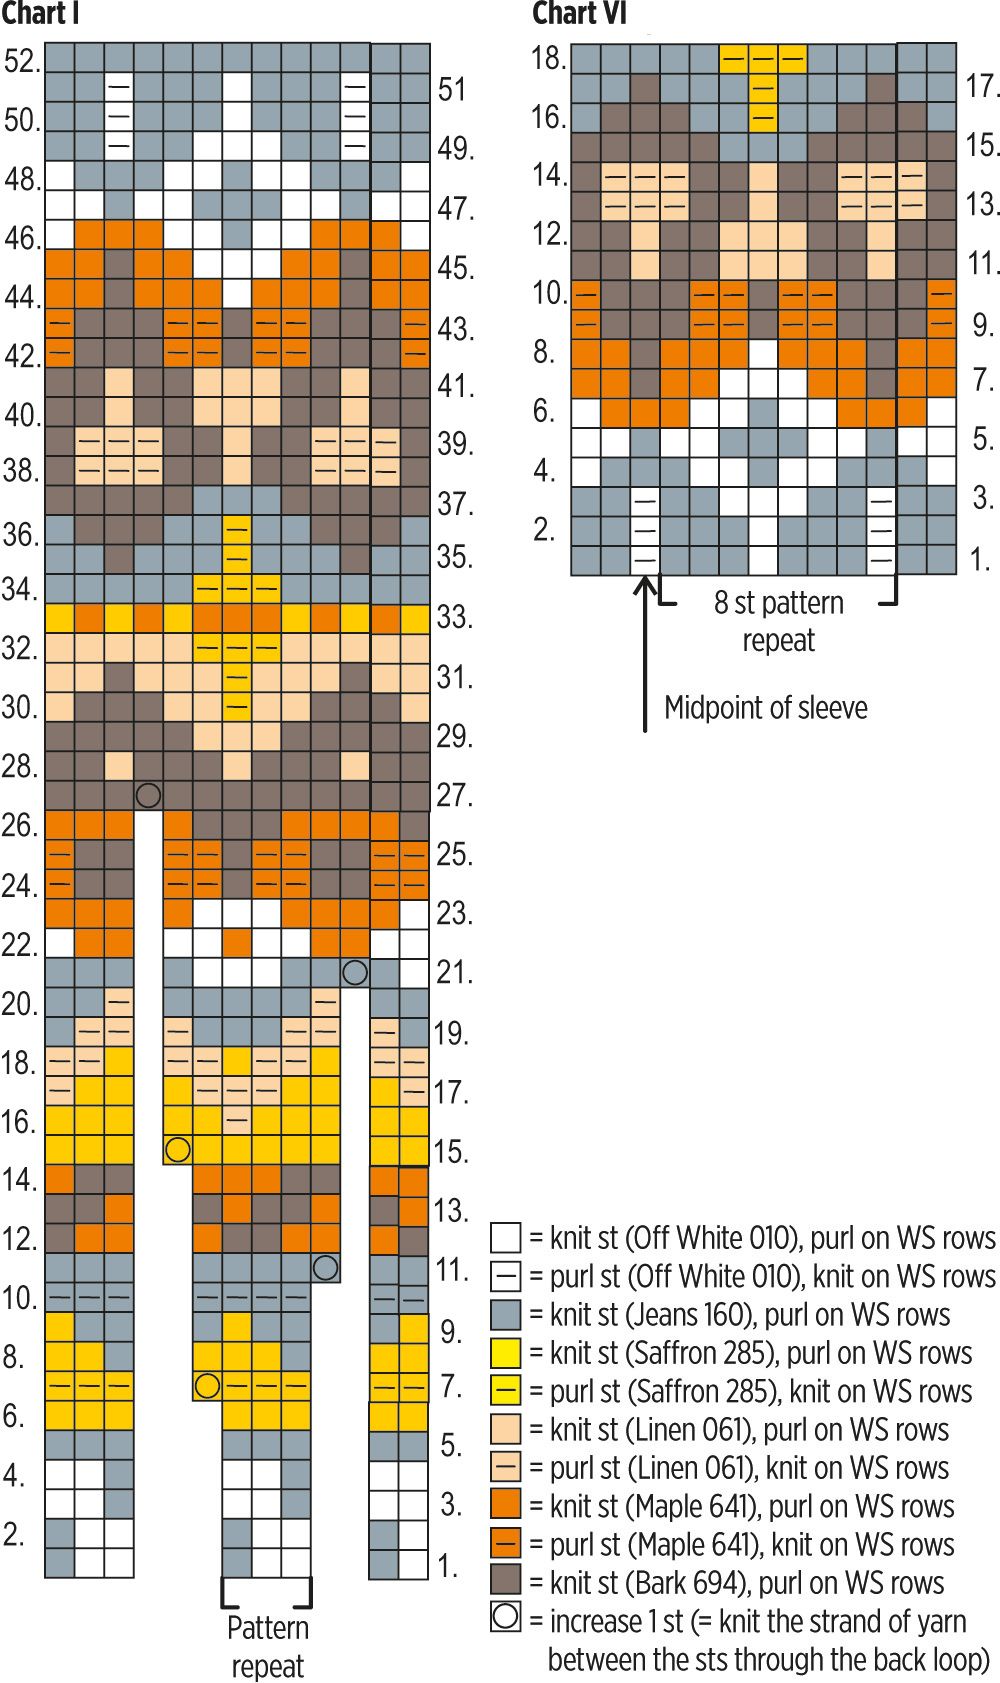
Begin the colourwork pattern on row 1 of chart I: work the 2 sts at the right edge, repeat the 3 st pattern 38(40)42(44) times, work the 3 sts at left. Keep knitting the edge sts. Work rows 2-52 of the chart.
1 st per pattern repeat increased on rows 7, 11, 15, 21 and 27. 309(325)341(357) sts now on the needles.
Work stockinette st using Jeans for 2(4)4(6) rows. On the last row increase 2 sts in each pattern repeat and 1 st at the end of row. 77(81)85(89) sts increased, 386(406)426(446) sts now on the needles. Continue with the Jeans yarn.
Divide the sts into five groups: 54(58)62(66)sts (front) + 80(82)84(86)sts (sleeve) + 118(126)134(142)sts (back) + 80(82)84(86)sts (sleeve) + 54(58)62(66)sts (front). Place markers at the edges of the pieces.
Top left front
Continue with the 54(58)62(66) left front sts. Begin the cable pattern on the RS on row 1 of chart II: work the 1 st at right, work section A (= 8+2 sts), section B (= 20 sts), section C (= 20+4 sts), section D until you reach the arrow for your size [= 5+1 sts (9+1 sts) 13+1 sts (17 + 1 sts)], cast on 1 st at the end of row. 8 sts increased, 62(66)70(74) sts on the needles. Work row 2 of the chart, then keep repeating rows 3-10 at section A and rows 3-14 at sections B, C and D. Note: At the same time on every other row increase 1x1st, 1x2sts and 1x3 sts at the left end = 68(72)76(80)sts. With the increased sts work to the end of section D and then keep repeating section E (= 4 sts) as needed.
After the increases finish on a WS row, break yarn and leave the sts on hold.
Top left sleeve
Continue with the 80(82)84(86) sleeve sts. Begin the cable pattern on row 1 of chart V: cast on 1 st at the beginning, start at the correct spot for your size [= 7+1 sts (8+1 sts) 9+1 sts (10+1 sts) on section C], work section D (19+1 sts), section E (= 9+1 sts), section F (= 10+2 sts). The midpoint of the piece is marked with an arrow. Work the other side as a mirror image: work sections E, D, section C until you reach the correct spot [= 7+1 sts (8+1 sts) 9+1 sts (10+1 sts)], cast on 1 st at the end. Note: Make sure to mirror the cables at sections D and C. 10 sts increased, 90(92)94(96) sts on the needles. Work row 2 of the chart, then keep repeating rows 3-10 at section E and rows 3-14 at sections C, D and F. Note: At the same time on every other row increase 1x1 st, 1x2 sts and 1x3 sts at both ends = 102(104)106(108) sts.
After the increases finish on a WS row and leave the sts on hold.
Top back
Continue with the 118(126)134(142) backsts. Begin the cable pattern on row 1 of chart IV: cast on 1 st, begin at the correct spot for your size [= 5+1 sts (9+1 sts) 13+1 sts (17+1 sts) on section B], work section C (= 20+4 sts), section D (= 20 sts), section E (= 8+2 sts) and section F (= 12 sts). The midpoint of the piece is marked with an arrow. Work the other side as a mirror image: work sections E, D and C, work B until you reach the correct spot [= 5+1 sts (9+1 sts) 13+1 sts (17+1 sts)], cast on 1 st at the end. Note: Make sure to mirror the cables at sections D, B and A. 16 sts increased, 134(142)150(158) sts on the needles. Work row 2 of the chart, then keep repeating rows 3-10 at section E and rows 3-14 at sections A, B, C, D and F. Note: At the same time on every other row increase 1x1 st, 1x2 sts and 1x3 sts at both ends = 146(154)162(170) sts. With the increased sts work to the end of section B and then keep repeating section A (= 4 sts) as needed.
After the increases finish on a WS row, break yarn and leave the sts on hold.
Top right sleeve
Work like top left sleeve.
Top right front
Continue with the 54(58)62(66) front sts. Begin the cable pattern on the RS on row 1 of chart III: cast on 1 st, begin at the correct spot for your size [= 5+1 sts (9+1 sts) 13+1 sts (17+1 sts) on section D], work section C (= 20+4 sts), section B (= 20 sts), section A (= 8+2 sts) and the 1 st at left. 8 sts increased, 62(66)70(74) sts on the needles. Work row 2 of the chart, then keep repeating rows 3-10 at section A and rows 3-14 at sections B, C and D. Note: At the same time on every other row increase 1x1st, 1x2 sts and 1x3 sts at the right end = 68(72)76(80) sts. With the increased sts work to the end of section D, then keep repeating E (= 4 sts) as needed.
After the increases finish on a WS row, break yarn and leave the sts on hold.
Body
Resume the cable pattern with the front and back sts: on the RS work the 68(72)76(80) left front sts, cast on 12(16)20(24) sts for an armhole, work the 146(154)162(170) back sts, cast on 12(16)20(24) for the other armhole, work the 68(72)76(80) right front sts = 306(330)354(378) sts.
After approx. 30(31)32,5(33,5) cm, finish on a WS row. Work 2 rows in stockinette st, evenly decreasing 77(85)85(93) sts on the first row: 19(21)21(23) sts on the front pieces and 39(43)43(47) sts on the back = 229(245)269(285) sts.
Begin the colourwork pattern on row 1 of chart VI: work the 2 sts at right, repeat the 8 st pattern 28(30)33(35) times, work the 3 sts at left. Work rows 2-18 of the chart.
Switch to the smaller circular needle. Using Jeans knit 1 row and decrease 1 st = 228(244)268(284) sts. Begin ribbing on the WS: p3, *k2, p2*, repeat *-*, k2, p3. Work ribbing for 4 cm, then loosely bind off in pattern.
Sleeves
Move the 102(104)106(108) sts onto the double-pointed needles and pick up and knit 10(14)18(22) additional sts from the armhole cast-on = 112(118)124(130) sts. Working in the round, resume the cable pattern. Work the increased sts following the chart. The beginning of round is at the midpoint of the picked-up sts.
When the piece measures 1,5(1,5)1,5(0,5) cm from the armhole, decrease 1 st on both sides of the beginning of round. Repeat the decreases every 1,5 cm 16(19)18(21) more times = 78(78)86(86) sts.
Note: When the piece measures approx. 30(31)31(32) cm, begin the colourwork pattern on row 1 of chart VI. The midpoint of the piece is marked with an arrow, use that to determine the starting point. Work rows 2-18 of the chart.
Switch to the smaller needles and use Jeans for the rest of the piece. Knit 1 round, evenly decreasing 6(6)10(10) sts = 72(72)76(76) sts. Work ribbing for 8 cm, then bind off in pattern.
Knit the other sleeve in the same manner.
Finishing
Pin to measurements wrong side up, mist and allow to dry.
Borders: Using Jeans, pick up and knit sts from the RS of the left front. Pick up approx. 24 sts per 10 cm. Make sure the number of sts is divisible by 4. Begin ribbing on the WS: p3, *k2, p2*, repeat *-*, k2, p3. When the border measures 3 cm, bind off in pattern.
Place markers for buttons on the border, the topmost one and lowest one approx. 1,5 cm from the edges and the other 7 evenly in between. Work the right border in the same manner. Work buttonholes (= k2tog, yo) when the border measures 1,5 cm. When the border measures 3 cm, bind off in pattern.
Sew on the buttons.
Karheikko Cardigan Novita Nalle
Size(s)
S/M(L)XL(XXL)
Finished dimensions
body circumference 100(108)116(124) cm / 39¼(42½)45¾(48¾) in middle back length 63(65)67(69) cm / 24¾(25½)26½(27¼) in inner sleeve length 47(48)48(49) cm / 18½(19)19(19¼) in
Yarn demand
Novita Nalle (160) Jeans 500(550)600(650) g, (694) Bark 50(50)<100(<100) g, (641) Maple 50(50)50(50) g, (061) Linen 50(50)50(50) g, (010) Off White 50(50)50(50) g and (285) Saffron 50(50)50(50) g
Needles and other supplies
Circular needles (80 cm / 32 in) Novita 3½ mm (UK 9½ / US 4) and 4 mm (UK 8 / US 6) or sizes needed for gauge; 3½ mm and 4 mm double-pointed needles for the sleeves Other supplies 9 buttons
Stitch patterns
- Stockinette stitch: knit the right side rows and purl the wrong side rows.
- Ribbing: *k2, p2*, repeat *-*. On WS rows
Yoke
Using Jeans and the smaller circular needle, cast on 100(100)104(104) sts and begin ribbing on the WS: p3, *k2, p2*, repeat *-*, k2, p3. Work ribbing for 8(8)10(10) rows.
Purl the WS row, evenly increasing 19(25)27(33) sts = 119(125)131(137) sts.
Begin the colourwork pattern on row 1 of chart I: work the 2 sts at the right edge, repeat the 3 st pattern 38(40)42(44) times, work the 3 sts at left. Keep knitting the edge sts. Work rows 2-52 of the chart.
1 st per pattern repeat increased on rows 7, 11, 15, 21 and 27. 309(325)341(357) sts now on the needles.
Work stockinette st using Jeans for 2(4)4(6) rows. On the last row increase 2 sts in each pattern repeat and 1 st at the end of row. 77(81)85(89) sts increased, 386(406)426(446) sts now on the needles. Continue with the Jeans yarn.
Divide the sts into five groups: 54(58)62(66)sts (front) + 80(82)84(86)sts (sleeve) + 118(126)134(142)sts (back) + 80(82)84(86)sts (sleeve) + 54(58)62(66)sts (front). Place markers at the edges of the pieces.
Top left front
Continue with the 54(58)62(66) left front sts. Begin the cable pattern on the RS on row 1 of chart II: work the 1 st at right, work section A (= 8+2 sts), section B (= 20 sts), section C (= 20+4 sts), section D until you reach the arrow for your size [= 5+1 sts (9+1 sts) 13+1 sts (17 + 1 sts)], cast on 1 st at the end of row. 8 sts increased, 62(66)70(74) sts on the needles. Work row 2 of the chart, then keep repeating rows 3-10 at section A and rows 3-14 at sections B, C and D. Note: At the same time on every other row increase 1x1st, 1x2sts and 1x3 sts at the left end = 68(72)76(80)sts. With the increased sts work to the end of section D and then keep repeating section E (= 4 sts) as needed.
After the increases finish on a WS row, break yarn and leave the sts on hold.
Top left sleeve
Continue with the 80(82)84(86) sleeve sts. Begin the cable pattern on row 1 of chart V: cast on 1 st at the beginning, start at the correct spot for your size [= 7+1 sts (8+1 sts) 9+1 sts (10+1 sts) on section C], work section D (19+1 sts), section E (= 9+1 sts), section F (= 10+2 sts). The midpoint of the piece is marked with an arrow. Work the other side as a mirror image: work sections E, D, section C until you reach the correct spot [= 7+1 sts (8+1 sts) 9+1 sts (10+1 sts)], cast on 1 st at the end. Note: Make sure to mirror the cables at sections D and C. 10 sts increased, 90(92)94(96) sts on the needles. Work row 2 of the chart, then keep repeating rows 3-10 at section E and rows 3-14 at sections C, D and F. Note: At the same time on every other row increase 1x1 st, 1x2 sts and 1x3 sts at both ends = 102(104)106(108) sts.
After the increases finish on a WS row and leave the sts on hold.
Top back
Continue with the 118(126)134(142) backsts. Begin the cable pattern on row 1 of chart IV: cast on 1 st, begin at the correct spot for your size [= 5+1 sts (9+1 sts) 13+1 sts (17+1 sts) on section B], work section C (= 20+4 sts), section D (= 20 sts), section E (= 8+2 sts) and section F (= 12 sts). The midpoint of the piece is marked with an arrow. Work the other side as a mirror image: work sections E, D and C, work B until you reach the correct spot [= 5+1 sts (9+1 sts) 13+1 sts (17+1 sts)], cast on 1 st at the end. Note: Make sure to mirror the cables at sections D, B and A. 16 sts increased, 134(142)150(158) sts on the needles. Work row 2 of the chart, then keep repeating rows 3-10 at section E and rows 3-14 at sections A, B, C, D and F. Note: At the same time on every other row increase 1x1 st, 1x2 sts and 1x3 sts at both ends = 146(154)162(170) sts. With the increased sts work to the end of section B and then keep repeating section A (= 4 sts) as needed.
After the increases finish on a WS row, break yarn and leave the sts on hold.
Top right sleeve
Work like top left sleeve.
Top right front
Continue with the 54(58)62(66) front sts. Begin the cable pattern on the RS on row 1 of chart III: cast on 1 st, begin at the correct spot for your size [= 5+1 sts (9+1 sts) 13+1 sts (17+1 sts) on section D], work section C (= 20+4 sts), section B (= 20 sts), section A (= 8+2 sts) and the 1 st at left. 8 sts increased, 62(66)70(74) sts on the needles. Work row 2 of the chart, then keep repeating rows 3-10 at section A and rows 3-14 at sections B, C and D. Note: At the same time on every other row increase 1x1st, 1x2 sts and 1x3 sts at the right end = 68(72)76(80) sts. With the increased sts work to the end of section D, then keep repeating E (= 4 sts) as needed.
After the increases finish on a WS row, break yarn and leave the sts on hold.
Body
Resume the cable pattern with the front and back sts: on the RS work the 68(72)76(80) left front sts, cast on 12(16)20(24) sts for an armhole, work the 146(154)162(170) back sts, cast on 12(16)20(24) for the other armhole, work the 68(72)76(80) right front sts = 306(330)354(378) sts.
After approx. 30(31)32,5(33,5) cm, finish on a WS row. Work 2 rows in stockinette st, evenly decreasing 77(85)85(93) sts on the first row: 19(21)21(23) sts on the front pieces and 39(43)43(47) sts on the back = 229(245)269(285) sts.
Begin the colourwork pattern on row 1 of chart VI: work the 2 sts at right, repeat the 8 st pattern 28(30)33(35) times, work the 3 sts at left. Work rows 2-18 of the chart.
Switch to the smaller circular needle. Using Jeans knit 1 row and decrease 1 st = 228(244)268(284) sts. Begin ribbing on the WS: p3, *k2, p2*, repeat *-*, k2, p3. Work ribbing for 4 cm, then loosely bind off in pattern.
Sleeves
Move the 102(104)106(108) sts onto the double-pointed needles and pick up and knit 10(14)18(22) additional sts from the armhole cast-on = 112(118)124(130) sts. Working in the round, resume the cable pattern. Work the increased sts following the chart. The beginning of round is at the midpoint of the picked-up sts.
When the piece measures 1,5(1,5)1,5(0,5) cm from the armhole, decrease 1 st on both sides of the beginning of round. Repeat the decreases every 1,5 cm 16(19)18(21) more times = 78(78)86(86) sts.
Note: When the piece measures approx. 30(31)31(32) cm, begin the colourwork pattern on row 1 of chart VI. The midpoint of the piece is marked with an arrow, use that to determine the starting point. Work rows 2-18 of the chart.
Switch to the smaller needles and use Jeans for the rest of the piece. Knit 1 round, evenly decreasing 6(6)10(10) sts = 72(72)76(76) sts. Work ribbing for 8 cm, then bind off in pattern.
Knit the other sleeve in the same manner.
Finishing
Pin to measurements wrong side up, mist and allow to dry.
Borders: Using Jeans, pick up and knit sts from the RS of the left front. Pick up approx. 24 sts per 10 cm. Make sure the number of sts is divisible by 4. Begin ribbing on the WS: p3, *k2, p2*, repeat *-*, k2, p3. When the border measures 3 cm, bind off in pattern.
Place markers for buttons on the border, the topmost one and lowest one approx. 1,5 cm from the edges and the other 7 evenly in between. Work the right border in the same manner. Work buttonholes (= k2tog, yo) when the border measures 1,5 cm. When the border measures 3 cm, bind off in pattern.
Sew on the buttons.