

Group Chat Cardigan, Novita 7 Veljestä
Designed by Moa Blomqvist, the Group Chat cardigan is crocheted in a bold colour combination of 7 Brothers yarn. Wide, baggy sleeves and a loose fit make this crochet knit particularly topical.
Designer
Moa Blomqvist
Size(s)
XS(S/M)L
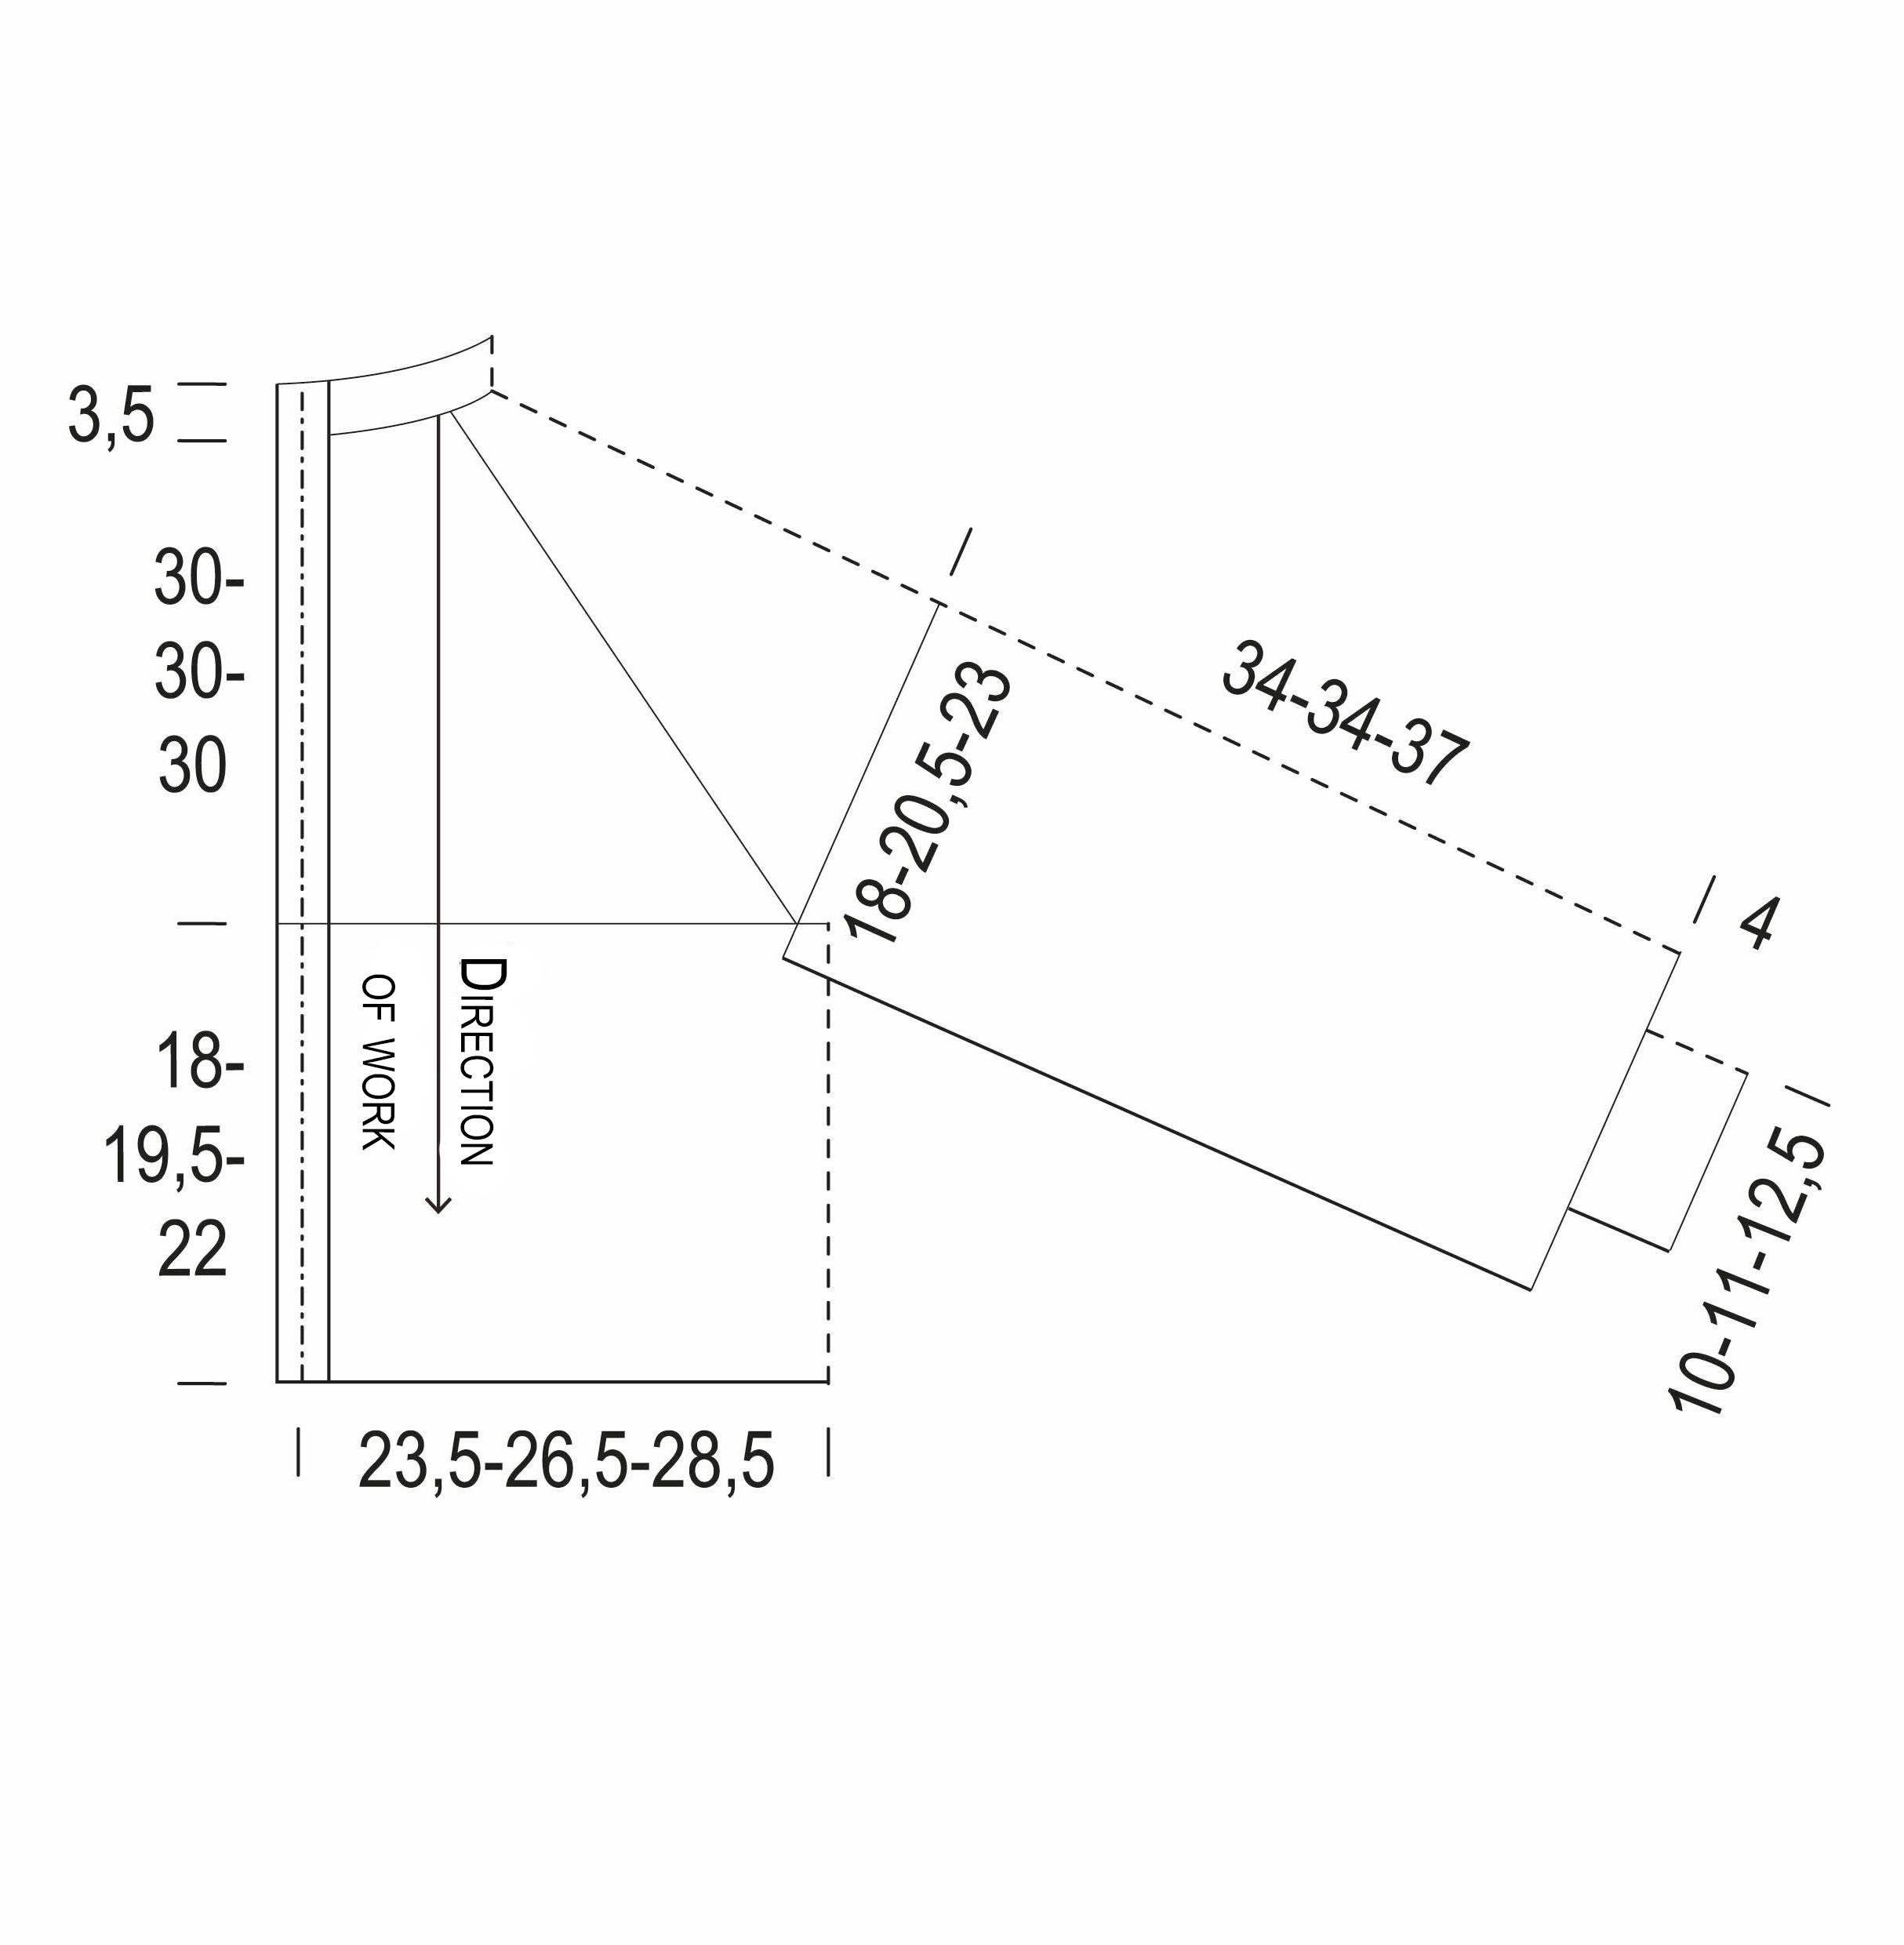
Finished dimensions
chest (circumference) 94(106)114 cm
length, centre back (incl. neckband) 51.5(53)55.5 cm
inside sleeve length 38(38)41 cm (sleeves will stretch when worn)
Yarn demand
7 Veljestä Colour A: (011) white 300(300)400 g Colour B: (525) Geisha 100(100)200 g Colour C: (099) soot 100(100)200 g Colour D: (323) taikuri 100(100)200 g Colour E: (136) lobelia 100(100)100 g
Needles and other supplies
Recommended crochet hook Novita 4.5 mm or as required to meet gauge
Finished dimensions
chest (circumference) 94(106)114 cm
length, centre back (incl. neckband) 51.5(53)55.5 cm
inside sleeve length 38(38)41 cm (sleeves will stretch when worn)
Gauge swatch Moss stitch: All rows: 2 ch sts (= 1st dc), *1 dc in next ch st, 1 ch st*, repeat *-* until 1 dc + 2 ch sts remain, work dc into the second ch at the start of the previous row. Turn your work.
YOST BLO (= yarn over slip stitch back loop only): yarn over, insert hook through the back loop, pick up the yarn and pull it through all the stitches on the hook. Top tip! Make sure that you’ve correctly identified the back loop. When you’re only working into back loops, you’ll see stitches to the front of your work that look like knit stitches.
YOST BLO2tog:yarn over, insert hook through the back loop, pick up the yarn and pull it through one stitch, yarn over, insert hook into back loop of the next stitch, pick up the yarn and pull through all the stitches on the hook.
Tension 17 sts and 16 rows of moss stitch = 10 cm
Neckband
Using colour E, crochet a starting chain of 14(14)16 ch sts.
Row 1 (WS): ch 1, *YOST BLO*, repeat *-* until end of row. Turn your work.
Row 2 (RS): ch 1, work 1 sl st into every stitch, always working into the back loop. Turn your work.
Repeat Rows 1–2 until you have 71(81)81 rows, including the starting chain. Break yarn.
Yoke
Hold the neckband with the RS facing towards you and the starting edge on your right. Insert your hook into the st in the top right corner.
Row 1 (RS): Using colour A work 2 ch st (= 1st dc), *1 dc until end of next concave row, 1 ch st*, repeat *–*, until far end of neckband and add 1 dc in the corner st. Before finishing the last dc, pull through with colour B. The dcs will always go into the purl sts + 1 dc on both edges. You now have 36(41)41 dc. Turn your work.
Divide the dcs as follows using stitch markers:
Front piece: 6(7)7 dcs
Sleeve: 5(6)6 dcs
Back piece: 14(15)15 dcs
Sleeve: 5(6)6 dcs
Front piece: 6(7)7 dcs
The stitch markers are attached to ch sts between the dcs. When working WS rows, keep moving the stitch marker onto the dc, which you should work up to the marker and on RS rows to the ch st, where the marker sits.
From now on, crochet RS rows with colour A and alternate WS rows with colours B, C and D in this order. Change colour at the end of the row as above. Now start the moss stitch:
Row 2 (WS): 2 ch sts (= 1st dc), *1 dc in next ch st, 1 ch st*, repeat *-* until 1 dc + 2 ch sts remain, work dc in the second ch from beginning of previous row. Turn your work.
For sizes XS and S/M:
Row 3 (RS): *Work in moss stitch to 1 ch st before stitch marker, make increase (= crochet 1 dc + 1 ch st + 1 dc + 1 ch st in same ch st), move the stitch marker to the last ch st worked, repeat the increase on next ch st*, repeat *–* until last stitch marker and continue in moss stitch until end of row. Turn your work. You have now added 8 dc and your work has 44(49) dc.
Rows 4–6: Work as per Row 2.
Repeat Rows 3–6 another 10(10) times and then work Rows 3–4.
For size L:
Row 3 (RS): *Work in moss stitch to 1 ch st before stitch marker, make increase (= crochet 1 dc + 1 ch st + 1 dc + 1 ch st in same ch st), move the stitch marker to the last ch st worked, repeat the increase on next ch st*, repeat *–* until last stitch marker and continue in moss stitch until end of row. Turn your work. You have now added 8 dc and your work has 49 dc.
Rows 4: Work as per Row 2.
Repeat Rows 3–4 another 3 times and then work Rows 3–6 as per the instructions for XS and S/M another 9 times. Now work Rows 3–4.
All sizes:
The yoke comprises 48(48)48 rows including 12(12)14 increase rows. The work now has 132(137)153 dcs:
Front piece: 18(19)21 dcs
Sleeve: 29(30)34 dcs
Back piece: 38(39)43 dcs
Sleeve: 29(30)34 dcs
Front piece: 18(19)21 dcs
Body
You should now separate the work into sleeve and body sections:
Row 49: 2 ch st (= 1st dc), work the front piece in moss stitch, 4(10)10 ch sts in armhole and skip sleeve sts, continue to work back piece in moss stitch, 4(10)10 ch sts in armhole, skip sleeve sts, continue to work front piece in moss stitch. Turn your work.
Row 50: 2 ch st (= 1st dc), work in moss stitch and add dc in every second ch st in armhole. The work now has 78(87)95 dc.
Continue to work in moss stitch until you have 77(79)83 rows or you have reached the desired length. Break yarn.
Sleeve
Row 49 (RS): Join colour A in the middle of the armhole, work in moss stitch until the last dc is worked at the start of a row. The sleeve has 31(35)39 dcs. Turn your work.
Continue to work in moss stitch as above until the sleeve has 103(103)107 rows as counted from the base of the neckband or the sleeve is 4 cm shorter than required. Break yarn.
Join the sleeve seam.
Preparing the cuff:
Row 1: Join colour E to cuff seam on RS. Crochet 1 ch st followed by 32(36)40 sl st around the cuff. Change direction.
Row 2: *yo sl st into back loop 2tog, yo sl st into back loop of next 2 sts*, repeat *–* until end of row. You now have 24(27)30 sts. Don’t break yarn, start ribbing from here.
Ribbing:
The rib is worked at a right angle in relation to the cuff. When turning at edge of cuff, instead of ch st, work 1 sl st to connect the ribbing to the cuff.
Row 1: 6 ch sts. Turn your work.
Row 2: ch 1, 6 sl sts into the back loop, 1 sl st to the back loop of the st on the 2nd cuff set-up row (strand inside the cuff). Turn your work.
Row 3: *yost blo*, repeat *-* 5 more times. Turn your work.
Repeat Rows 2–3 until the ribbing is attached to all the sts on the 2nd set-up row. Break yarn, leaving enough tail to finish off.
Repeat to make the other sleeve.
Front edging
Join the colour E to the bottom corner of the right front piece with the RS facing up.
Row 1: 1 ch st, 1 sl st at end of every moss stitch row until neckband and then 1 sl st into every neckband st. Turn your work.
Row 2: ch 1, *YOST BLO*, repeat *-* until end of row. Turn your work.
Row 3: ch 1, work 1 sl st into every stitch, always working into the back loop. Turn your work.
Repeat Rows 2–3 a total of 3 times. Break yarn.
Work the left front piece as above but start from the top corner of the neckband.
Finishing
Fold the neckband over to the inside and stitch into place.
Weave in any loose ends. To block, gently wet your cardigan and carefully reshape then leave to dry. Alternatively, you can steam it gently.
Group Chat Cardigan, Novita 7 Veljestä
Size(s)
XS(S/M)L
Finished dimensions
chest (circumference) 94(106)114 cm
length, centre back (incl. neckband) 51.5(53)55.5 cm
inside sleeve length 38(38)41 cm (sleeves will stretch when worn)
Yarn demand
7 Veljestä Colour A: (011) white 300(300)400 g Colour B: (525) Geisha 100(100)200 g Colour C: (099) soot 100(100)200 g Colour D: (323) taikuri 100(100)200 g Colour E: (136) lobelia 100(100)100 g
Needles and other supplies
Recommended crochet hook Novita 4.5 mm or as required to meet gauge
Gauge swatch Moss stitch: All rows: 2 ch sts (= 1st dc), *1 dc in next ch st, 1 ch st*, repeat *-* until 1 dc + 2 ch sts remain, work dc into the second ch at the start of the previous row. Turn your work.
YOST BLO (= yarn over slip stitch back loop only): yarn over, insert hook through the back loop, pick up the yarn and pull it through all the stitches on the hook. Top tip! Make sure that you’ve correctly identified the back loop. When you’re only working into back loops, you’ll see stitches to the front of your work that look like knit stitches.
YOST BLO2tog:yarn over, insert hook through the back loop, pick up the yarn and pull it through one stitch, yarn over, insert hook into back loop of the next stitch, pick up the yarn and pull through all the stitches on the hook.
Tension 17 sts and 16 rows of moss stitch = 10 cm
Neckband
Using colour E, crochet a starting chain of 14(14)16 ch sts.
Row 1 (WS): ch 1, *YOST BLO*, repeat *-* until end of row. Turn your work.
Row 2 (RS): ch 1, work 1 sl st into every stitch, always working into the back loop. Turn your work.
Repeat Rows 1–2 until you have 71(81)81 rows, including the starting chain. Break yarn.
Yoke
Hold the neckband with the RS facing towards you and the starting edge on your right. Insert your hook into the st in the top right corner.
Row 1 (RS): Using colour A work 2 ch st (= 1st dc), *1 dc until end of next concave row, 1 ch st*, repeat *–*, until far end of neckband and add 1 dc in the corner st. Before finishing the last dc, pull through with colour B. The dcs will always go into the purl sts + 1 dc on both edges. You now have 36(41)41 dc. Turn your work.
Divide the dcs as follows using stitch markers:
Front piece: 6(7)7 dcs
Sleeve: 5(6)6 dcs
Back piece: 14(15)15 dcs
Sleeve: 5(6)6 dcs
Front piece: 6(7)7 dcs
The stitch markers are attached to ch sts between the dcs. When working WS rows, keep moving the stitch marker onto the dc, which you should work up to the marker and on RS rows to the ch st, where the marker sits.
From now on, crochet RS rows with colour A and alternate WS rows with colours B, C and D in this order. Change colour at the end of the row as above. Now start the moss stitch:
Row 2 (WS): 2 ch sts (= 1st dc), *1 dc in next ch st, 1 ch st*, repeat *-* until 1 dc + 2 ch sts remain, work dc in the second ch from beginning of previous row. Turn your work.
For sizes XS and S/M:
Row 3 (RS): *Work in moss stitch to 1 ch st before stitch marker, make increase (= crochet 1 dc + 1 ch st + 1 dc + 1 ch st in same ch st), move the stitch marker to the last ch st worked, repeat the increase on next ch st*, repeat *–* until last stitch marker and continue in moss stitch until end of row. Turn your work. You have now added 8 dc and your work has 44(49) dc.
Rows 4–6: Work as per Row 2.
Repeat Rows 3–6 another 10(10) times and then work Rows 3–4.
For size L:
Row 3 (RS): *Work in moss stitch to 1 ch st before stitch marker, make increase (= crochet 1 dc + 1 ch st + 1 dc + 1 ch st in same ch st), move the stitch marker to the last ch st worked, repeat the increase on next ch st*, repeat *–* until last stitch marker and continue in moss stitch until end of row. Turn your work. You have now added 8 dc and your work has 49 dc.
Rows 4: Work as per Row 2.
Repeat Rows 3–4 another 3 times and then work Rows 3–6 as per the instructions for XS and S/M another 9 times. Now work Rows 3–4.
All sizes:
The yoke comprises 48(48)48 rows including 12(12)14 increase rows. The work now has 132(137)153 dcs:
Front piece: 18(19)21 dcs
Sleeve: 29(30)34 dcs
Back piece: 38(39)43 dcs
Sleeve: 29(30)34 dcs
Front piece: 18(19)21 dcs
Body
You should now separate the work into sleeve and body sections:
Row 49: 2 ch st (= 1st dc), work the front piece in moss stitch, 4(10)10 ch sts in armhole and skip sleeve sts, continue to work back piece in moss stitch, 4(10)10 ch sts in armhole, skip sleeve sts, continue to work front piece in moss stitch. Turn your work.
Row 50: 2 ch st (= 1st dc), work in moss stitch and add dc in every second ch st in armhole. The work now has 78(87)95 dc.
Continue to work in moss stitch until you have 77(79)83 rows or you have reached the desired length. Break yarn.
Sleeve
Row 49 (RS): Join colour A in the middle of the armhole, work in moss stitch until the last dc is worked at the start of a row. The sleeve has 31(35)39 dcs. Turn your work.
Continue to work in moss stitch as above until the sleeve has 103(103)107 rows as counted from the base of the neckband or the sleeve is 4 cm shorter than required. Break yarn.
Join the sleeve seam.
Preparing the cuff:
Row 1: Join colour E to cuff seam on RS. Crochet 1 ch st followed by 32(36)40 sl st around the cuff. Change direction.
Row 2: *yo sl st into back loop 2tog, yo sl st into back loop of next 2 sts*, repeat *–* until end of row. You now have 24(27)30 sts. Don’t break yarn, start ribbing from here.
Ribbing:
The rib is worked at a right angle in relation to the cuff. When turning at edge of cuff, instead of ch st, work 1 sl st to connect the ribbing to the cuff.
Row 1: 6 ch sts. Turn your work.
Row 2: ch 1, 6 sl sts into the back loop, 1 sl st to the back loop of the st on the 2nd cuff set-up row (strand inside the cuff). Turn your work.
Row 3: *yost blo*, repeat *-* 5 more times. Turn your work.
Repeat Rows 2–3 until the ribbing is attached to all the sts on the 2nd set-up row. Break yarn, leaving enough tail to finish off.
Repeat to make the other sleeve.
Front edging
Join the colour E to the bottom corner of the right front piece with the RS facing up.
Row 1: 1 ch st, 1 sl st at end of every moss stitch row until neckband and then 1 sl st into every neckband st. Turn your work.
Row 2: ch 1, *YOST BLO*, repeat *-* until end of row. Turn your work.
Row 3: ch 1, work 1 sl st into every stitch, always working into the back loop. Turn your work.
Repeat Rows 2–3 a total of 3 times. Break yarn.
Work the left front piece as above but start from the top corner of the neckband.
Finishing
Fold the neckband over to the inside and stitch into place.
Weave in any loose ends. To block, gently wet your cardigan and carefully reshape then leave to dry. Alternatively, you can steam it gently.