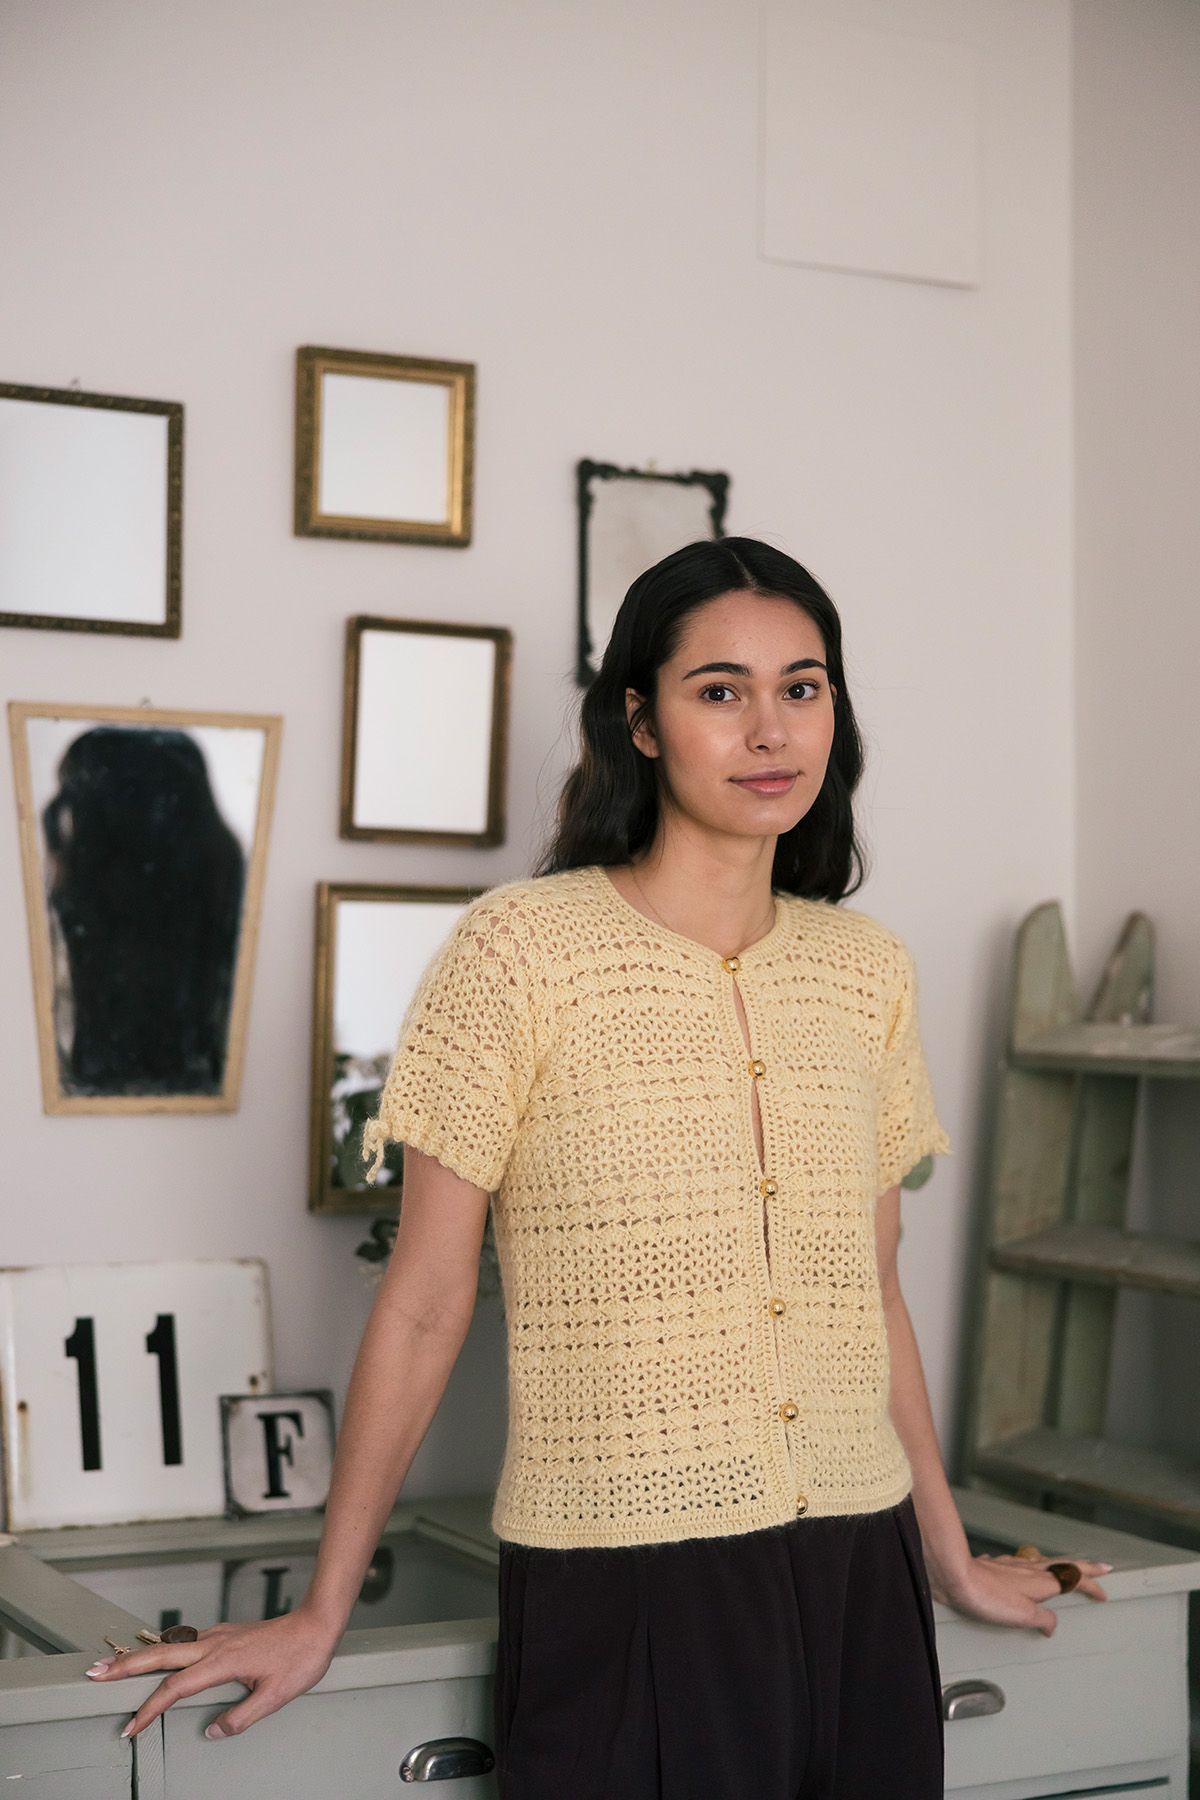
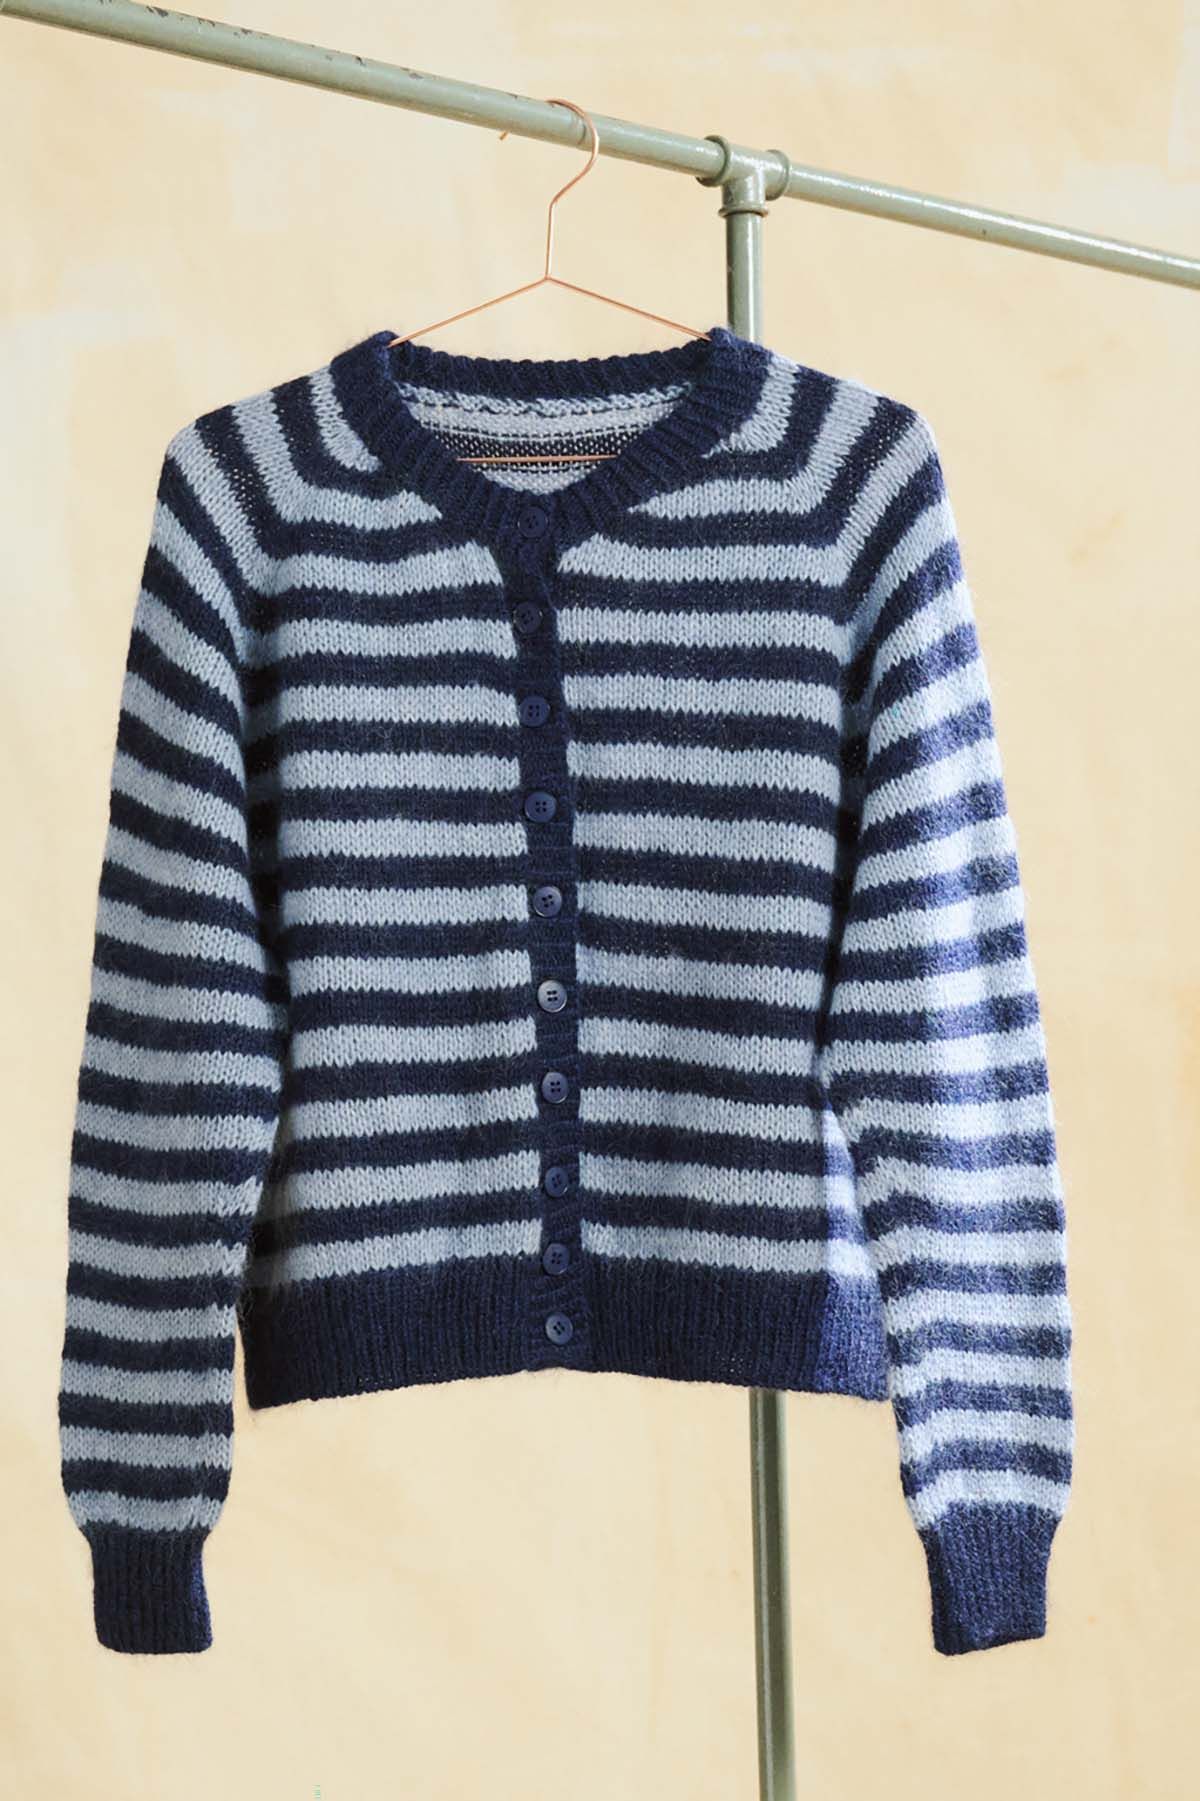
Cottager cable cardigan Novita Nordic Wool
This cardigan is a cabled masterpiece. The cable pattern stretches over 102 stitches, with three distinct cable motifs. So take out your cable needle, focus and get started with a beautiful although admittedly laborious cardigan project.
Designer
Lea Petäjä
Language
Size(s)
XS(S)M(L)XL(XXL)
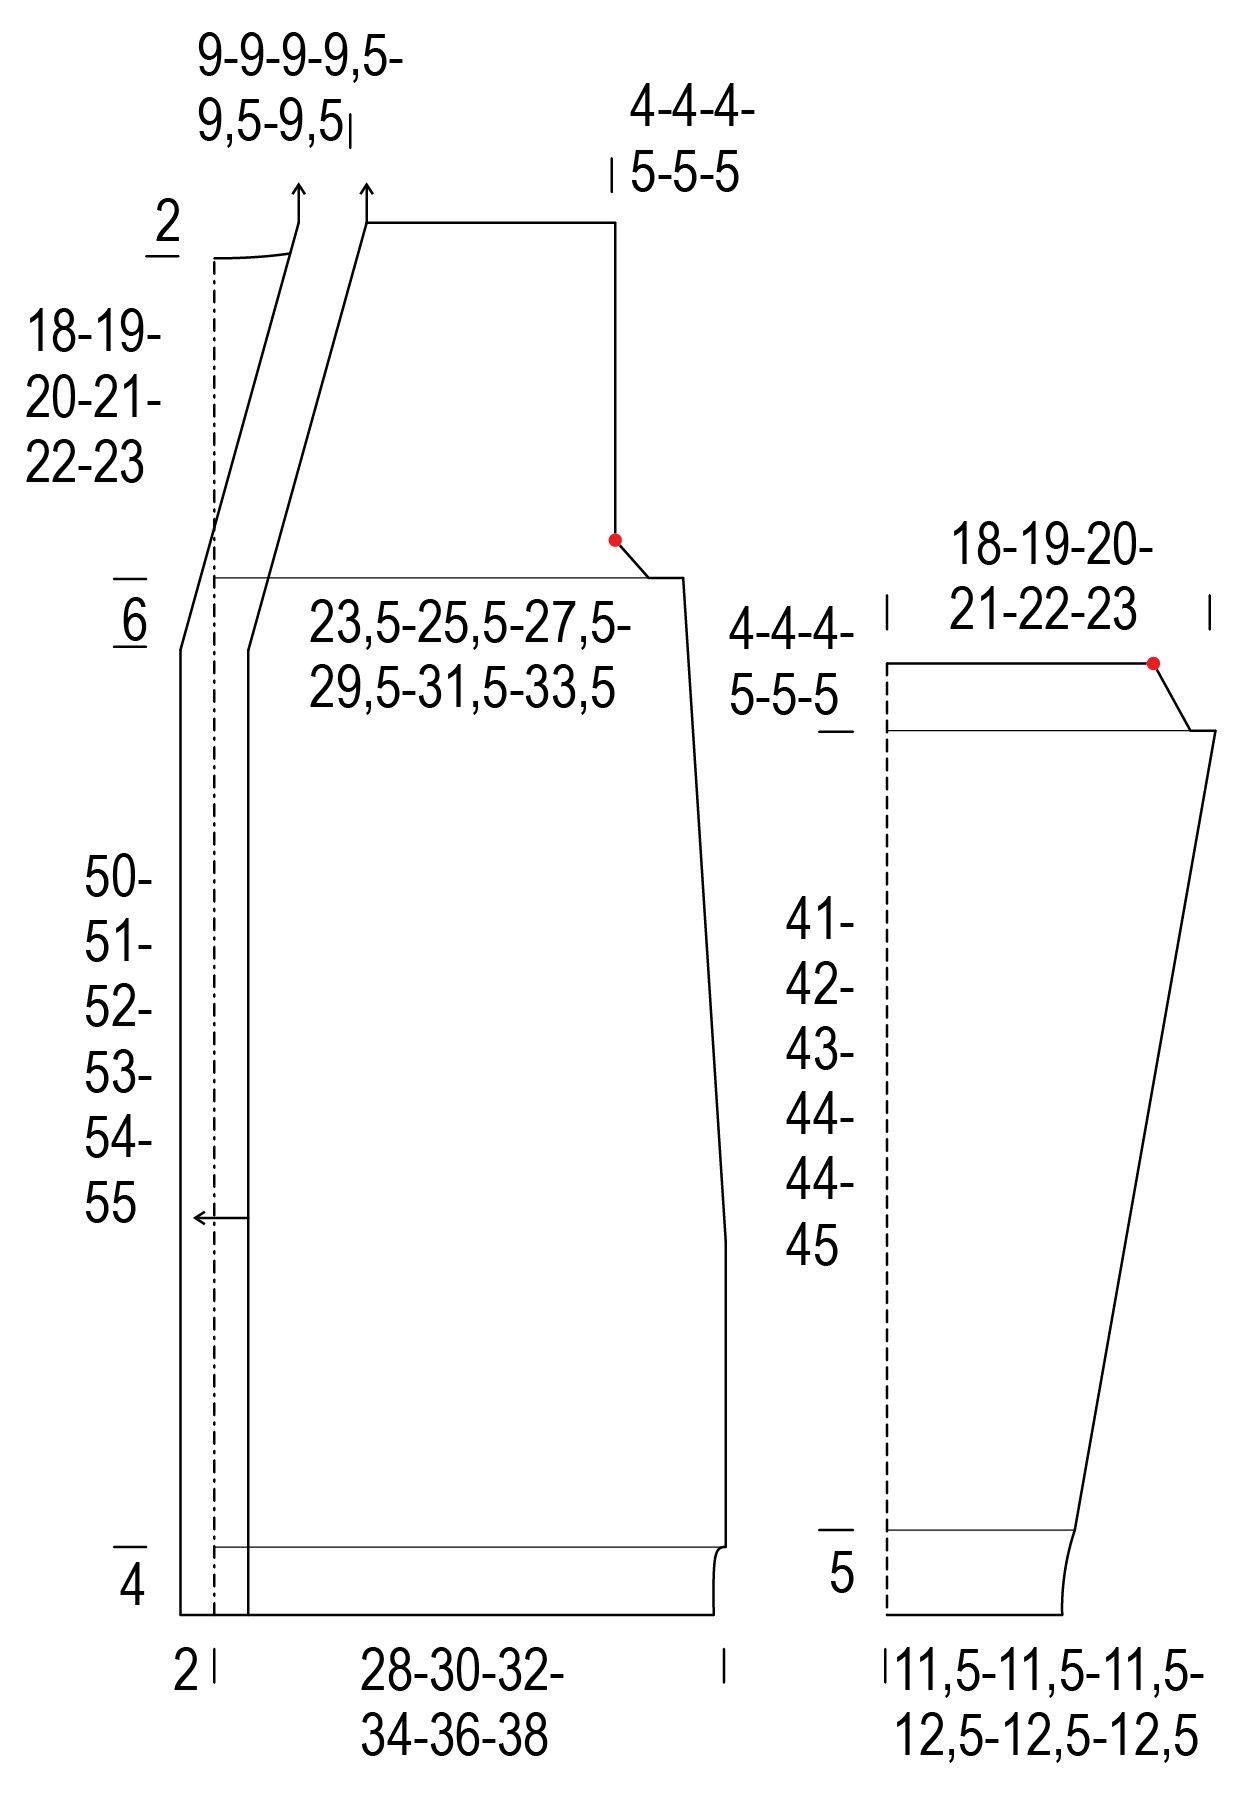
Finished dimensions
body circumference 94(102)110(118)126(134) cm / 37(40¼)43¼(46½)49½(52¾) in length approx. 80(82)84(86)88(90) cm / 31½(32¼)33(33¾)34¾(35½) in inner sleeve length 46(47)48(49)49(50) cm / 18(18½)19(19¼)19¼(19¾) in
Yarn demand
Novita Nordic Wool (010) Off White 650(700)750(800)850(900) g
Needles and other supplies
Circular needles (80 cm / 32 in) Novita 4 mm (UK 8 / US 6) and 5 mm (UK 6 / US 8) or sizes needed; a second 4 mm circular needle (80 cm / 32 in) for the border Other supplies 6 buttons
Finished dimensions
body circumference 94(102)110(118)126(134) cm / 37(40¼)43¼(46½)49½(52¾) in length approx. 80(82)84(86)88(90) cm / 31½(32¼)33(33¾)34¾(35½) in inner sleeve length 46(47)48(49)49(50) cm / 18(18½)19(19¼)19¼(19¾) in
Stitch patterns
- K1 p1 ribbing: *k1, p1*, repeat *-*. On the wrong side rows, knit the knit sts and purl the purl sts.
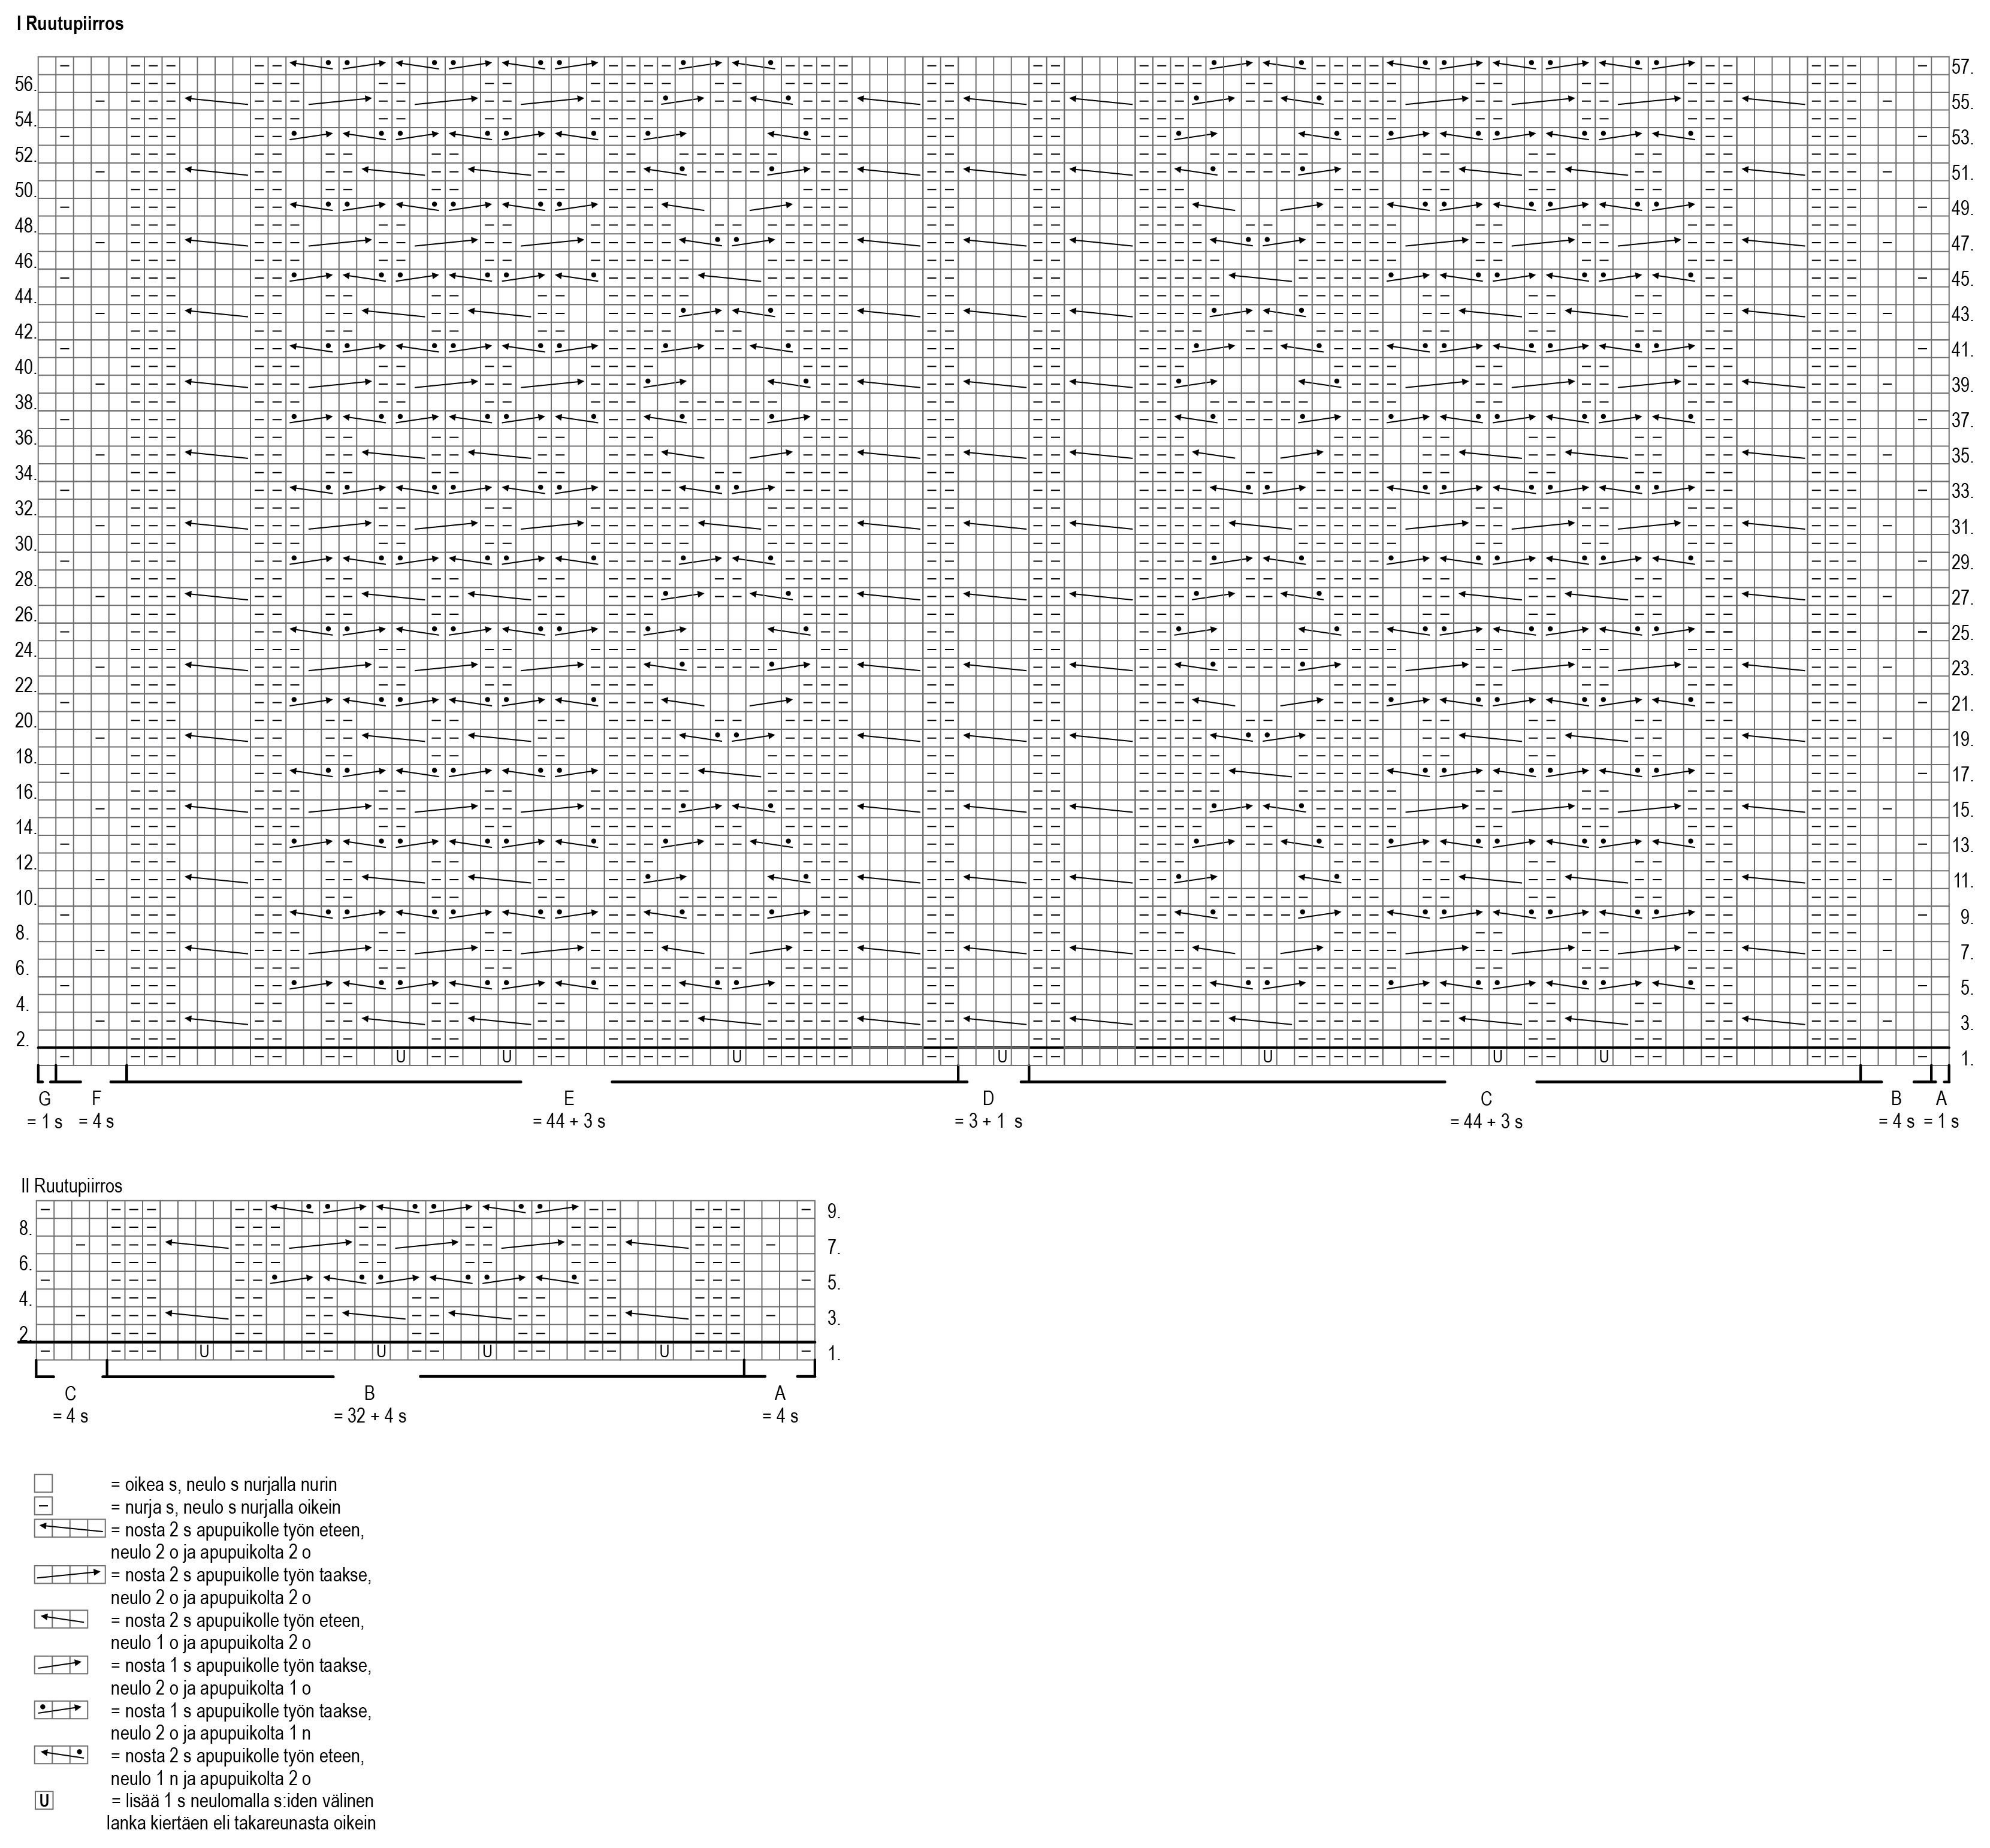
- Textured pattern: follow the chart and instructions.
- Cable pattern: follow the chart and instructions.
- K2 p2 ribbing: *k2, p2*, repeat *-*. On the wrong side rows
Back
Using the smaller needles cast on 121(129)137(145)153(161) sts and begin k1 p1 ribbing on the WS with p1. Work ribbing for 4 cm.
Switch to the larger needles and begin the pattern on row 1 of chart I: (RS) work section A (= 1 st), repeat section B (= 4 sts) as needed with next 14(18)22(26)30(34) sts, work section C (= 44+3 sts), section D (= 3+1 sts), section E (= 44+3 sts), repeat section F (= 4 sts) as needed with next 14(18)22(26)30(34) sts, work section G (= 1 st). 7 sts increased, 128(136)144(152)160(168) sts on the needles.
Keep repeating rows 2-57 of the chart.
When the piece measures 17(18)18(19)19(20) cm, decrease 1 st at both ends. Repeat the decreases every 5 cm 7 more times = 112(120)128(136)144(152) sts.
When the piece measures 60(61)62(63)64(65) cm, on every other row bind off 1x3(3)3(4)4(4) sts and 1x2 sts at both ends for the armholes. On every other row decrease 3(3)3(4)4(4)x1 st at both ends = 96(104)112(116)124(132)sts.
When the armhole measures 18(19)20(21)22(23) cm, securely bind off the middle 38(38)38(40)40(40) sts for the neckline. Work one shoulder at a time. On every other row bind off 2x2 sts at the neckline edge.
When the armhole measures 20(21)22(23)24(25) cm, bind off the 25(29)33(34)38(42) shoulder sts.
Knit the other side in the same manner.
Left front
Using the smaller needles cast on 59(63)67(71)75(79) sts and begin k1 p1 ribbing on the WS with k1. Work ribbing for 4 cm.
Switch to the larger needles and begin the pattern on row 1 of chart I: (RS) work section A (= 1 st), repeat section B (= 4 sts) as needed with next 14(18)22(26)30(34) sts, work section C (= 44+3 sts). 3 sts increased, 62(66)70(74)78(82) sts on the needles.
Keep repeating rows 2-57 of the chart.
When the piece measures 17(18)18(19)19(20) cm, decrease 1 st at the right end. Repeat the decrease every 5 cm 7 more times.
Note: When the piece measures 54(55)56(57)58(59) cm, decrease 1 st at the left end (front edge): on a RS row work to last 3 sts, p2tog, p1. Repeat the decrease every 1 cm 17(16)15(16)15(14) more times and then 3(4)5(5)6(7) times every 2 cm.
Note: When the piece measures 60(61)62(63)64(65) cm, on every other row bind off 1x3(3)3(4)4(4) sts and 1x2 sts at the right end for the armhole. On every other row decrease 3(3)3(4)4(4)x1 st at the right edge.
When the armhole measures 20(21)22(23)24(25) cm, bind off the 25(29)33(34)38(42) shoulder sts.
Right front
Using the smaller needles cast on 59(63)67(71)75(79) sts and begin k1 p1 ribbing on the WS with k1. Work ribbing for 4 cm.
Switch to the larger needles and begin the pattern on row 1 of chart I: (RS) work section E (= 44+3 sts), repeat section F (= 4 sts) as needed with next 14(18)22(26)30(34) sts, work section G (= 1 st). 3 sts increased, 62(66)70(74)78(82) sts on the needles.
Keep repeating rows 2-57 of the chart.
When the piece measures 17(18)18(19)19(20) cm, decrease 1 st at the left end. Repeat the decrease every 5 cm 7 more times.
Note: When the piece measures 54(55)56(57)58(59) cm, decrease 1 st at the right end (front edge): on a RS row p1, p2tog, work to end. Repeat the decrease every 1 cm 17(16)15(16)15(14) more times and then 3(4)5(5)6(7) times every 2 cm.
Note: When the piece measures 60(61)62(63)64(65) cm, on every other row bind off 1x3(3)3(4)4(4) sts and 1x2 sts at the left end for the armhole. On every other row decrease 3(3)3(4)4(4)x1 st at the left edge.
When the armhole measures 20(21)22(23)24(25) cm, bind off the 25(29)33(34)38(42) shoulder sts.
Sleeves
Using the smaller needles cast on 48(48)48(52)52(52) sts and work ribbing for 5 cm.
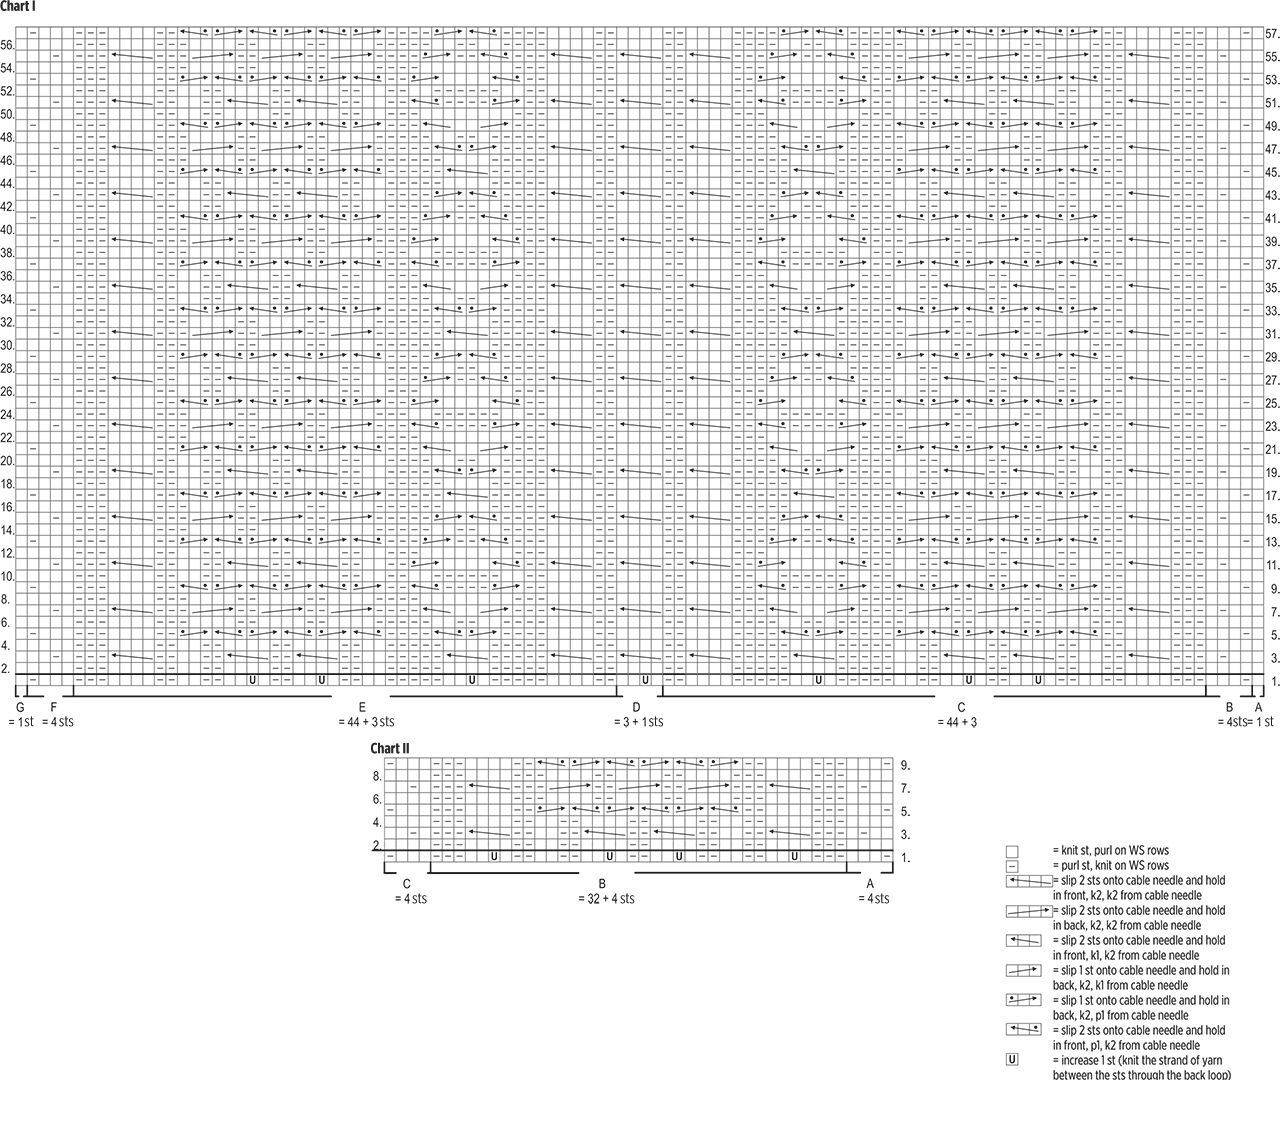
Switch to the larger needles and begin the pattern on row 1 of chart II: (RS) repeat section A (= 4 sts) as needed with first 8(8)8(10)10(10) sts, work section B (= 32+4 sts), repeat section C (= 4 sts) as needed with next 8(8)8(10)10(10) sts. 4 sts increased, 52(52)52(56)56(56) sts on the needles.
Keep repeating rows 2-9 of the chart.
Note: When the piece measures 10(12)8(9)13(10) cm, increase 1 st at both ends. Repeat the increases every 3(2,5)2,5(2,5)2(2) cm 11(13)15(15)17(19) more times = 76(80)84(88)92(96) sts. Work the increased sts following section A at the right end and section C at the left end.
When the piece measures 45(46)47(48)48(49) cm, on every other row bind off 1x3(3)3(4)4(4) sts and 1x2 sts at both ends. On every other row decrease 3(3)3(4)4(4)x1 st at both ends. Bind off the remaining sts.
Knit the other sleeve in the same manner.
Finishing
Pin to measurements wrong side up, mist and allow to dry.
Sew the shoulder seams. Attach the sleeves following the red markings on the pattern. Sew the side seams and sleeve seams.
Borders: Using 2 circular needles (4 mm) pick up and knit sts from the RS at the right front edge, neckline and left front edge. Skip every 4th row. Make sure the number of sts is divisible by 4. Begin k2 p2 ribbing on the WS: p3, k2, *p2, k2*, repeat *-*, p3.
Note: When the ribbing measures 1 cm, work buttonholes on the right front. The first buttonhole should be at the starting point of the neckline decreases and the other 5 at 9 cm intervals. Buttonhole: work 2 sts together, yarn over.
When the ribbing measures 4 cm, bind off in pattern.
Sew on the buttons.
Cottager cable cardigan Novita Nordic Wool
Size(s)
XS(S)M(L)XL(XXL)
Finished dimensions
body circumference 94(102)110(118)126(134) cm / 37(40¼)43¼(46½)49½(52¾) in length approx. 80(82)84(86)88(90) cm / 31½(32¼)33(33¾)34¾(35½) in inner sleeve length 46(47)48(49)49(50) cm / 18(18½)19(19¼)19¼(19¾) in
Yarn demand
Novita Nordic Wool (010) Off White 650(700)750(800)850(900) g
Needles and other supplies
Circular needles (80 cm / 32 in) Novita 4 mm (UK 8 / US 6) and 5 mm (UK 6 / US 8) or sizes needed; a second 4 mm circular needle (80 cm / 32 in) for the border Other supplies 6 buttons
Stitch patterns
- K1 p1 ribbing: *k1, p1*, repeat *-*. On the wrong side rows, knit the knit sts and purl the purl sts.
- Textured pattern: follow the chart and instructions.
- Cable pattern: follow the chart and instructions.
- K2 p2 ribbing: *k2, p2*, repeat *-*. On the wrong side rows
Back
Using the smaller needles cast on 121(129)137(145)153(161) sts and begin k1 p1 ribbing on the WS with p1. Work ribbing for 4 cm.
Switch to the larger needles and begin the pattern on row 1 of chart I: (RS) work section A (= 1 st), repeat section B (= 4 sts) as needed with next 14(18)22(26)30(34) sts, work section C (= 44+3 sts), section D (= 3+1 sts), section E (= 44+3 sts), repeat section F (= 4 sts) as needed with next 14(18)22(26)30(34) sts, work section G (= 1 st). 7 sts increased, 128(136)144(152)160(168) sts on the needles.
Keep repeating rows 2-57 of the chart.
When the piece measures 17(18)18(19)19(20) cm, decrease 1 st at both ends. Repeat the decreases every 5 cm 7 more times = 112(120)128(136)144(152) sts.
When the piece measures 60(61)62(63)64(65) cm, on every other row bind off 1x3(3)3(4)4(4) sts and 1x2 sts at both ends for the armholes. On every other row decrease 3(3)3(4)4(4)x1 st at both ends = 96(104)112(116)124(132)sts.
When the armhole measures 18(19)20(21)22(23) cm, securely bind off the middle 38(38)38(40)40(40) sts for the neckline. Work one shoulder at a time. On every other row bind off 2x2 sts at the neckline edge.
When the armhole measures 20(21)22(23)24(25) cm, bind off the 25(29)33(34)38(42) shoulder sts.
Knit the other side in the same manner.
Left front
Using the smaller needles cast on 59(63)67(71)75(79) sts and begin k1 p1 ribbing on the WS with k1. Work ribbing for 4 cm.
Switch to the larger needles and begin the pattern on row 1 of chart I: (RS) work section A (= 1 st), repeat section B (= 4 sts) as needed with next 14(18)22(26)30(34) sts, work section C (= 44+3 sts). 3 sts increased, 62(66)70(74)78(82) sts on the needles.
Keep repeating rows 2-57 of the chart.
When the piece measures 17(18)18(19)19(20) cm, decrease 1 st at the right end. Repeat the decrease every 5 cm 7 more times.
Note: When the piece measures 54(55)56(57)58(59) cm, decrease 1 st at the left end (front edge): on a RS row work to last 3 sts, p2tog, p1. Repeat the decrease every 1 cm 17(16)15(16)15(14) more times and then 3(4)5(5)6(7) times every 2 cm.
Note: When the piece measures 60(61)62(63)64(65) cm, on every other row bind off 1x3(3)3(4)4(4) sts and 1x2 sts at the right end for the armhole. On every other row decrease 3(3)3(4)4(4)x1 st at the right edge.
When the armhole measures 20(21)22(23)24(25) cm, bind off the 25(29)33(34)38(42) shoulder sts.
Right front
Using the smaller needles cast on 59(63)67(71)75(79) sts and begin k1 p1 ribbing on the WS with k1. Work ribbing for 4 cm.
Switch to the larger needles and begin the pattern on row 1 of chart I: (RS) work section E (= 44+3 sts), repeat section F (= 4 sts) as needed with next 14(18)22(26)30(34) sts, work section G (= 1 st). 3 sts increased, 62(66)70(74)78(82) sts on the needles.
Keep repeating rows 2-57 of the chart.
When the piece measures 17(18)18(19)19(20) cm, decrease 1 st at the left end. Repeat the decrease every 5 cm 7 more times.
Note: When the piece measures 54(55)56(57)58(59) cm, decrease 1 st at the right end (front edge): on a RS row p1, p2tog, work to end. Repeat the decrease every 1 cm 17(16)15(16)15(14) more times and then 3(4)5(5)6(7) times every 2 cm.
Note: When the piece measures 60(61)62(63)64(65) cm, on every other row bind off 1x3(3)3(4)4(4) sts and 1x2 sts at the left end for the armhole. On every other row decrease 3(3)3(4)4(4)x1 st at the left edge.
When the armhole measures 20(21)22(23)24(25) cm, bind off the 25(29)33(34)38(42) shoulder sts.
Sleeves
Using the smaller needles cast on 48(48)48(52)52(52) sts and work ribbing for 5 cm.
Switch to the larger needles and begin the pattern on row 1 of chart II: (RS) repeat section A (= 4 sts) as needed with first 8(8)8(10)10(10) sts, work section B (= 32+4 sts), repeat section C (= 4 sts) as needed with next 8(8)8(10)10(10) sts. 4 sts increased, 52(52)52(56)56(56) sts on the needles.
Keep repeating rows 2-9 of the chart.
Note: When the piece measures 10(12)8(9)13(10) cm, increase 1 st at both ends. Repeat the increases every 3(2,5)2,5(2,5)2(2) cm 11(13)15(15)17(19) more times = 76(80)84(88)92(96) sts. Work the increased sts following section A at the right end and section C at the left end.
When the piece measures 45(46)47(48)48(49) cm, on every other row bind off 1x3(3)3(4)4(4) sts and 1x2 sts at both ends. On every other row decrease 3(3)3(4)4(4)x1 st at both ends. Bind off the remaining sts.
Knit the other sleeve in the same manner.
Finishing
Pin to measurements wrong side up, mist and allow to dry.
Sew the shoulder seams. Attach the sleeves following the red markings on the pattern. Sew the side seams and sleeve seams.
Borders: Using 2 circular needles (4 mm) pick up and knit sts from the RS at the right front edge, neckline and left front edge. Skip every 4th row. Make sure the number of sts is divisible by 4. Begin k2 p2 ribbing on the WS: p3, k2, *p2, k2*, repeat *-*, p3.
Note: When the ribbing measures 1 cm, work buttonholes on the right front. The first buttonhole should be at the starting point of the neckline decreases and the other 5 at 9 cm intervals. Buttonhole: work 2 sts together, yarn over.
When the ribbing measures 4 cm, bind off in pattern.
Sew on the buttons.