Aura Cardigan CAL
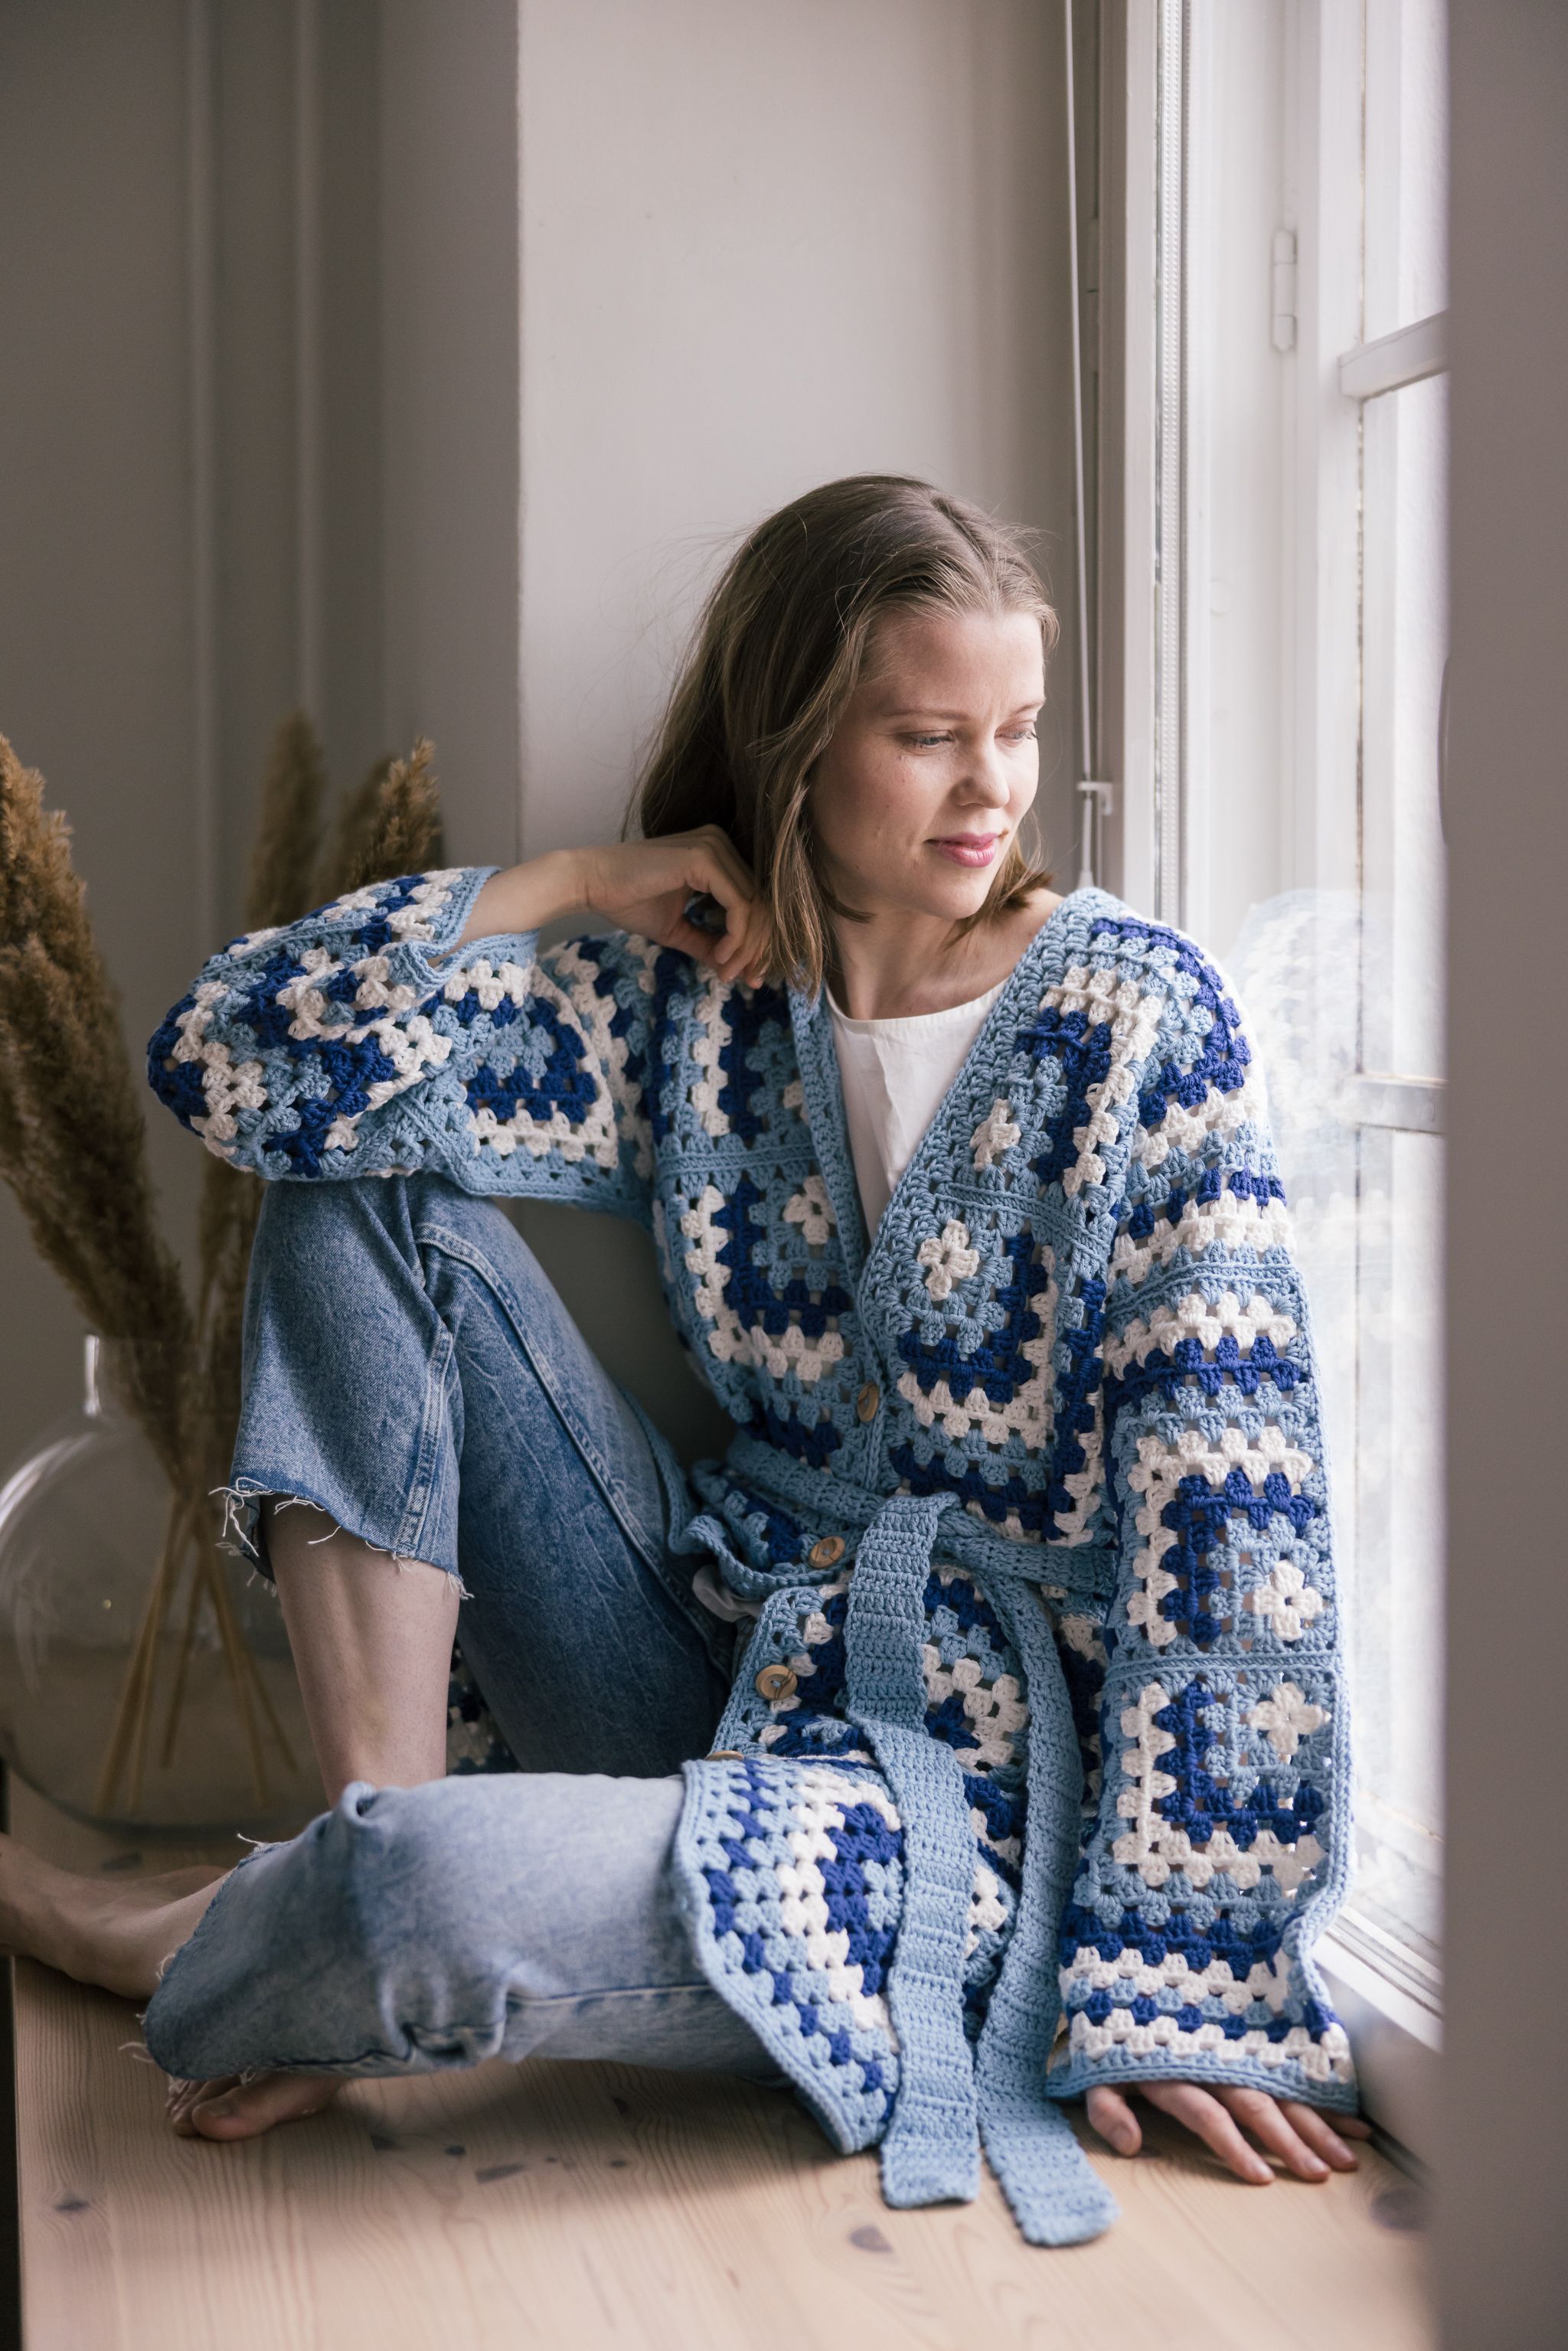
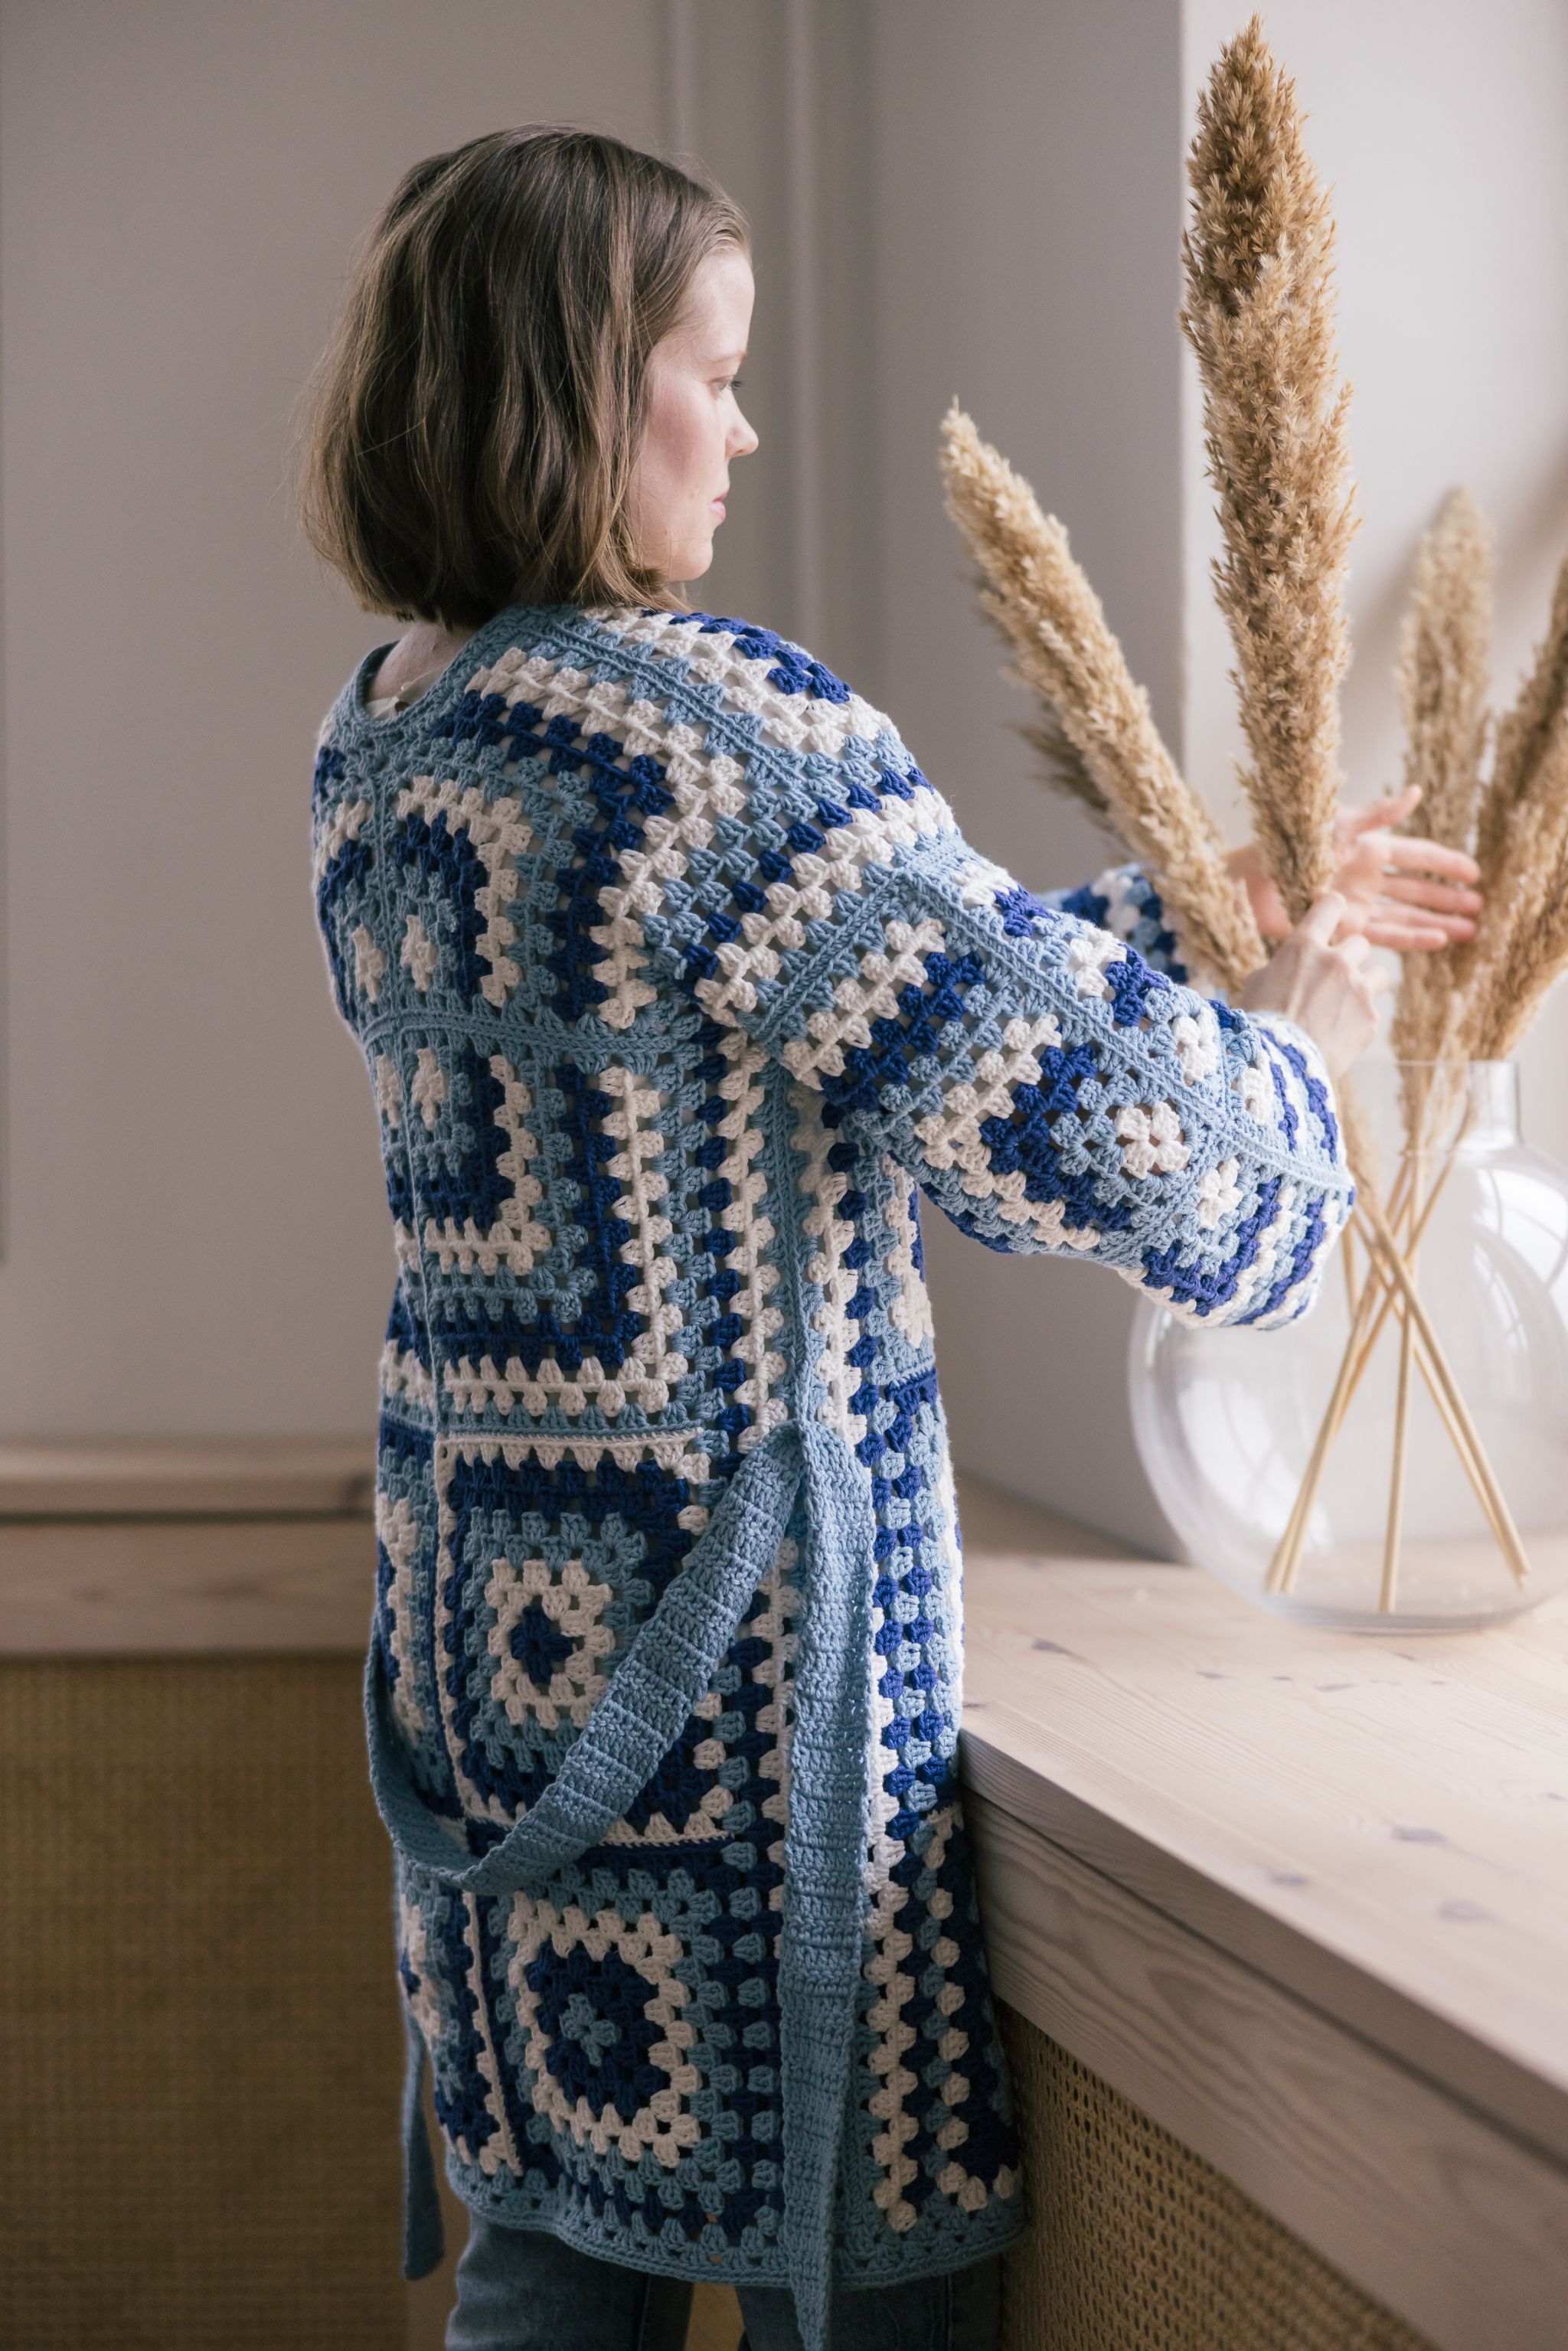
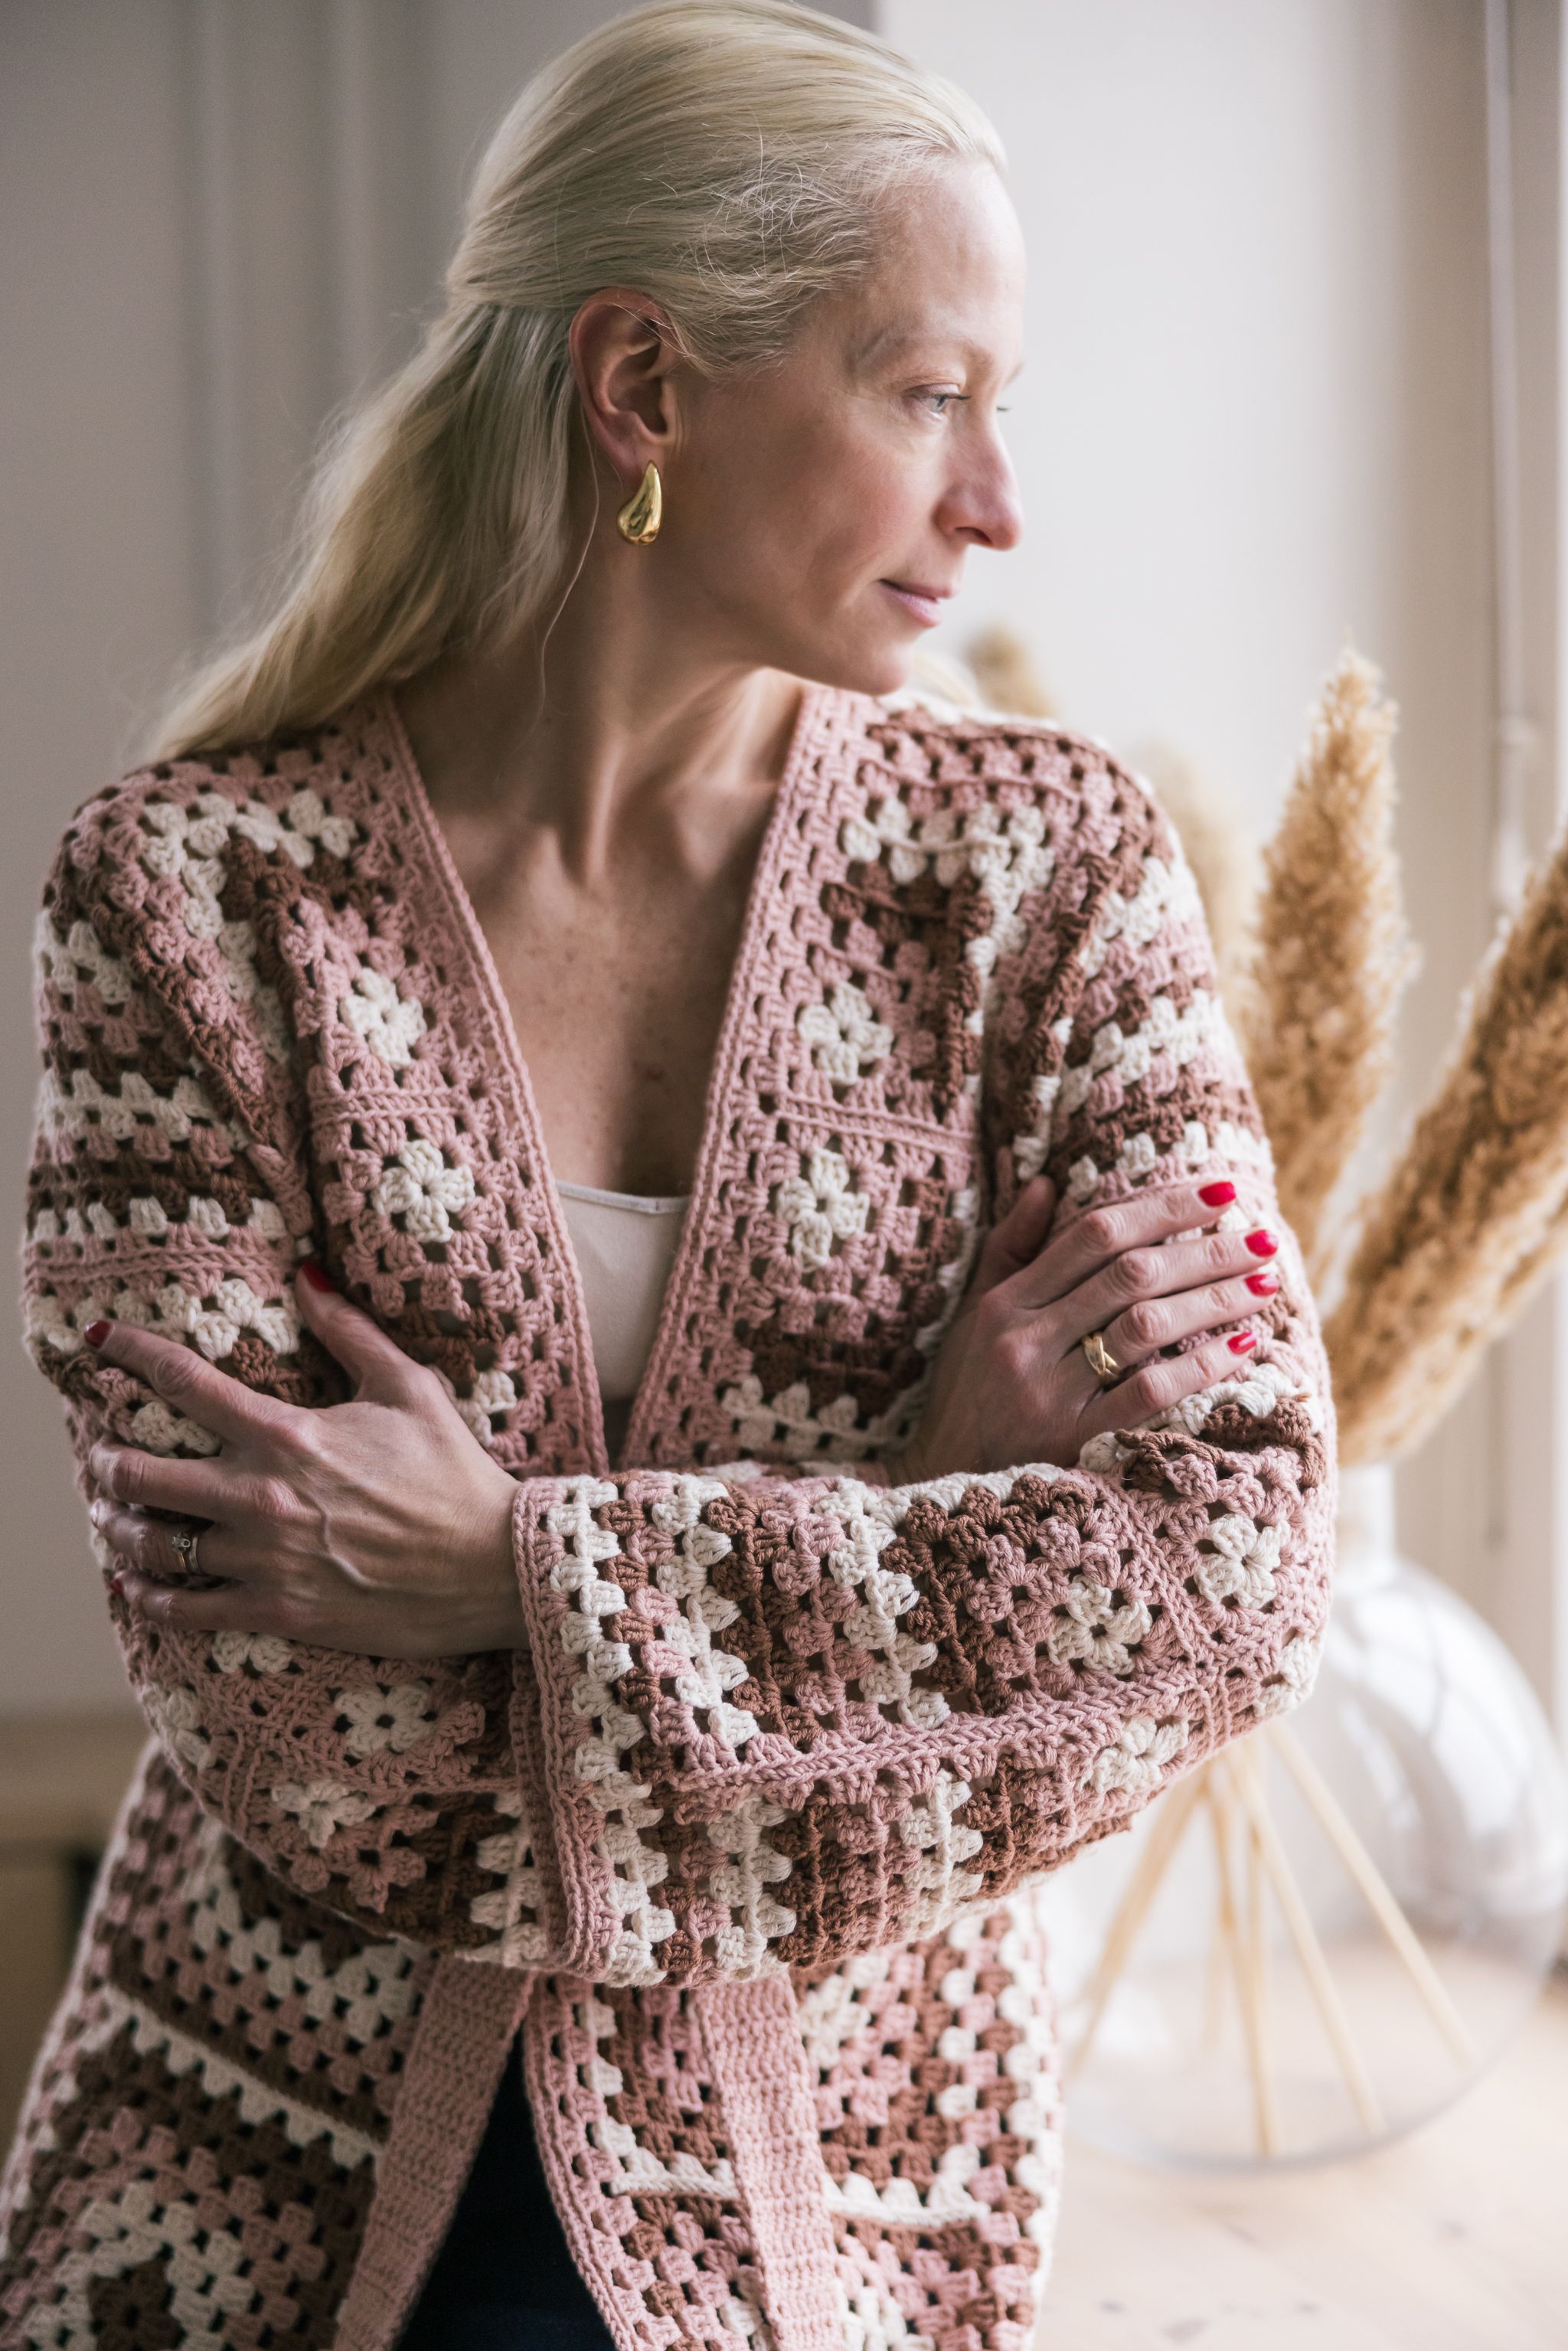
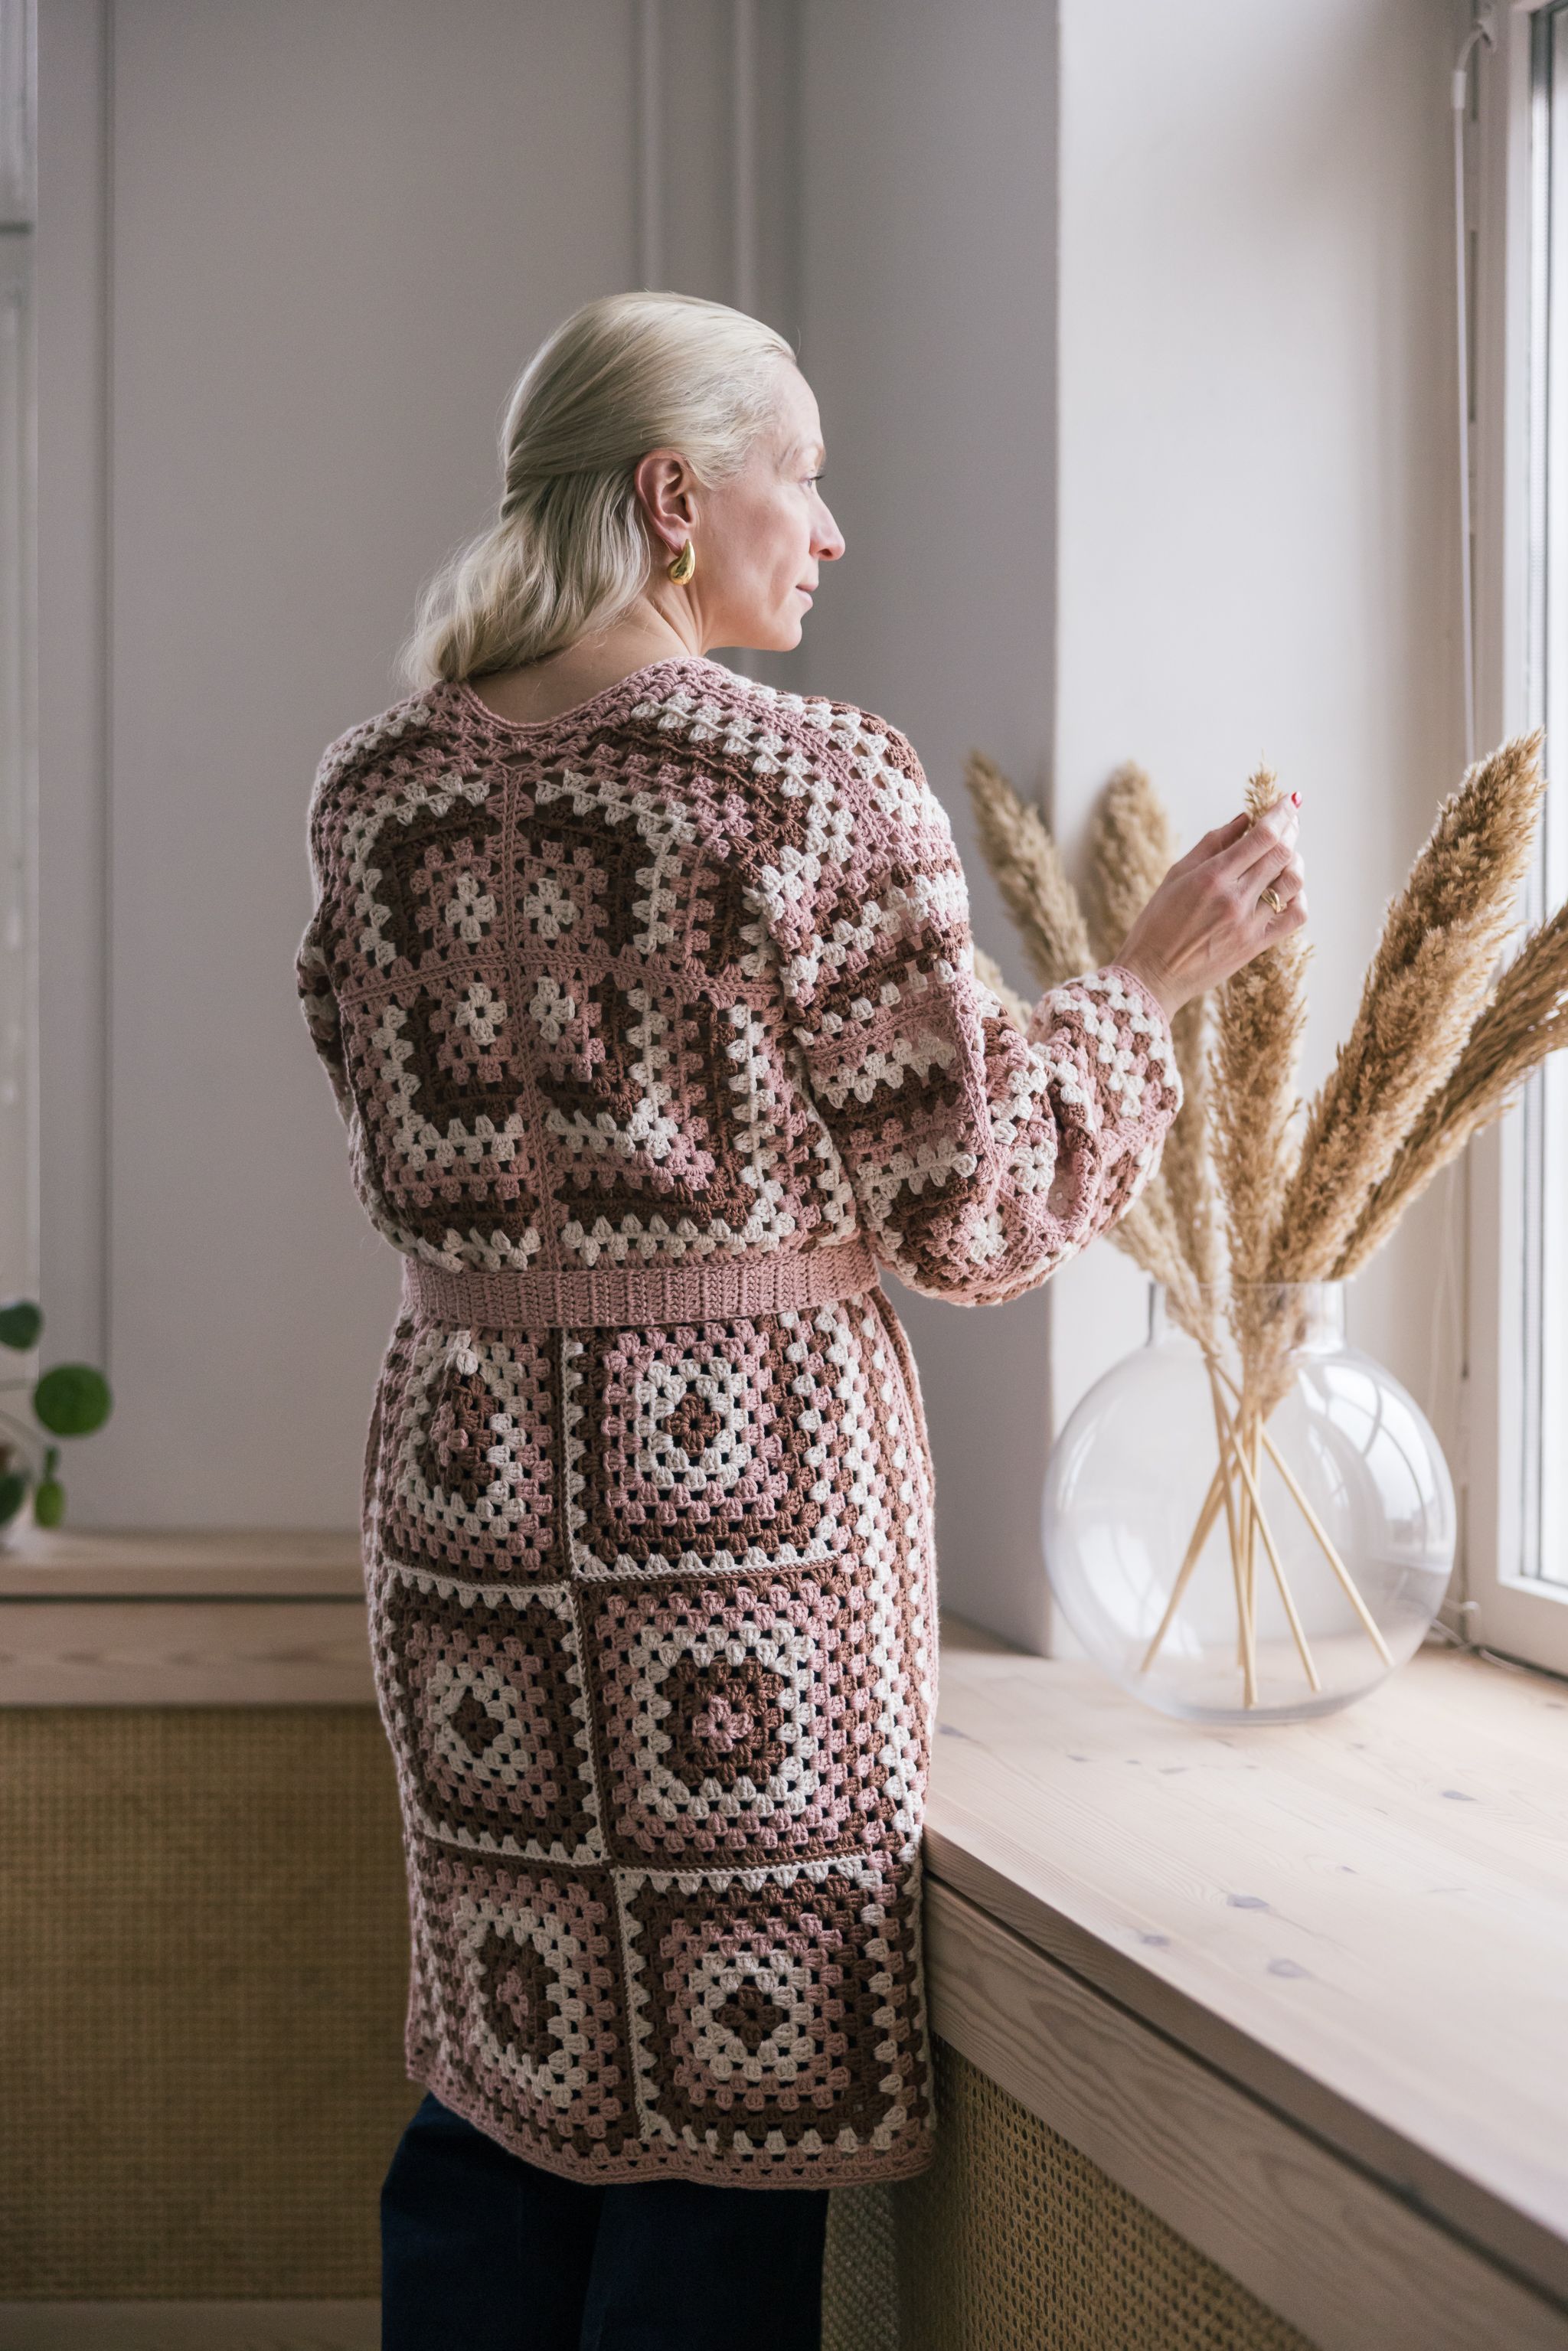
Choose your favourite colour, grab the hook and join us to crochet a cardigan designed by Sisko Sälpäkivi and Minna Metsänen with the new Aura cotton yarn.
Size(s)
XS(S)M(L)XL(XXL)
Finished dimensions
chest circumference approx. 90(100)110(120)130(140) cm / 35½(39¼)43¼(47¼)51¼(55)”
length at center back: short option approx. 82 cm / 32¼” and long option approx. 102 cm / 40¼”
sleeve length at under arm: 44 cm / 17¼”, sleeve length can be adjusted
Yarn demand
NB The pre-selected yarn quantities are for the long design Short design (blue cardigan) Colour 1: (0011) empathy (white) 300(350)350(400)450(450) g Colour 2: (1601) honesty (light blue) 550(550)550(550)600(650) g Colour 3: (1701) creativity (dark blue) 300(300)300(350)350(400) g Long design (pink cardigan) Colour 1: (0021) healing (white) 350(400)400(450)500(500) g Colour 2: (5211) sensitivity (pink) 550(550)600(600)650(700) g Colour 3: (6451) change (brown) 350(400)400(450)450(500) g
Needles and other supplies
Crochet hook Novita 4,5 mm or size needed to obtain gauge
Finished dimensions
chest circumference approx. 90(100)110(120)130(140) cm / 35½(39¼)43¼(47¼)51¼(55)”
length at center back: short option approx. 82 cm / 32¼” and long option approx. 102 cm / 40¼”
sleeve length at under arm: 44 cm / 17¼”, sleeve length can be adjusted
Crochet pattern Work the squares in accordance with the instructions and charts.
Changing colors: leave out the last pull-through for the last double crochet (2 stitches on hook), put the new color on the hook and pull the yarn through the sts.
Gauge The size of a finished crocheted square, following charts I and II, is approx. 20 x 20 cm / 7¾ x 7¾”
Part 1
Mitered granny square
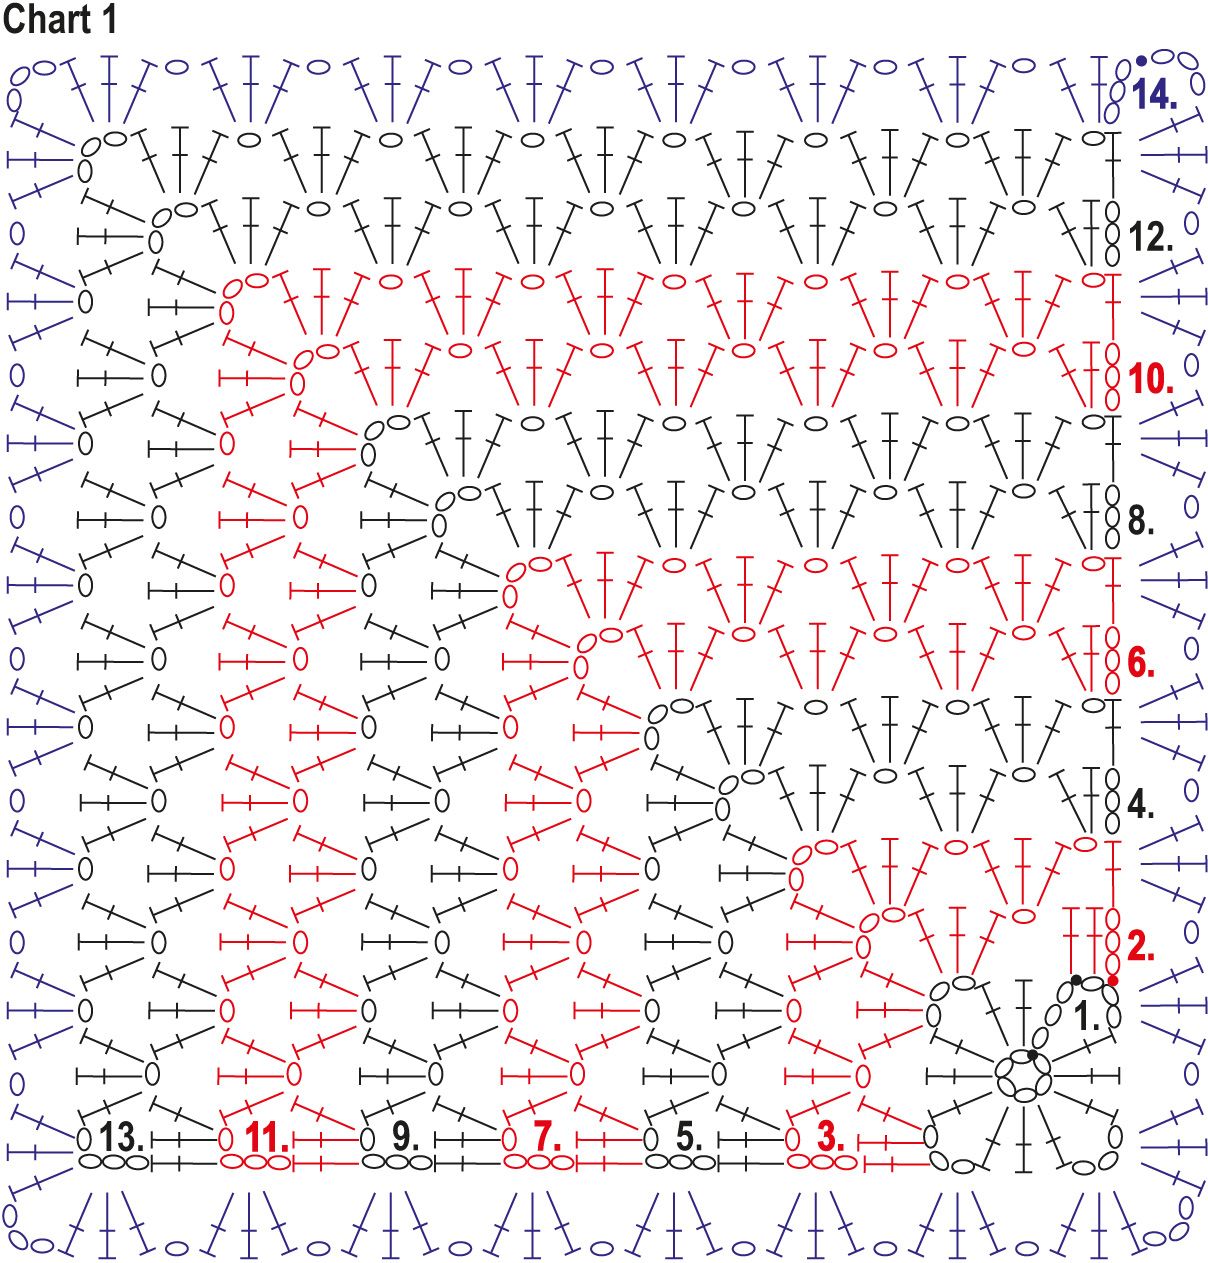
Work a total of 8 mitered granny squares following chart I. Please note, sizes in the pattern are given in cm.
Using color 1, chain (ch) 6 to form a foundation chain and join with 1 slip stitch (sl st) into the first ch st, to form a ring. Work according to chart I and the instructions.
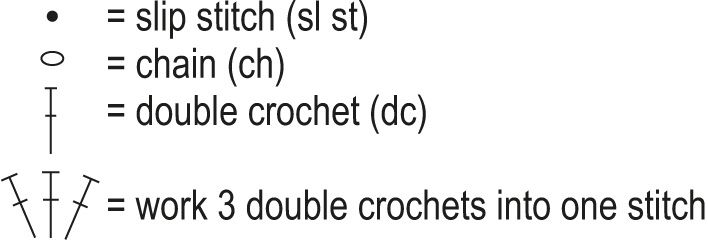
Row 1: Ch3 (= first double crochet of the row), work 2 double crochets (dc) into ring, *ch3, 3 dc*, repeat *–* twice more and ch3. Join the ends of the row with 1 sl st into third ch st from beg of row. There should now be 4 double crochet groups in this row. Cut the yarn.
Row 2: Switch to color 2 and join the yarn in the chain of ch sts at the corner with 1 sl st. Ch3, 2 dc in first chain space, ch1, work into the corner’s chain 3 space 3 dc + ch3 + 3 dc, then ch1 and into the next chain of ch sts 3 dc. Turn work.
Row 3: Ch4 (= 1st dc + ch1), in the side center hole 3 dc + ch1, work into the corner’s chain 3 space 3 dc + ch3 + 3 dc + ch1, in the center hole work 3 dc + ch1 and work 1 dc into the last dc of the edge. Switch to color 3 and turn work.
Row 4: Ch3 (= 1st dc) and around the first ch work 2 dc + ch1, in the next hole work 3 dc + ch1, work into the corner’s chain 3 space 3 dc + ch3 + 3 dc + ch1, in the next hole work 3 dc + ch1 and work 3 dc into the last chain of ch sts. Turn work.
Row 5: Ch4 (= 1st dc + ch1), in the next two side holes work 3 dc + ch1, work into the corner’s chain 3 space 3 dc + ch3 + 3 dc + ch1, in the next two side holes work 3 dc and ch1 and work 1 dc into the last dc at the edge. Switch to color 1 and turn work.
Row 6: Ch3 (= 1st dc) and around the first ch work 2 dc + ch1, in the next two holes work 3 dc + ch1, work into the corner’s chain 3 space chain 3 dc + ch3 + 3 dc + ch1, in the next two holes work 3 dc + ch1 and work 3 dc into the last chain of ch sts. Turn work.
Row 7: Ch4 (= 1st dc + ch1), in the next three side holes work 3 dc + ch1, work into the corner’s chain 3 space 3 dc + ch3 + 3 dc + ch1, in the next three side holes work 3 dc + ch1 and work 1 dc into the last dc at the edge. Switch to color 2 and turn work.
Continue working in the same way. Work rows 8–9 with color 2, rows 10–11 with color 3, and rows 12–13 with color 1.
At the end of row 13, switch to color 2 and crochet row 14, which goes round the entire square. This row is shown in blue in the chart. After the last row, leave approx. 50 cm of yarn for sewing together.
Finishing
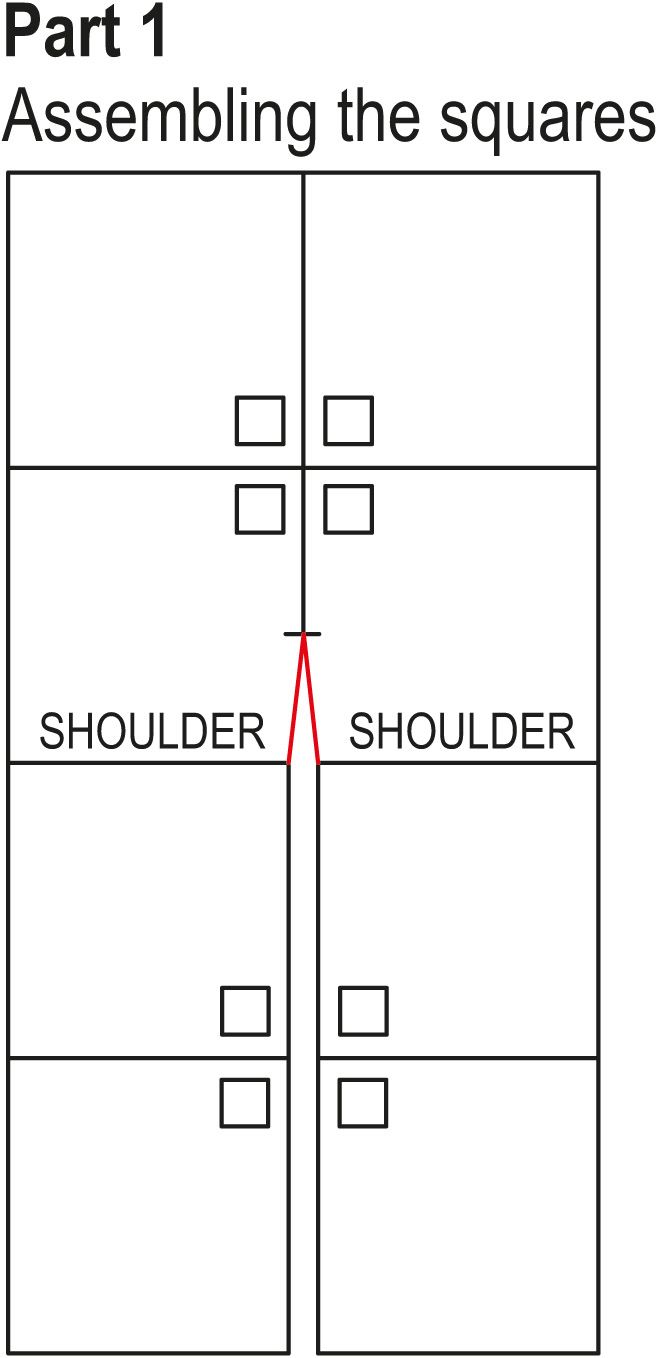
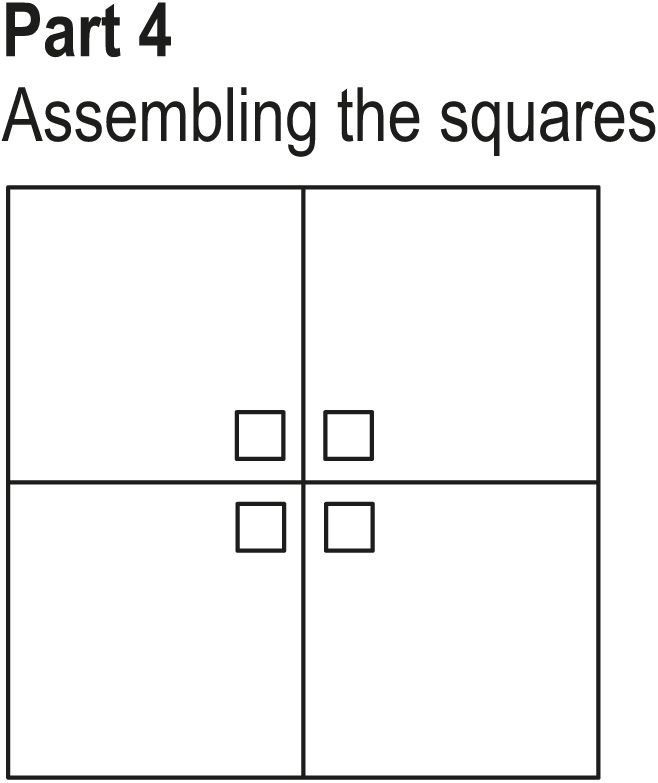
Lightly steam the squares and sew together in accordance with the chart. Using whip stitches, sew the pieces together through the back loops of the edge stitches. The small flowers on the squares should be positioned so that a large square is formed in the center. The back piece comprises four squares forming a large square and the front pieces are rectangles each formed of two squares.
NOTE At the center of the back, approx. 8 cm of the seam from the neckline down should be left unsewn. This will create a slit at the neck in the back piece to help from the neckline (indicated in red on the chart).
Part 2
Granny square
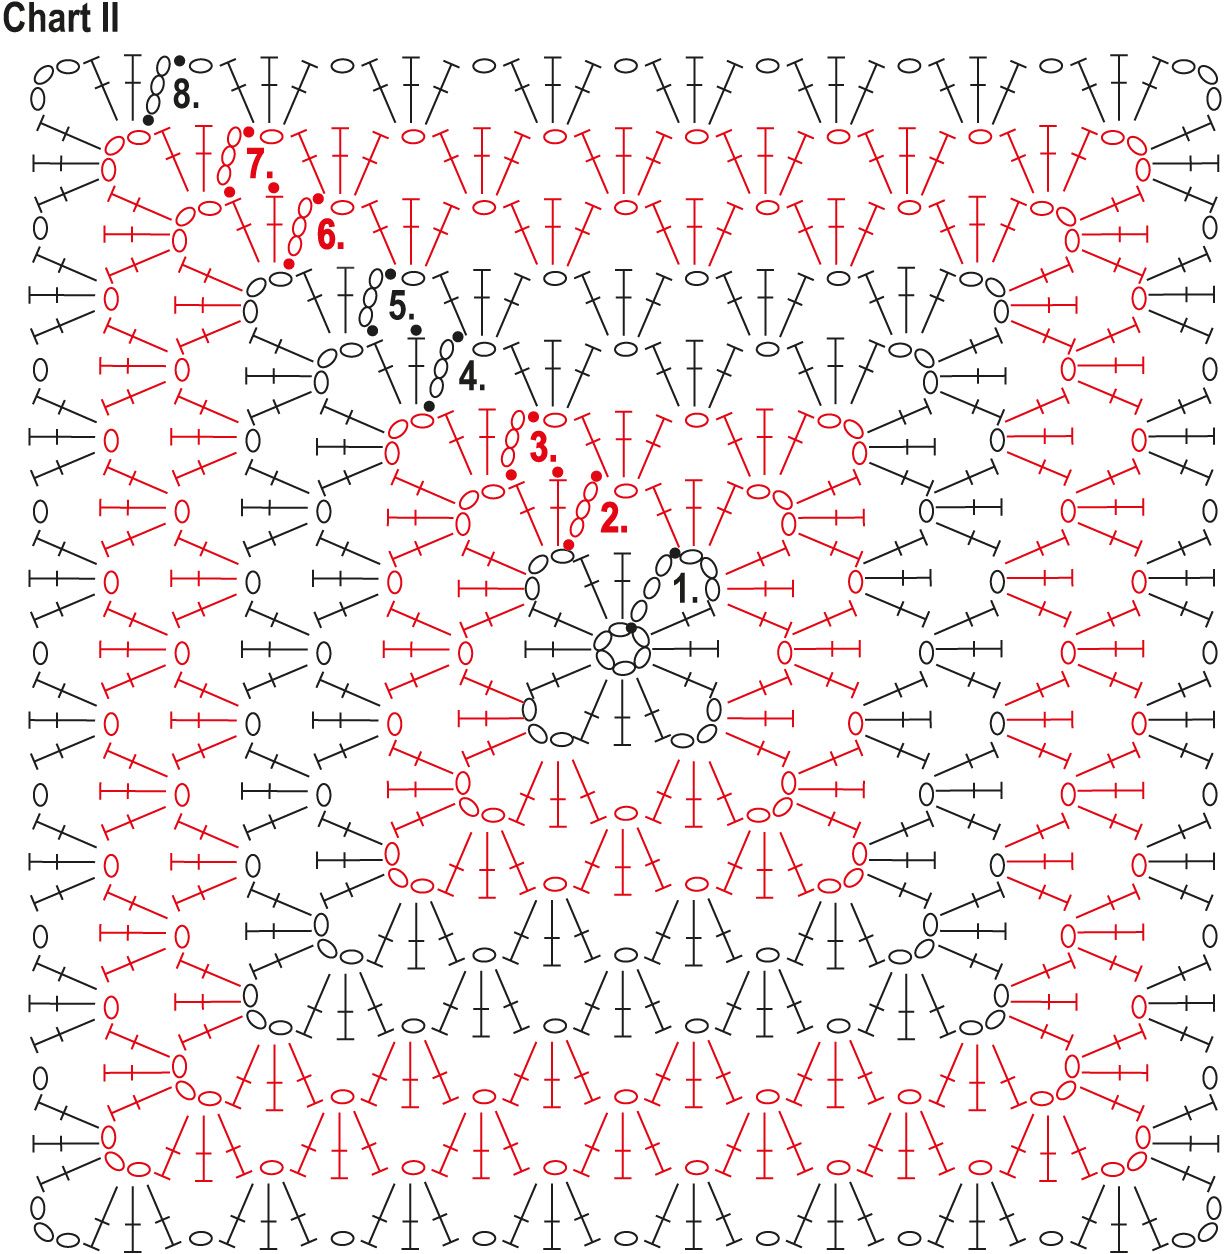
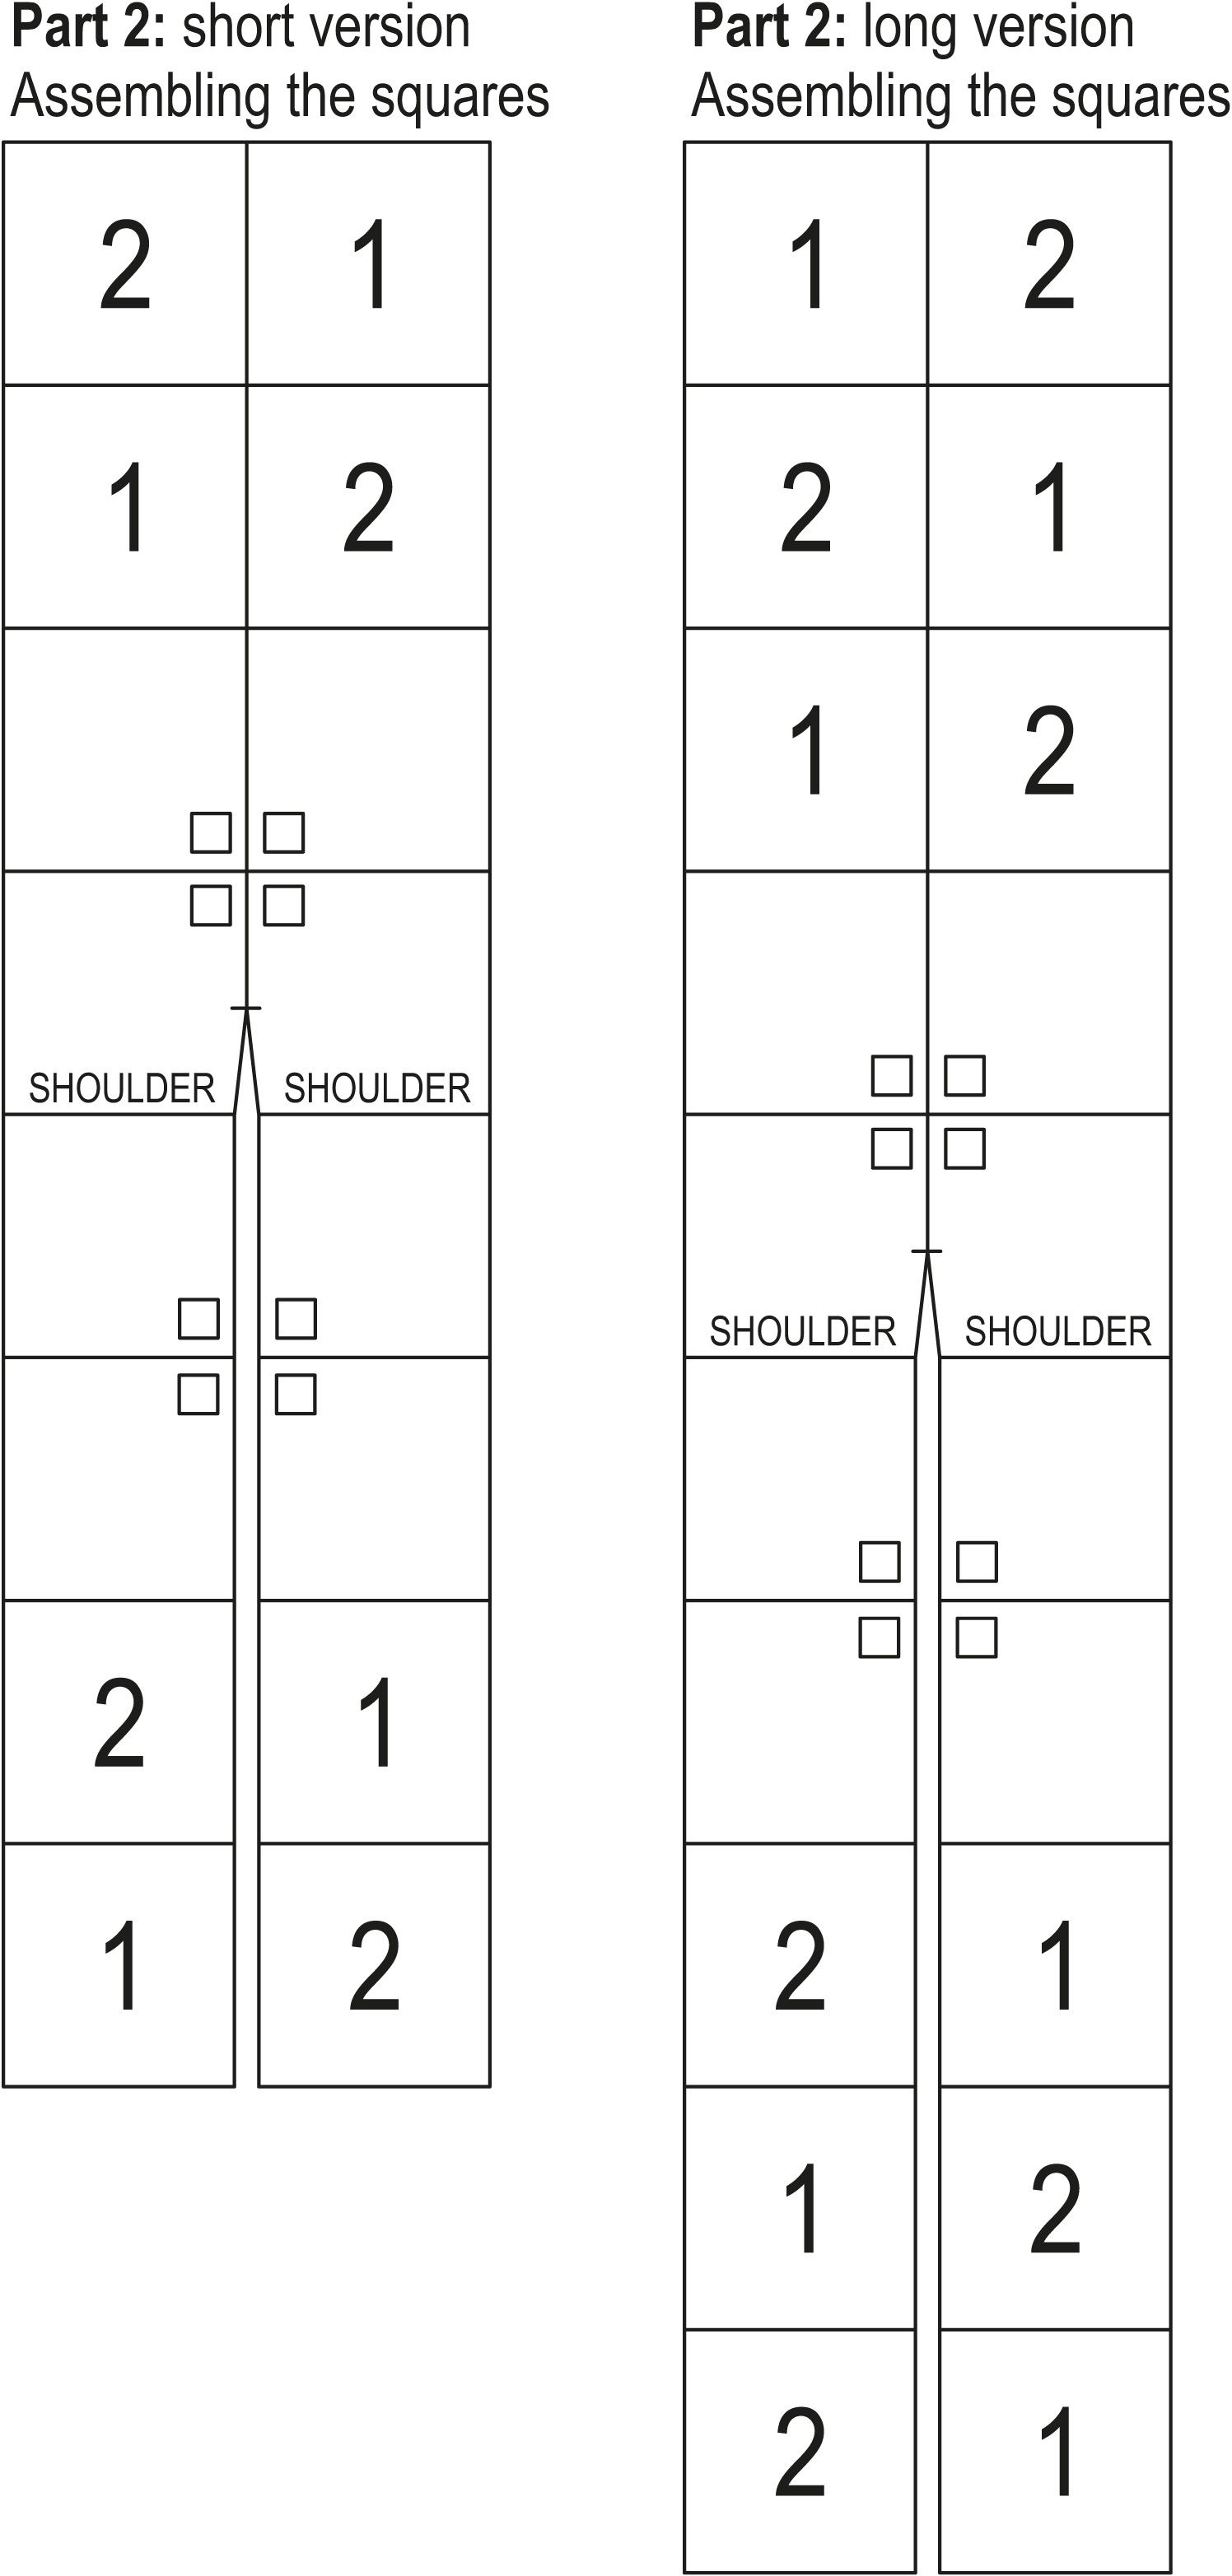
For the short cardigan, crochet a total of eight squares in accordance with chart II, making four squares of each color combination.
For the long cardigan, crochet a total of 12 squares in accordance with chart II, making six squares of each color combination.
Color combination 1:
Using color 3, chain (ch) 6 to form a foundation chain and join with 1 slip stitch (sl st) into the first ch st, to form a ring. Work following chart II and the instructions.
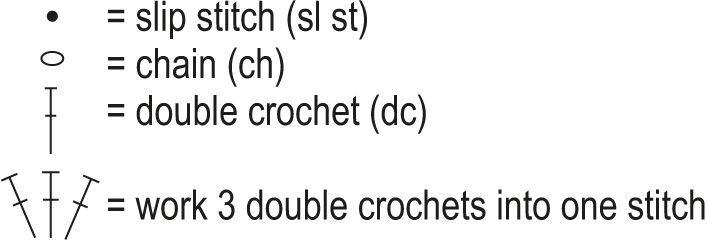
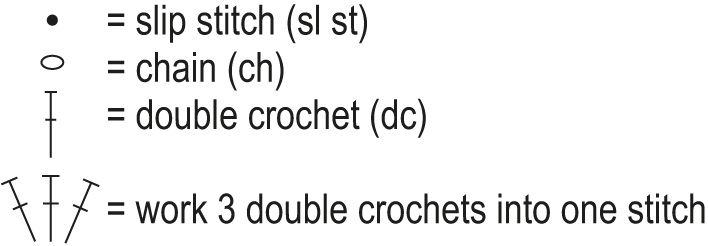
Round 1: Ch3 (= first double crochet of the round), work 2 double crochets (dc) into ring, *ch3, 3 dc*, repeat *–* twice more and ch3. Join round with 1 sl st into third ch st from beg of round. There should now be 4 double crochet groups in this round. Cut the yarn.
Round 2: Switch to color 1 and join the yarn in the chain of ch sts in the upper left corner with 1 sl st, in a different place to where round 1 ended. The point where the round changes will for the remaining rounds be the upper left corner. Work into the same corner’s chain 3 space ch3 (= 1st dc) + 2 dc + ch3 + 3 dc + ch1. *Into the next corner’s chain 3 space work 3 dc + ch3 + dc 3 + ch1*, repeat *–* twice more. Close round with 1 sl st into the third ch st of beg of round. Sl st to the corner of the square: work 1 sl st into the next two dcs.
Round 3: Work into the corner’s 3 st chain ch3 (= 1st dc) + 2 dc + ch3 + 3 dc + ch1 and in the center side hole work 3 dc + ch1. *Work into the corner’s chain 3 space 3 dc + ch3 + 3 dc + ch1 and in the center hole work dc 3 + ch1*, repeat *–* twice more and close round with 1 sl st into the third ch st of beg of round. Cut the yarn.
Round 4: Join color 2 at the left corner of the square with a sl st. Work into the corner’s chain 3 space ch3 (= 1st dc) + 2 dc + ch3 + 3 dc + ch1 and in the next two side holes work 3 dc + ch1. *Work into the next corner’s chain 3 space 3 dc + ch3 + 3 dc + ch1 and in the two next holes work dc 3 + ch1*, repeat *–* twice more and close round with 1 sl st into the third ch st of beg of round. Sl st to the corner of the square.
Round 5: Work into the corner’s chain 3 space ch3 (= 1st dc) + 2 dc + ch3 + 3 dc + ch1 and in the three next side holes work 3 dc + ch1. *Work into the next corner’s chain 3 space 3 dc + ch3 + 3 dc + ch1 and in the three next holes work dc 3 + ch1*, repeat *–* twice more and close round with 1 sl st into the third ch st of beg of round. Cut the yarn.
Round 6: Join color 3 at the left corner of the square with a sl st. Work into the corner’s 3 st chain ch3 (= 1st dc) + 2 dc + ch3 + 3 dc + ch1 and in the four next side holes work 3 dc + ch1. *Work into the corner’s chain 3 space 3 dc + ch3 + 3 dc + ch1 and in the four next holes work dc 3 + ch1*, repeat *–* twice more and close round with 1 sl st into the third ch st of beg of round. Sl st to the corner of the square.
Round 7: Work into the corner’s chain 3 space ch3 (= 1st dc) + 2 dc + ch3 + 3 dc + ch1 and in the five next side holes work 3 dc + ch1. *Work into thenext corner’s chain 3 space 3 dc + ch3 + 3 dc + ch1 and in the five next holes work dc 3 + ch1*, repeat *–* twice more and close round with 1 sl st into the third ch st of beg of round. Cut the yarn.
Round 8: Join color 1 at the left corner of the square with a sl st. Work into the corner’s chain 3 space ch3 (= 1st dc) + 2 dc + ch3 + 3 dc + ch1 and in the six next side holes work 3 dc + ch1. *Work into the next corner’s chain 3 space 3 dc + ch3 + 3 dc + ch1 and in the six next holes work dc 3 + ch1*, repeat *–* twice more and close round with 1 sl st into the third ch st of beg of round. It is easier to join the squares if you sl st to the left corner of the square. Cut the yarn and leave approx. 50 cm for sewing.
Color combination 2:
Round 1: Color 2.
Rounds 2–3: Color 3.
Rounds 4–5: Color 1.
Rounds 6–7: Color 2.
Round 8: Color 3.
Finishing
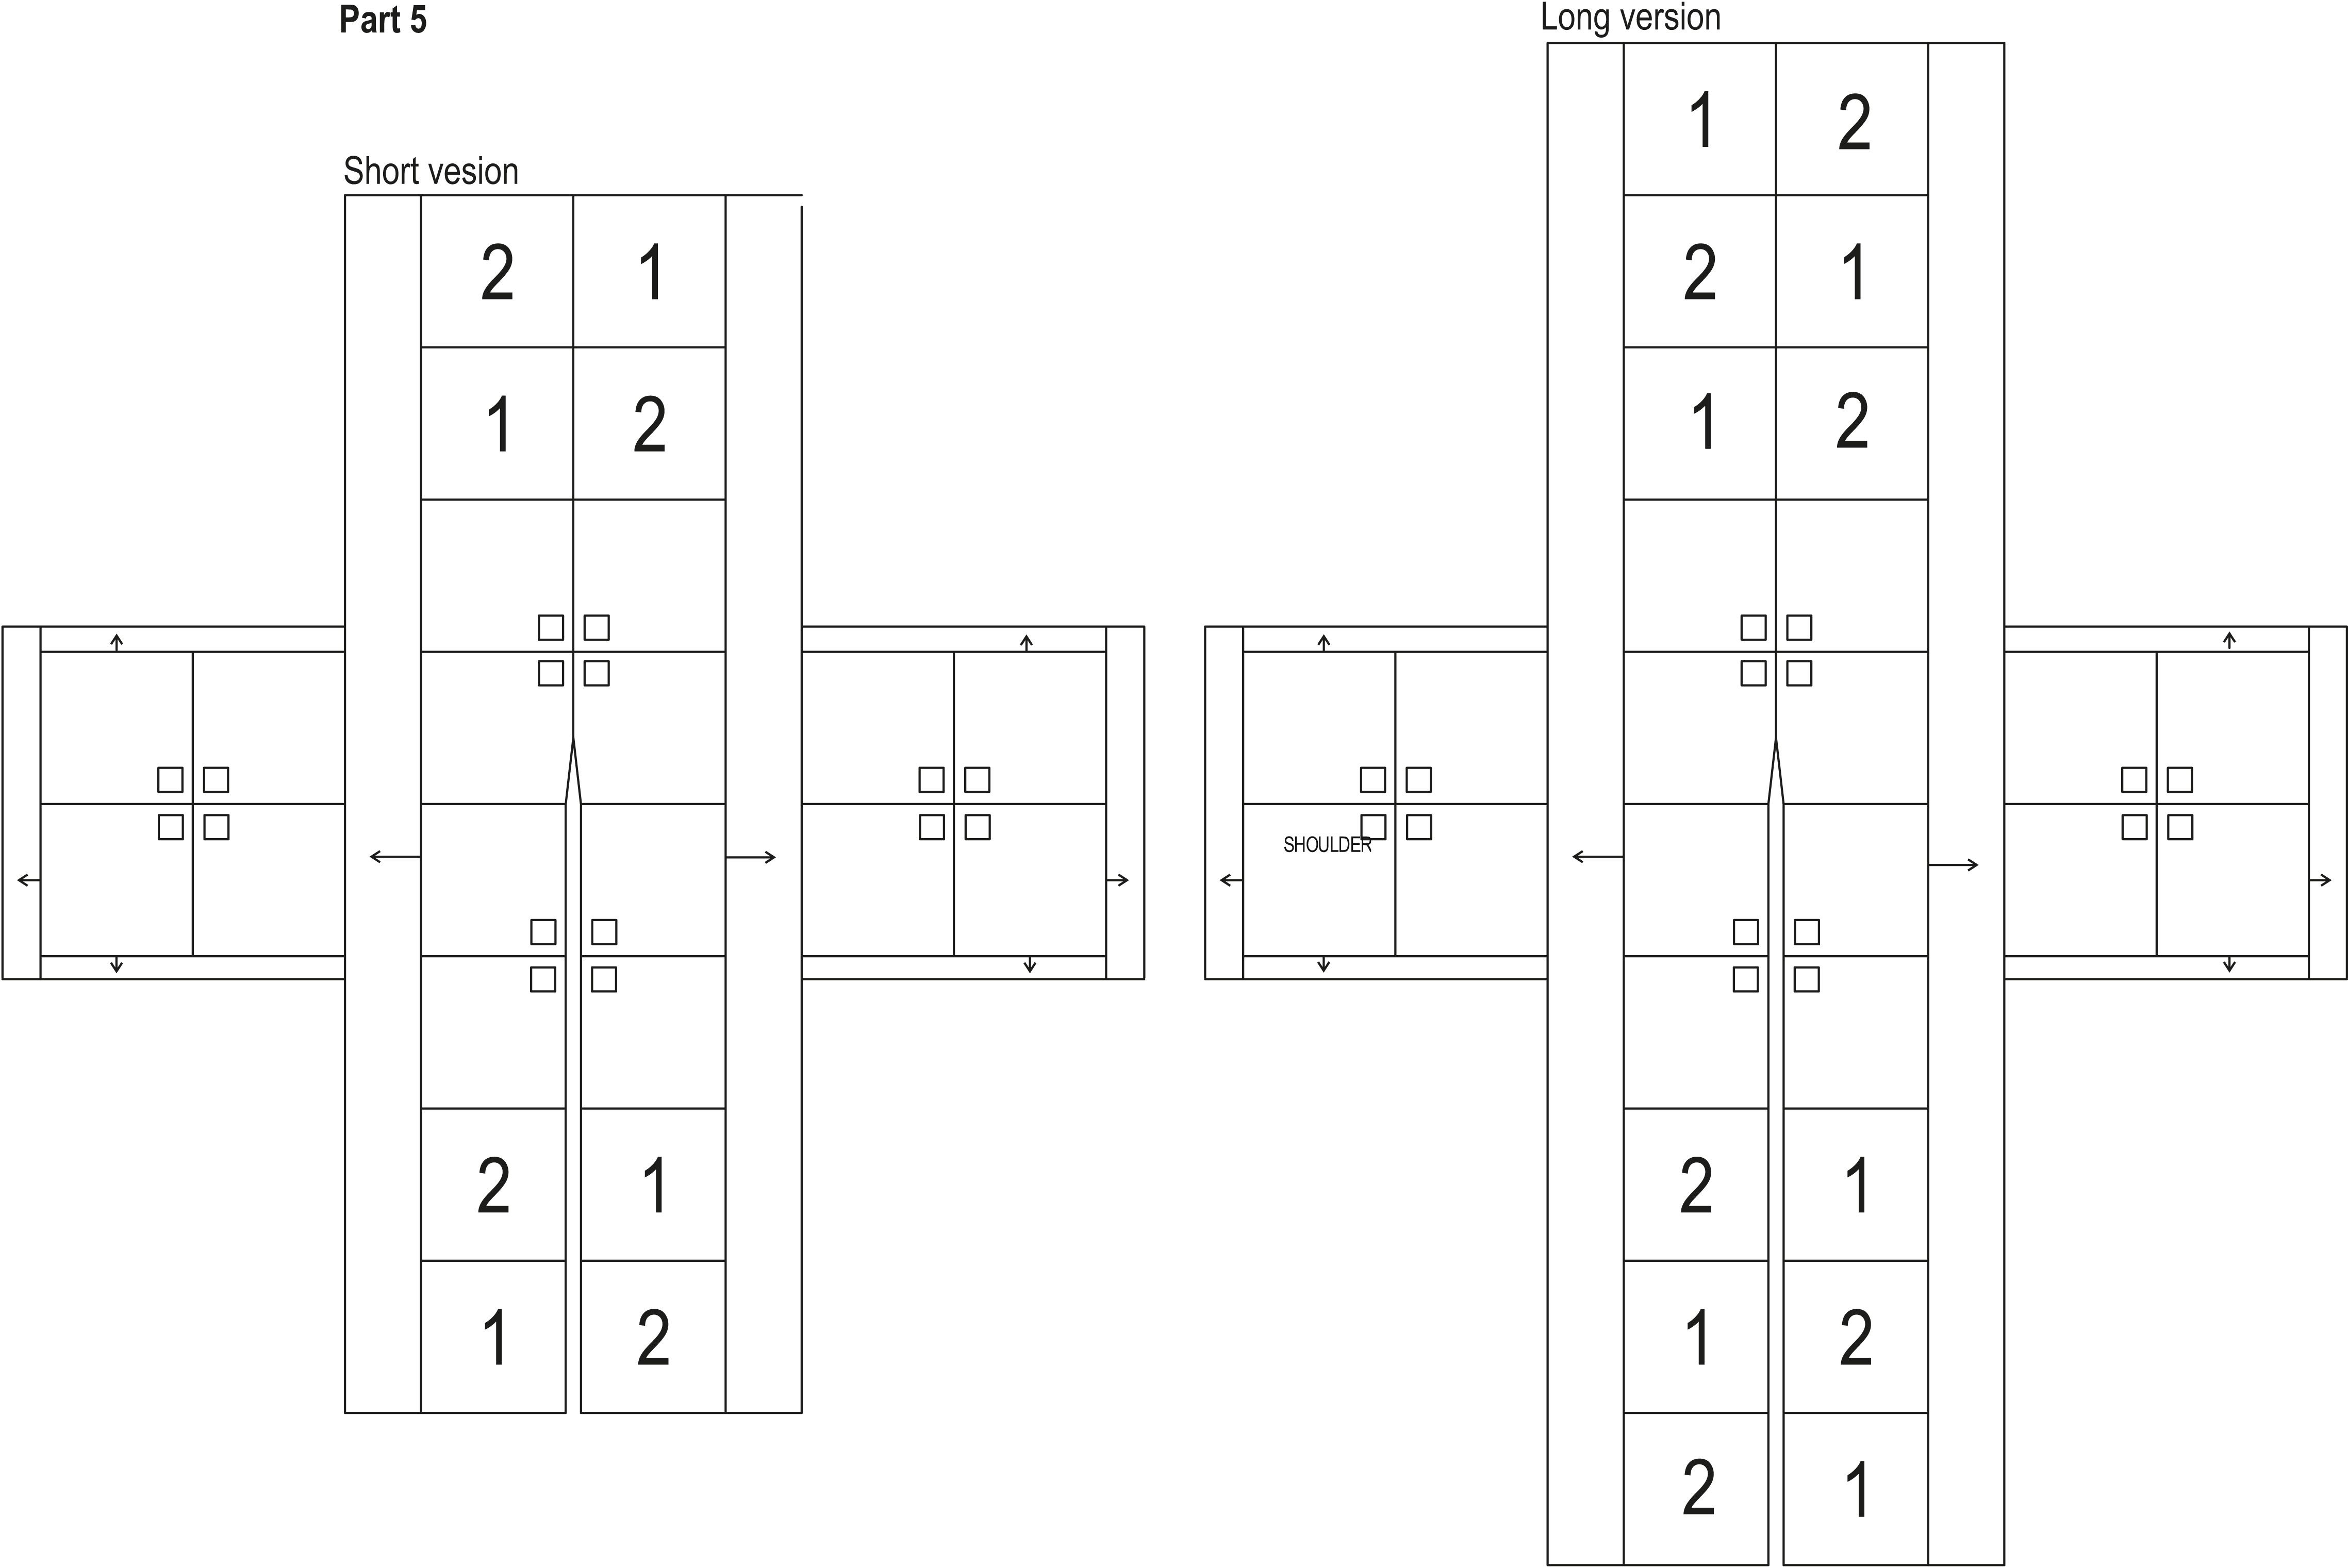
Lightly steam the squares and sew together in accordance with the assembly diagrams. Sew the squares to the pieces crocheted in part 1 as well.
Part 3
Next, work stripes with double crochet groups on both sides of the front and back pieces. The front and back pieces are joined at the shoulders, so the side stripes should be worked first on the left side along the side of the front piece, straight over the shoulder and along the side of the back piece, and on the right side first along the side of the back piece, straight over the shoulder and along the side of the front piece.
NOTE You can crochet the individual rows from the RS of the work each time, which will produce neater striping.
Crochet the left-hand side. Join color 2 with sl st at the lower left corner of the front piece and continue crocheting at row 1 in chart III, indicated in red in the chart.
Part 4
Next, crochet 8 mitered granny squares for the sleeves following chart I, as in part 1.
Using color 1, chain (ch) 6 to form a foundation chain and join with 1 slip stitch (sl st) into the first ch st, to form a ring. Work according to chart I and the instructions.
Row 1: Ch3 (= first double crochet of the row), work 2 double crochets (dc) into ring, *ch3, 3 dc*, repeat *–* twice more and ch3. Join the ends of the row with 1 sl st into third ch st from beg of row. There should now be 4 double crochet groups in this row. Cut the yarn.
Row 2: Switch to color 2 and join the yarn in the chain of ch sts at the corner with 1 sl st. Ch3, 2 dc in first chain space, ch1, work into the corner’s chain 3 space 3 dc + ch3 + 3 dc, then ch1 and into the next chain of ch sts 3 dc. Turn work.
Row 3: Ch4 (= 1st dc + ch1), in the side center hole 3 dc + ch1, work into the corner’s chain 3 space 3 dc + ch3 + 3 dc + ch1, in the center hole work 3 dc + ch1 and work 1 dc into the last dc of the edge. Switch to color 3 and turn work.
Row 4: Ch3 (= 1st dc) and around the first ch work 2 dc + ch1, in the next hole work 3 dc + ch1, work into the corner’s chain 3 space 3 dc + ch3 + 3 dc + ch1, in the next hole work 3 dc + ch1 and work 3 dc into the last chain of ch sts. Turn work.
Row 5: Ch4 (= 1st dc + ch1), in the next two side holes work 3 dc + ch1, work into the corner’s chain 3 space 3 dc + ch3 + 3 dc + ch1, in the next two side holes work 3 dc and ch1 and work 1 dc into the last dc at the edge. Switch to color 1 and turn work.
Row 6: Ch3 (= 1st dc) and around the first ch work 2 dc + ch1, in the next two holes work 3 dc + ch1, work into the corner’s chain 3 space 3 dc + ch3 + 3 dc + ch1, in the next two holes work 3 dc + ch1 and work 3 dc into the last chain of ch sts. Turn work.
Row 7: Ch4 (= 1st dc + ch1), in the next three side holes work 3 dc + ch1, work into the corner’s chain 3 space 3 dc + ch3 + 3 dc + ch1, in the next three side holes work 3 dc + ch1 and work 1 dc into the last dc at the edge. Switch to color 2 and turn work.
Continue working in the same way. Work rows 8–9 with color 2, rows 10–11 with color 3, and rows 12–13 with color 1.
At the end of row 13, switch to color 2 and crochet row 14, which goes round the entire square. This row is shown in blue in the chart. After the last row, leave approx. 50 cm of yarn for sewing together.
Part 5
Next, crochet stripes on the two opposite edges of the large square, as on the sides of the front and back pieces.
XS: Work 1 row with color 2.
S: Work 1 row with color 2.
M: Work 1 row with color 3 and 1 row with color 1.
L: Work 1 row with color 3 and 1 row with color 1.
XL: Work 1 row with color 3, 1 row with color 1, and 1 row with color 2.
XXL: Work 1 row with color 3, 1 row with color 1, and 1 row with color 2.
Sew the sleeves to the armholes. Align the center of the sleeve with the shoulder seam.
Sew the sleeves’ seams and the side seams.
Try onthe cardigan and check what sleeve length would be right for you. Crochet more or fewer rounds as needed. The sample cardigan has 4 additional rounds of crochet, adding approx. 4 cm.
Crochet the stripes at the cuff in the round, moving from round to round as explained in part 2, when making the granny squares.
Work 1 round with color 3, 2 rounds with color 1, and 1 round with color 2. NOTE When working the last dc round of the cuff, do not work the chain stitches between dc groups. This will narrow the cuff slightly. Finish the edge with 1 round of single crochets, working 1 sc into the back loop of every st. Cut the yarn.
Part 6
Front edges and bottom: Join color 2 to the lower right corner of the front piece with a sl st. Crochet 2 rows of dc groups first along the edge of the front piece, across the edges of the slit in the back of the neckline, along the other edge of the front piece and across the bottom, and finish the edge with 1 row of scs, working 1 sc into the back loop of every st.
Belt: Work the belt with color 2. Ch9 for the foundation chain. Row 1: Work 1 dc into the 3rd ch from the hook, and 1 dc into the next six chs = 8 dc. Turn work. Row 2: Ch2 (= 1st dc) and dc 7. Turn work. Repeat row 2 until the belt reaches approx. 180 cm or your desired length. If you prefer, you can work the belt with a smaller hook.
Belt loops: Ch 12 and cut the yarn. Leave a little tail at either end for sewing. Attach the belt loops to the side seams at approx. 20 cm from the armpit.
If you wish, you can attach buttons to the edge of the left front piece, with the holes in the pattern serving as buttonholes.
Aura Cardigan CAL
Size(s)
XS(S)M(L)XL(XXL)
Finished dimensions
chest circumference approx. 90(100)110(120)130(140) cm / 35½(39¼)43¼(47¼)51¼(55)”
length at center back: short option approx. 82 cm / 32¼” and long option approx. 102 cm / 40¼”
sleeve length at under arm: 44 cm / 17¼”, sleeve length can be adjusted
Yarn demand
NB The pre-selected yarn quantities are for the long design Short design (blue cardigan) Colour 1: (0011) empathy (white) 300(350)350(400)450(450) g Colour 2: (1601) honesty (light blue) 550(550)550(550)600(650) g Colour 3: (1701) creativity (dark blue) 300(300)300(350)350(400) g Long design (pink cardigan) Colour 1: (0021) healing (white) 350(400)400(450)500(500) g Colour 2: (5211) sensitivity (pink) 550(550)600(600)650(700) g Colour 3: (6451) change (brown) 350(400)400(450)450(500) g
Needles and other supplies
Crochet hook Novita 4,5 mm or size needed to obtain gauge
Crochet pattern Work the squares in accordance with the instructions and charts.
Changing colors: leave out the last pull-through for the last double crochet (2 stitches on hook), put the new color on the hook and pull the yarn through the sts.
Gauge The size of a finished crocheted square, following charts I and II, is approx. 20 x 20 cm / 7¾ x 7¾”
Part 1
Mitered granny square
Work a total of 8 mitered granny squares following chart I. Please note, sizes in the pattern are given in cm.
Using color 1, chain (ch) 6 to form a foundation chain and join with 1 slip stitch (sl st) into the first ch st, to form a ring. Work according to chart I and the instructions.
Row 1: Ch3 (= first double crochet of the row), work 2 double crochets (dc) into ring, *ch3, 3 dc*, repeat *–* twice more and ch3. Join the ends of the row with 1 sl st into third ch st from beg of row. There should now be 4 double crochet groups in this row. Cut the yarn.
Row 2: Switch to color 2 and join the yarn in the chain of ch sts at the corner with 1 sl st. Ch3, 2 dc in first chain space, ch1, work into the corner’s chain 3 space 3 dc + ch3 + 3 dc, then ch1 and into the next chain of ch sts 3 dc. Turn work.
Row 3: Ch4 (= 1st dc + ch1), in the side center hole 3 dc + ch1, work into the corner’s chain 3 space 3 dc + ch3 + 3 dc + ch1, in the center hole work 3 dc + ch1 and work 1 dc into the last dc of the edge. Switch to color 3 and turn work.
Row 4: Ch3 (= 1st dc) and around the first ch work 2 dc + ch1, in the next hole work 3 dc + ch1, work into the corner’s chain 3 space 3 dc + ch3 + 3 dc + ch1, in the next hole work 3 dc + ch1 and work 3 dc into the last chain of ch sts. Turn work.
Row 5: Ch4 (= 1st dc + ch1), in the next two side holes work 3 dc + ch1, work into the corner’s chain 3 space 3 dc + ch3 + 3 dc + ch1, in the next two side holes work 3 dc and ch1 and work 1 dc into the last dc at the edge. Switch to color 1 and turn work.
Row 6: Ch3 (= 1st dc) and around the first ch work 2 dc + ch1, in the next two holes work 3 dc + ch1, work into the corner’s chain 3 space chain 3 dc + ch3 + 3 dc + ch1, in the next two holes work 3 dc + ch1 and work 3 dc into the last chain of ch sts. Turn work.
Row 7: Ch4 (= 1st dc + ch1), in the next three side holes work 3 dc + ch1, work into the corner’s chain 3 space 3 dc + ch3 + 3 dc + ch1, in the next three side holes work 3 dc + ch1 and work 1 dc into the last dc at the edge. Switch to color 2 and turn work.
Continue working in the same way. Work rows 8–9 with color 2, rows 10–11 with color 3, and rows 12–13 with color 1.
At the end of row 13, switch to color 2 and crochet row 14, which goes round the entire square. This row is shown in blue in the chart. After the last row, leave approx. 50 cm of yarn for sewing together.
Finishing
Lightly steam the squares and sew together in accordance with the chart. Using whip stitches, sew the pieces together through the back loops of the edge stitches. The small flowers on the squares should be positioned so that a large square is formed in the center. The back piece comprises four squares forming a large square and the front pieces are rectangles each formed of two squares.
NOTE At the center of the back, approx. 8 cm of the seam from the neckline down should be left unsewn. This will create a slit at the neck in the back piece to help from the neckline (indicated in red on the chart).
Part 2
Granny square
For the short cardigan, crochet a total of eight squares in accordance with chart II, making four squares of each color combination.
For the long cardigan, crochet a total of 12 squares in accordance with chart II, making six squares of each color combination.
Color combination 1:
Using color 3, chain (ch) 6 to form a foundation chain and join with 1 slip stitch (sl st) into the first ch st, to form a ring. Work following chart II and the instructions.
Round 1: Ch3 (= first double crochet of the round), work 2 double crochets (dc) into ring, *ch3, 3 dc*, repeat *–* twice more and ch3. Join round with 1 sl st into third ch st from beg of round. There should now be 4 double crochet groups in this round. Cut the yarn.
Round 2: Switch to color 1 and join the yarn in the chain of ch sts in the upper left corner with 1 sl st, in a different place to where round 1 ended. The point where the round changes will for the remaining rounds be the upper left corner. Work into the same corner’s chain 3 space ch3 (= 1st dc) + 2 dc + ch3 + 3 dc + ch1. *Into the next corner’s chain 3 space work 3 dc + ch3 + dc 3 + ch1*, repeat *–* twice more. Close round with 1 sl st into the third ch st of beg of round. Sl st to the corner of the square: work 1 sl st into the next two dcs.
Round 3: Work into the corner’s 3 st chain ch3 (= 1st dc) + 2 dc + ch3 + 3 dc + ch1 and in the center side hole work 3 dc + ch1. *Work into the corner’s chain 3 space 3 dc + ch3 + 3 dc + ch1 and in the center hole work dc 3 + ch1*, repeat *–* twice more and close round with 1 sl st into the third ch st of beg of round. Cut the yarn.
Round 4: Join color 2 at the left corner of the square with a sl st. Work into the corner’s chain 3 space ch3 (= 1st dc) + 2 dc + ch3 + 3 dc + ch1 and in the next two side holes work 3 dc + ch1. *Work into the next corner’s chain 3 space 3 dc + ch3 + 3 dc + ch1 and in the two next holes work dc 3 + ch1*, repeat *–* twice more and close round with 1 sl st into the third ch st of beg of round. Sl st to the corner of the square.
Round 5: Work into the corner’s chain 3 space ch3 (= 1st dc) + 2 dc + ch3 + 3 dc + ch1 and in the three next side holes work 3 dc + ch1. *Work into the next corner’s chain 3 space 3 dc + ch3 + 3 dc + ch1 and in the three next holes work dc 3 + ch1*, repeat *–* twice more and close round with 1 sl st into the third ch st of beg of round. Cut the yarn.
Round 6: Join color 3 at the left corner of the square with a sl st. Work into the corner’s 3 st chain ch3 (= 1st dc) + 2 dc + ch3 + 3 dc + ch1 and in the four next side holes work 3 dc + ch1. *Work into the corner’s chain 3 space 3 dc + ch3 + 3 dc + ch1 and in the four next holes work dc 3 + ch1*, repeat *–* twice more and close round with 1 sl st into the third ch st of beg of round. Sl st to the corner of the square.
Round 7: Work into the corner’s chain 3 space ch3 (= 1st dc) + 2 dc + ch3 + 3 dc + ch1 and in the five next side holes work 3 dc + ch1. *Work into thenext corner’s chain 3 space 3 dc + ch3 + 3 dc + ch1 and in the five next holes work dc 3 + ch1*, repeat *–* twice more and close round with 1 sl st into the third ch st of beg of round. Cut the yarn.
Round 8: Join color 1 at the left corner of the square with a sl st. Work into the corner’s chain 3 space ch3 (= 1st dc) + 2 dc + ch3 + 3 dc + ch1 and in the six next side holes work 3 dc + ch1. *Work into the next corner’s chain 3 space 3 dc + ch3 + 3 dc + ch1 and in the six next holes work dc 3 + ch1*, repeat *–* twice more and close round with 1 sl st into the third ch st of beg of round. It is easier to join the squares if you sl st to the left corner of the square. Cut the yarn and leave approx. 50 cm for sewing.
Color combination 2:
Round 1: Color 2.
Rounds 2–3: Color 3.
Rounds 4–5: Color 1.
Rounds 6–7: Color 2.
Round 8: Color 3.
Finishing
Lightly steam the squares and sew together in accordance with the assembly diagrams. Sew the squares to the pieces crocheted in part 1 as well.
Part 3
Next, work stripes with double crochet groups on both sides of the front and back pieces. The front and back pieces are joined at the shoulders, so the side stripes should be worked first on the left side along the side of the front piece, straight over the shoulder and along the side of the back piece, and on the right side first along the side of the back piece, straight over the shoulder and along the side of the front piece.
NOTE You can crochet the individual rows from the RS of the work each time, which will produce neater striping.
Crochet the left-hand side. Join color 2 with sl st at the lower left corner of the front piece and continue crocheting at row 1 in chart III, indicated in red in the chart.
Part 4
Next, crochet 8 mitered granny squares for the sleeves following chart I, as in part 1.
Using color 1, chain (ch) 6 to form a foundation chain and join with 1 slip stitch (sl st) into the first ch st, to form a ring. Work according to chart I and the instructions.
Row 1: Ch3 (= first double crochet of the row), work 2 double crochets (dc) into ring, *ch3, 3 dc*, repeat *–* twice more and ch3. Join the ends of the row with 1 sl st into third ch st from beg of row. There should now be 4 double crochet groups in this row. Cut the yarn.
Row 2: Switch to color 2 and join the yarn in the chain of ch sts at the corner with 1 sl st. Ch3, 2 dc in first chain space, ch1, work into the corner’s chain 3 space 3 dc + ch3 + 3 dc, then ch1 and into the next chain of ch sts 3 dc. Turn work.
Row 3: Ch4 (= 1st dc + ch1), in the side center hole 3 dc + ch1, work into the corner’s chain 3 space 3 dc + ch3 + 3 dc + ch1, in the center hole work 3 dc + ch1 and work 1 dc into the last dc of the edge. Switch to color 3 and turn work.
Row 4: Ch3 (= 1st dc) and around the first ch work 2 dc + ch1, in the next hole work 3 dc + ch1, work into the corner’s chain 3 space 3 dc + ch3 + 3 dc + ch1, in the next hole work 3 dc + ch1 and work 3 dc into the last chain of ch sts. Turn work.
Row 5: Ch4 (= 1st dc + ch1), in the next two side holes work 3 dc + ch1, work into the corner’s chain 3 space 3 dc + ch3 + 3 dc + ch1, in the next two side holes work 3 dc and ch1 and work 1 dc into the last dc at the edge. Switch to color 1 and turn work.
Row 6: Ch3 (= 1st dc) and around the first ch work 2 dc + ch1, in the next two holes work 3 dc + ch1, work into the corner’s chain 3 space 3 dc + ch3 + 3 dc + ch1, in the next two holes work 3 dc + ch1 and work 3 dc into the last chain of ch sts. Turn work.
Row 7: Ch4 (= 1st dc + ch1), in the next three side holes work 3 dc + ch1, work into the corner’s chain 3 space 3 dc + ch3 + 3 dc + ch1, in the next three side holes work 3 dc + ch1 and work 1 dc into the last dc at the edge. Switch to color 2 and turn work.
Continue working in the same way. Work rows 8–9 with color 2, rows 10–11 with color 3, and rows 12–13 with color 1.
At the end of row 13, switch to color 2 and crochet row 14, which goes round the entire square. This row is shown in blue in the chart. After the last row, leave approx. 50 cm of yarn for sewing together.
Part 5
Next, crochet stripes on the two opposite edges of the large square, as on the sides of the front and back pieces.
XS: Work 1 row with color 2.
S: Work 1 row with color 2.
M: Work 1 row with color 3 and 1 row with color 1.
L: Work 1 row with color 3 and 1 row with color 1.
XL: Work 1 row with color 3, 1 row with color 1, and 1 row with color 2.
XXL: Work 1 row with color 3, 1 row with color 1, and 1 row with color 2.
Sew the sleeves to the armholes. Align the center of the sleeve with the shoulder seam.
Sew the sleeves’ seams and the side seams.
Try onthe cardigan and check what sleeve length would be right for you. Crochet more or fewer rounds as needed. The sample cardigan has 4 additional rounds of crochet, adding approx. 4 cm.
Crochet the stripes at the cuff in the round, moving from round to round as explained in part 2, when making the granny squares.
Work 1 round with color 3, 2 rounds with color 1, and 1 round with color 2. NOTE When working the last dc round of the cuff, do not work the chain stitches between dc groups. This will narrow the cuff slightly. Finish the edge with 1 round of single crochets, working 1 sc into the back loop of every st. Cut the yarn.
Part 6
Front edges and bottom: Join color 2 to the lower right corner of the front piece with a sl st. Crochet 2 rows of dc groups first along the edge of the front piece, across the edges of the slit in the back of the neckline, along the other edge of the front piece and across the bottom, and finish the edge with 1 row of scs, working 1 sc into the back loop of every st.
Belt: Work the belt with color 2. Ch9 for the foundation chain. Row 1: Work 1 dc into the 3rd ch from the hook, and 1 dc into the next six chs = 8 dc. Turn work. Row 2: Ch2 (= 1st dc) and dc 7. Turn work. Repeat row 2 until the belt reaches approx. 180 cm or your desired length. If you prefer, you can work the belt with a smaller hook.
Belt loops: Ch 12 and cut the yarn. Leave a little tail at either end for sewing. Attach the belt loops to the side seams at approx. 20 cm from the armpit.
If you wish, you can attach buttons to the edge of the left front piece, with the holes in the pattern serving as buttonholes.
