Novita 7 Veljestä Nature: Hurma, crocheted cardigan
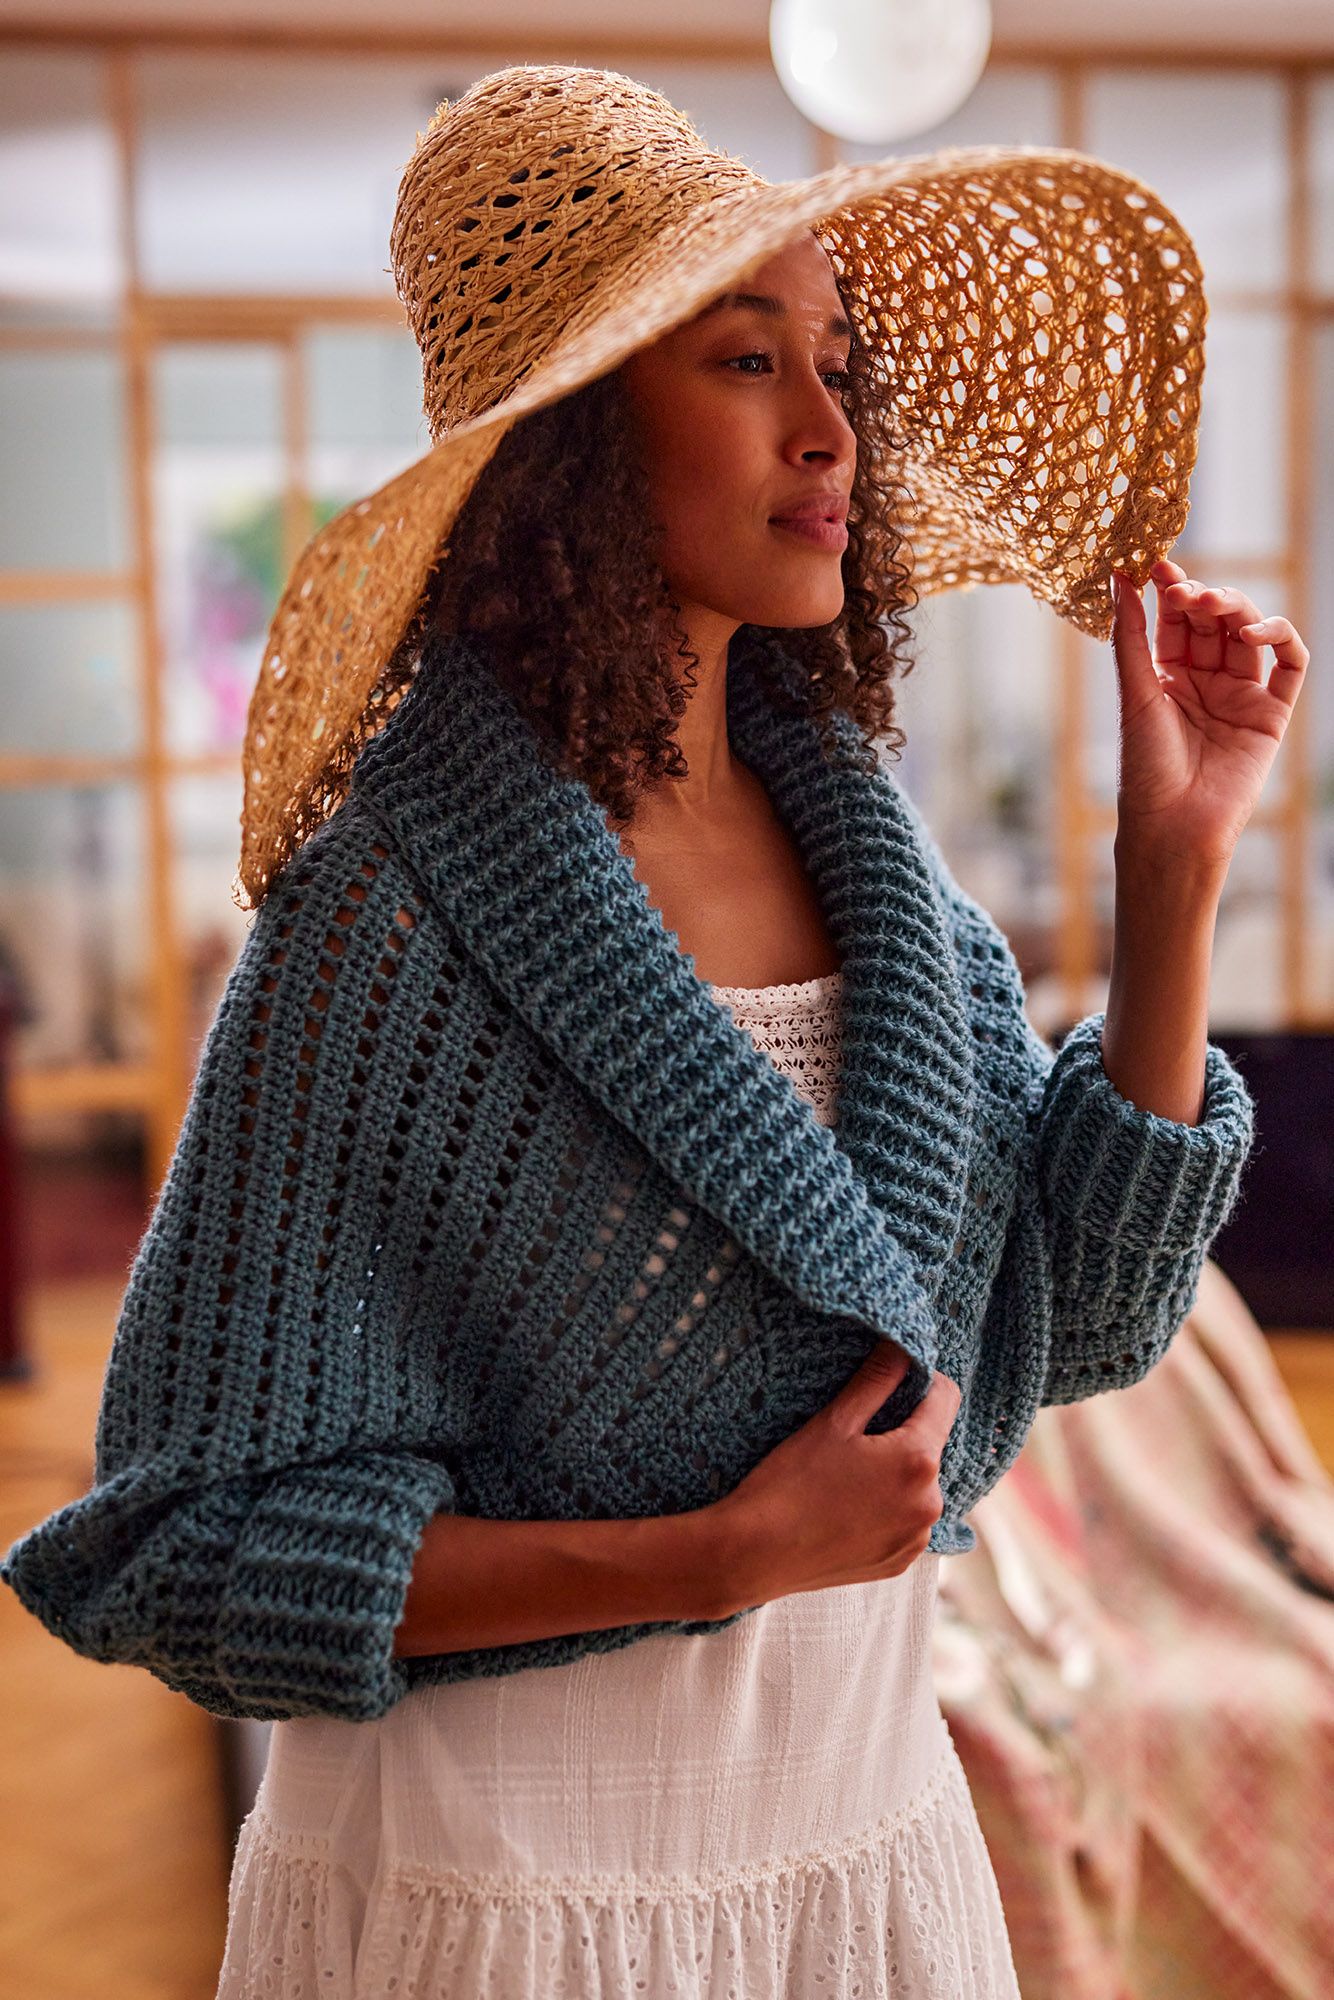
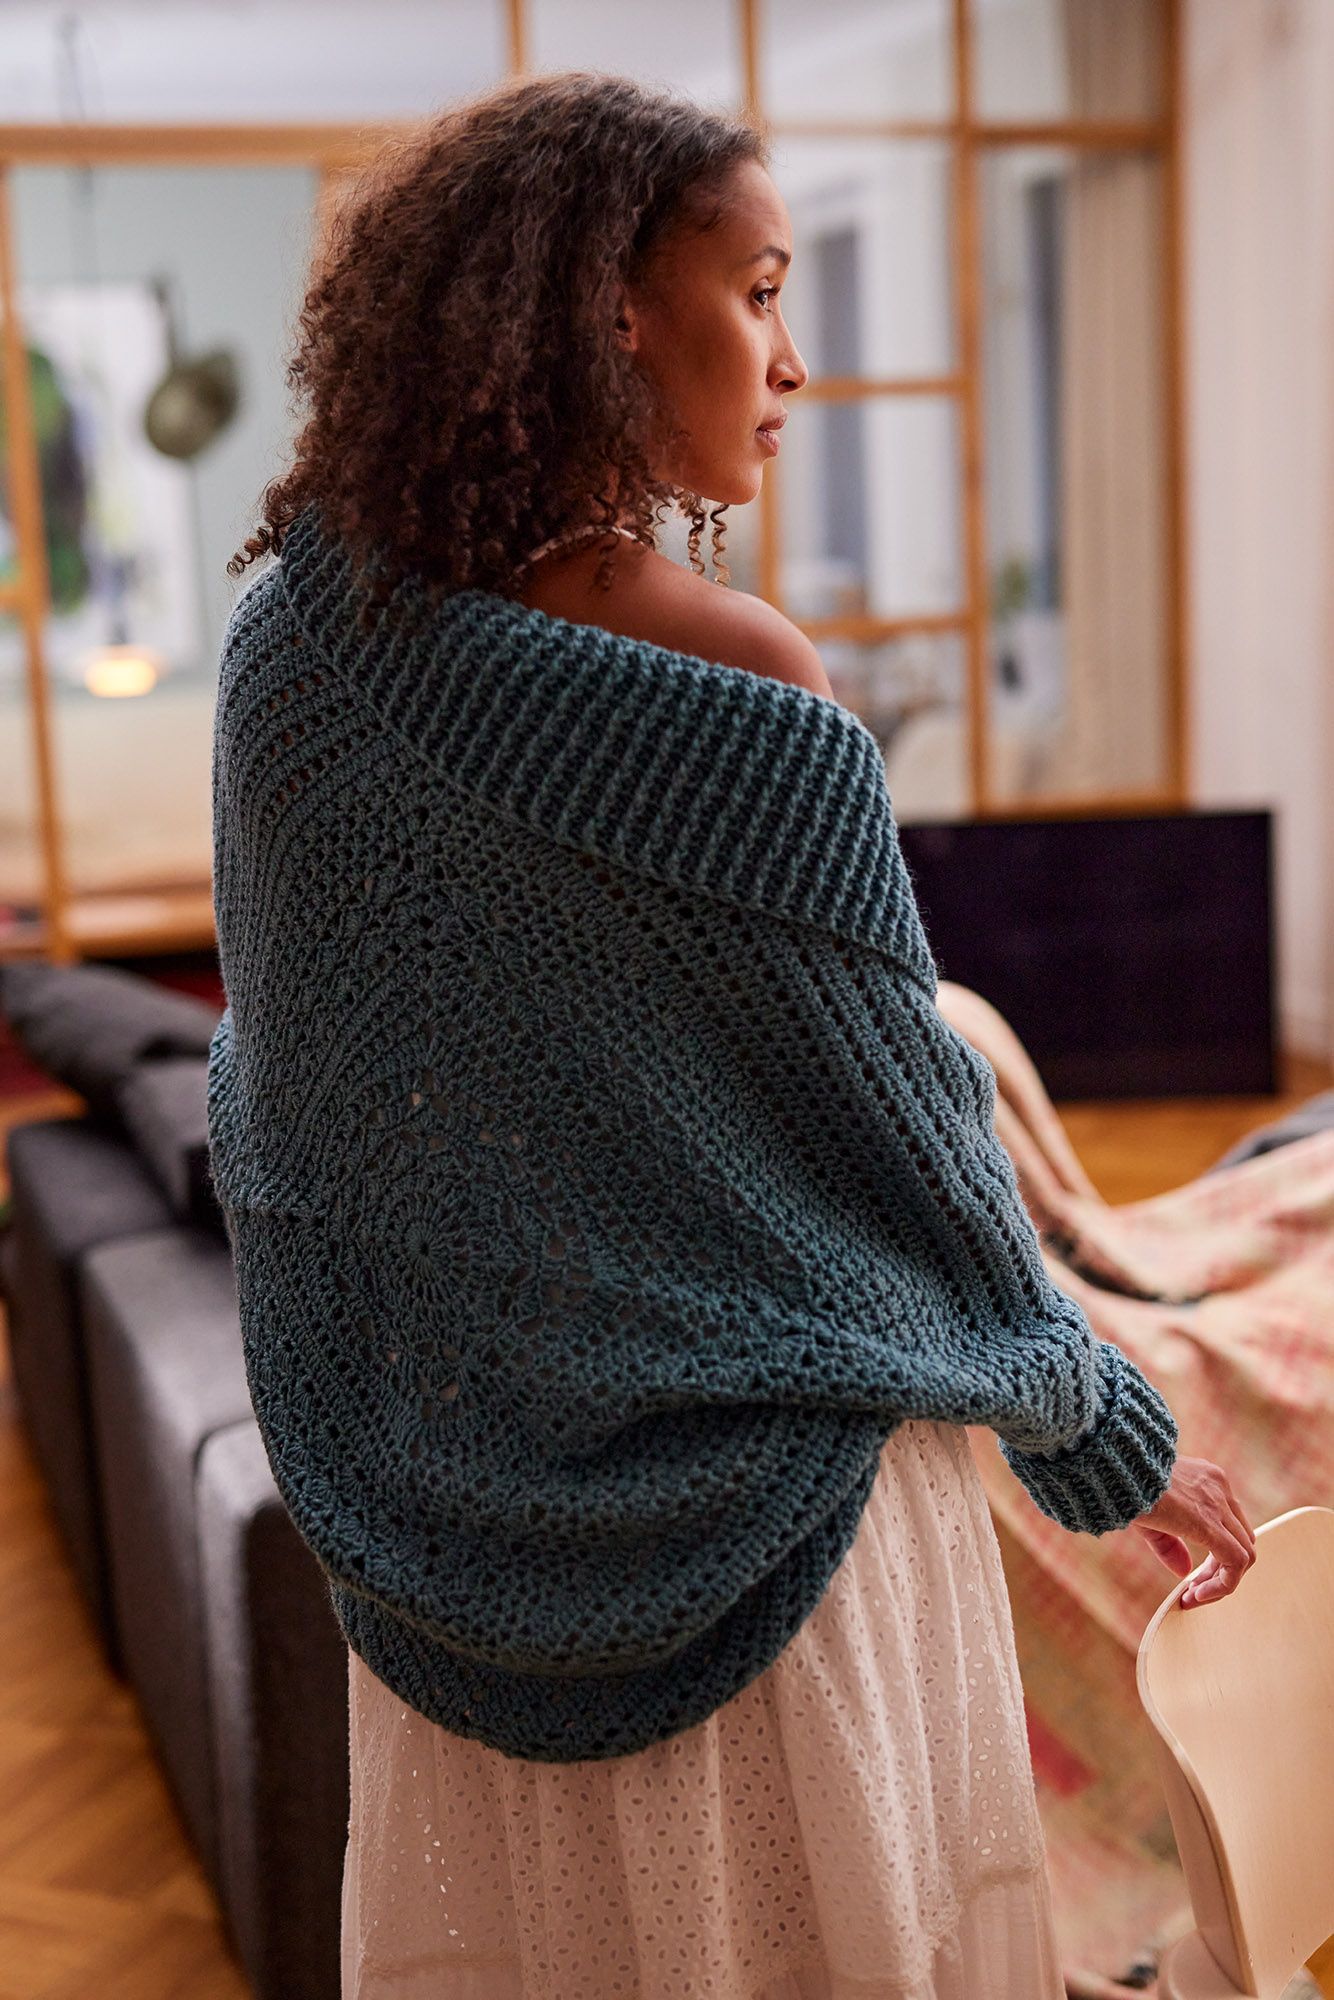
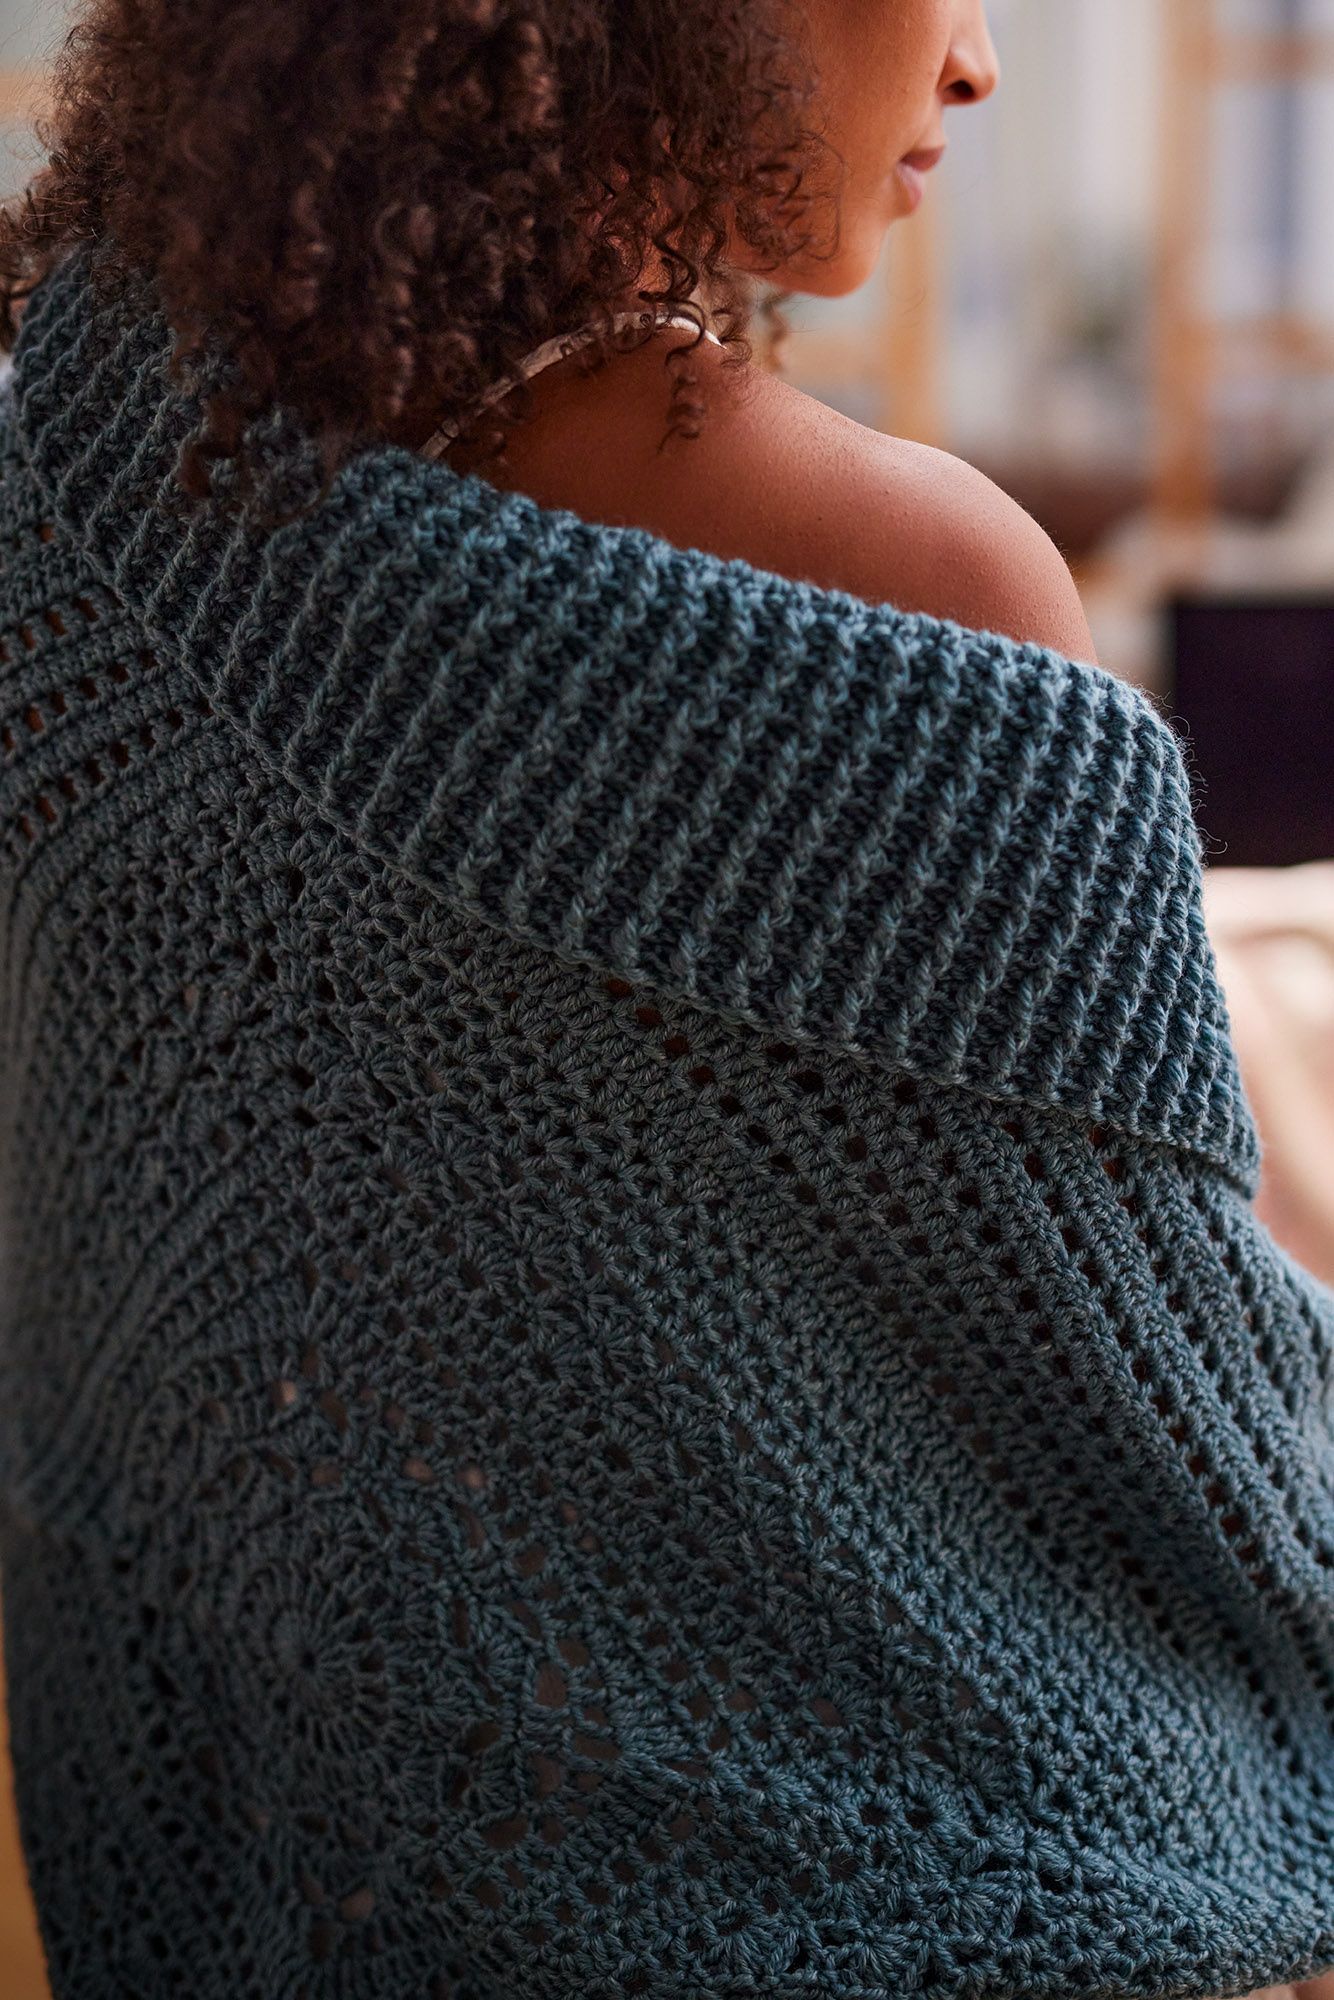
In this cardigan, crocheted with Novita 7 Veljestä Nature yarn, you can also enjoy the summer on cooler evenings. The cardigan starts by working a square for the middle of the back.
Designer
Lea Petäjä
Size(s)
S/M(L/XL)XXL
Finished dimensions
Finished measurements of cardigan:
Width approx. 90(100)110 cm/35.4(39.4)43.3”
Height approx. 77(86)95 cm/30.3(33.8)37.4”
Yarn demand
Novita 7 Veljestä Nature (183) Drops 750(900)1050 g
Needles and other supplies
Crochet hook: Novita 5 mm (US 8/UK 6) or size needed to fit gauge Notions: 1 fastener, if desired
Finished dimensions
Finished measurements of cardigan:
Width approx. 90(100)110 cm/35.4(39.4)43.3”
Height approx. 77(86)95 cm/30.3(33.8)37.4”
Crochet stitch patterns: chain stitch (ch), single crochet (sc), double crochet (dc), treble (tr) and slip stitch (sl st), work acc to crochet chart and written instructions.
Gauge/Tension: Size of 1 square, worked acc to rnds 1-13: 27 x 27 cm/10.6” square
Note: this pattern is written in US crochet terms. Sometimes, they differ from UK terms. At the end of the pattern, you can find a list of Abbreviation & Term Differences between the U.S./Canada and United Kingdom (U.K.). Please check this list if you are used to the UK terms!
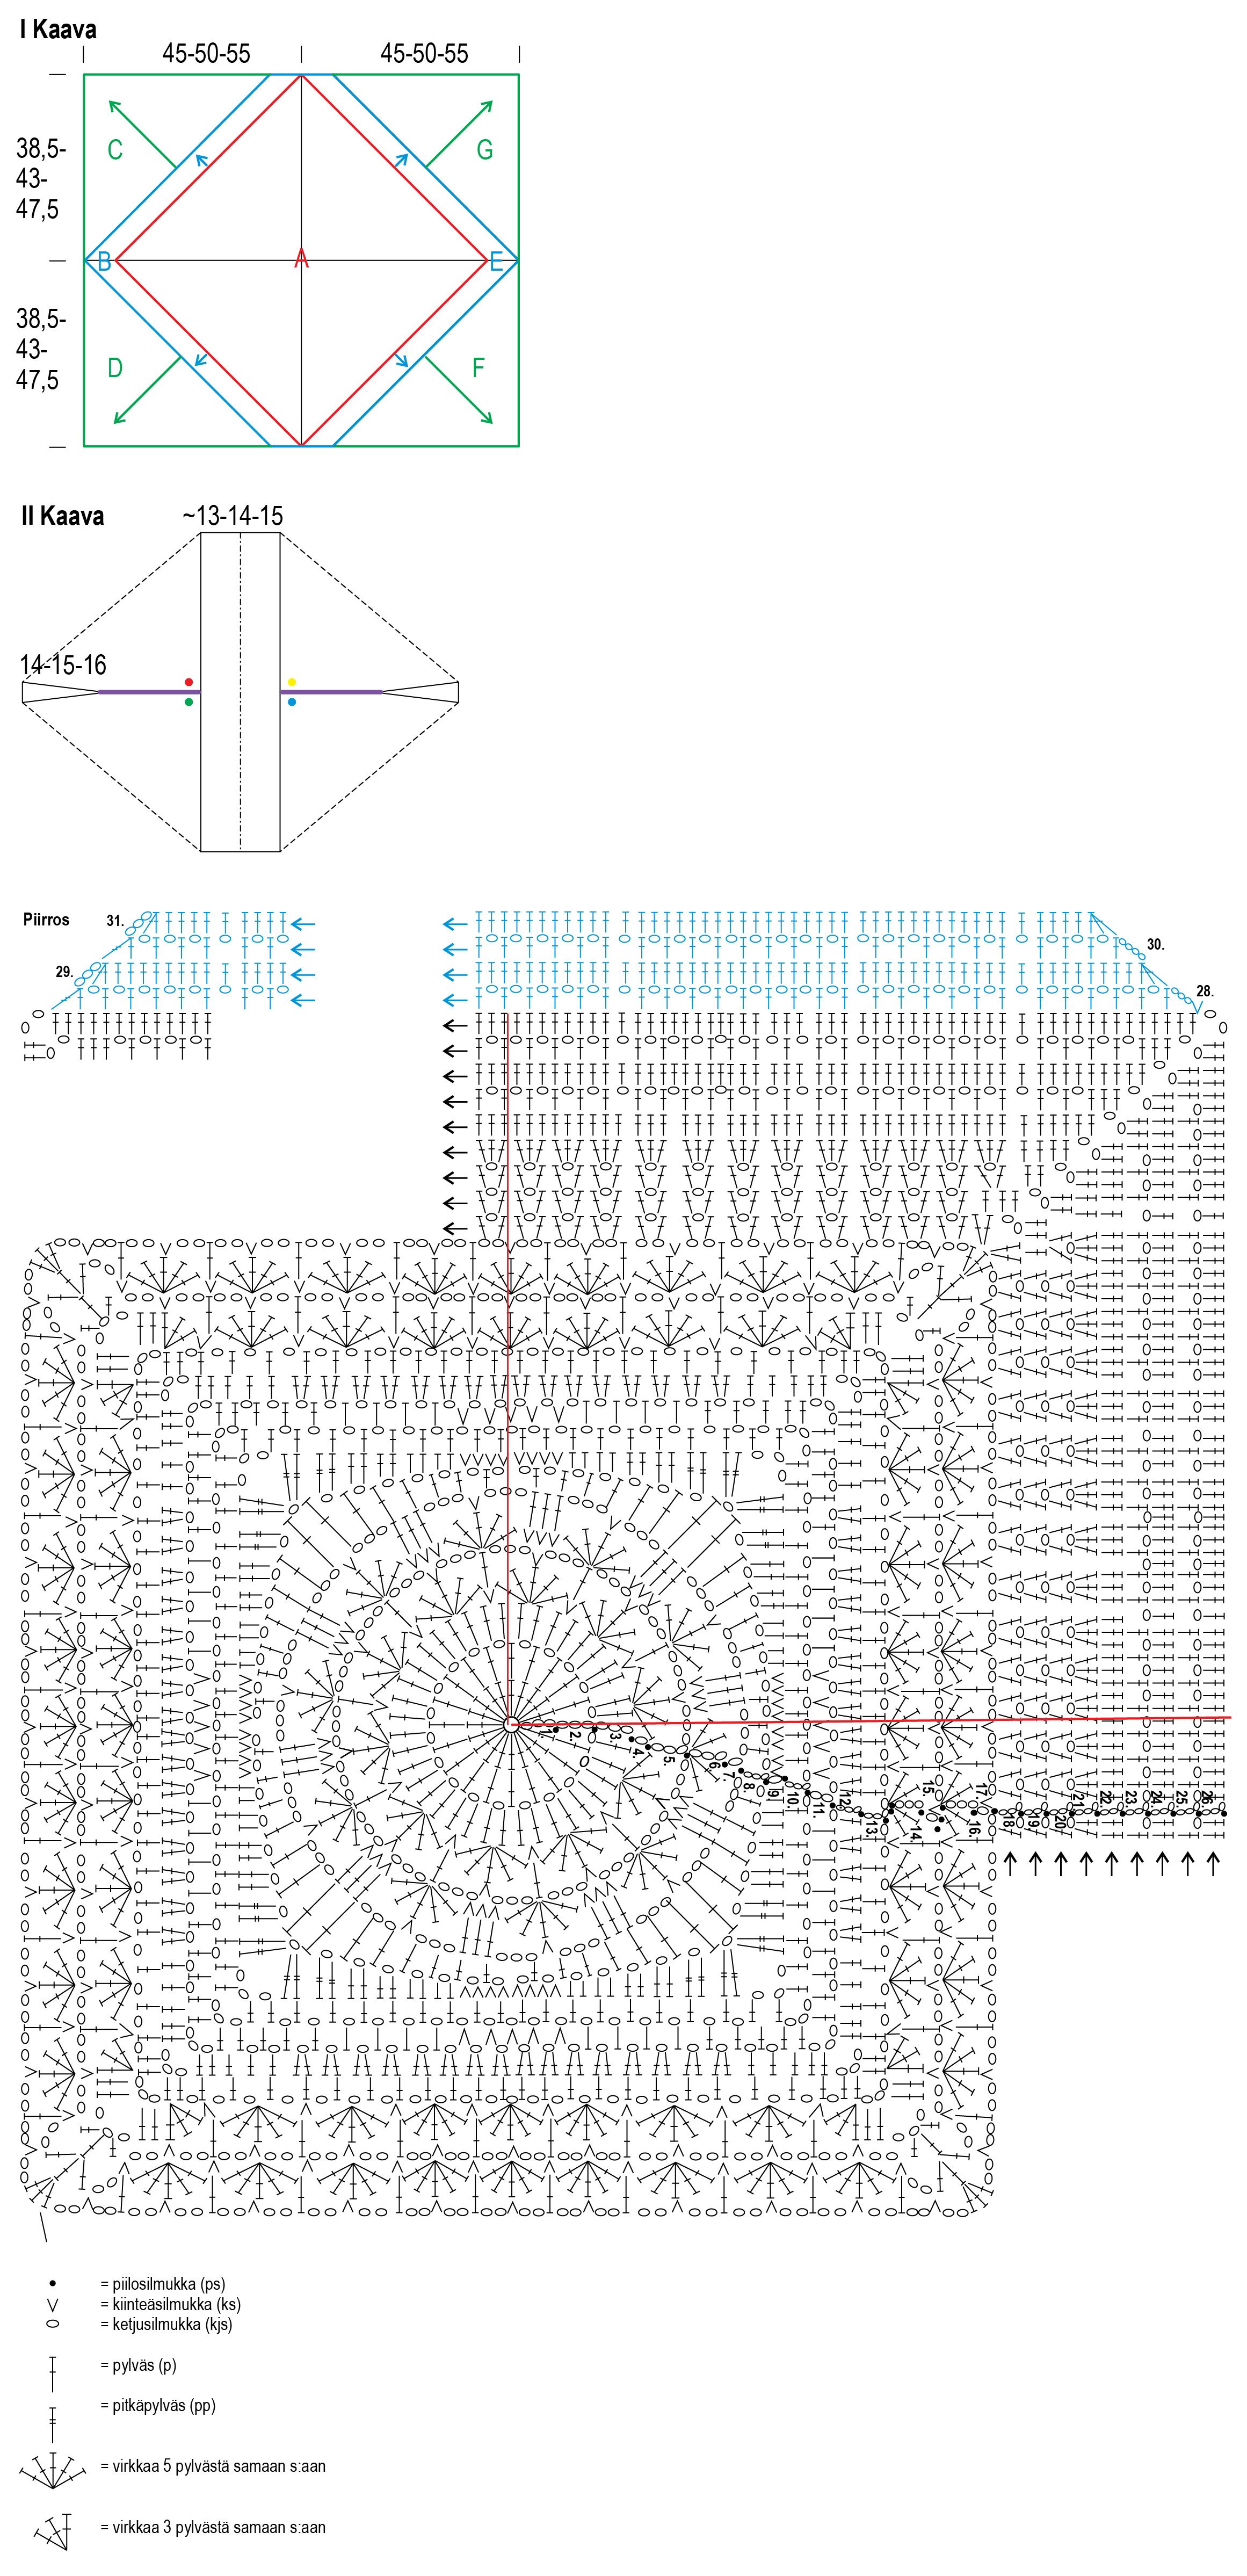
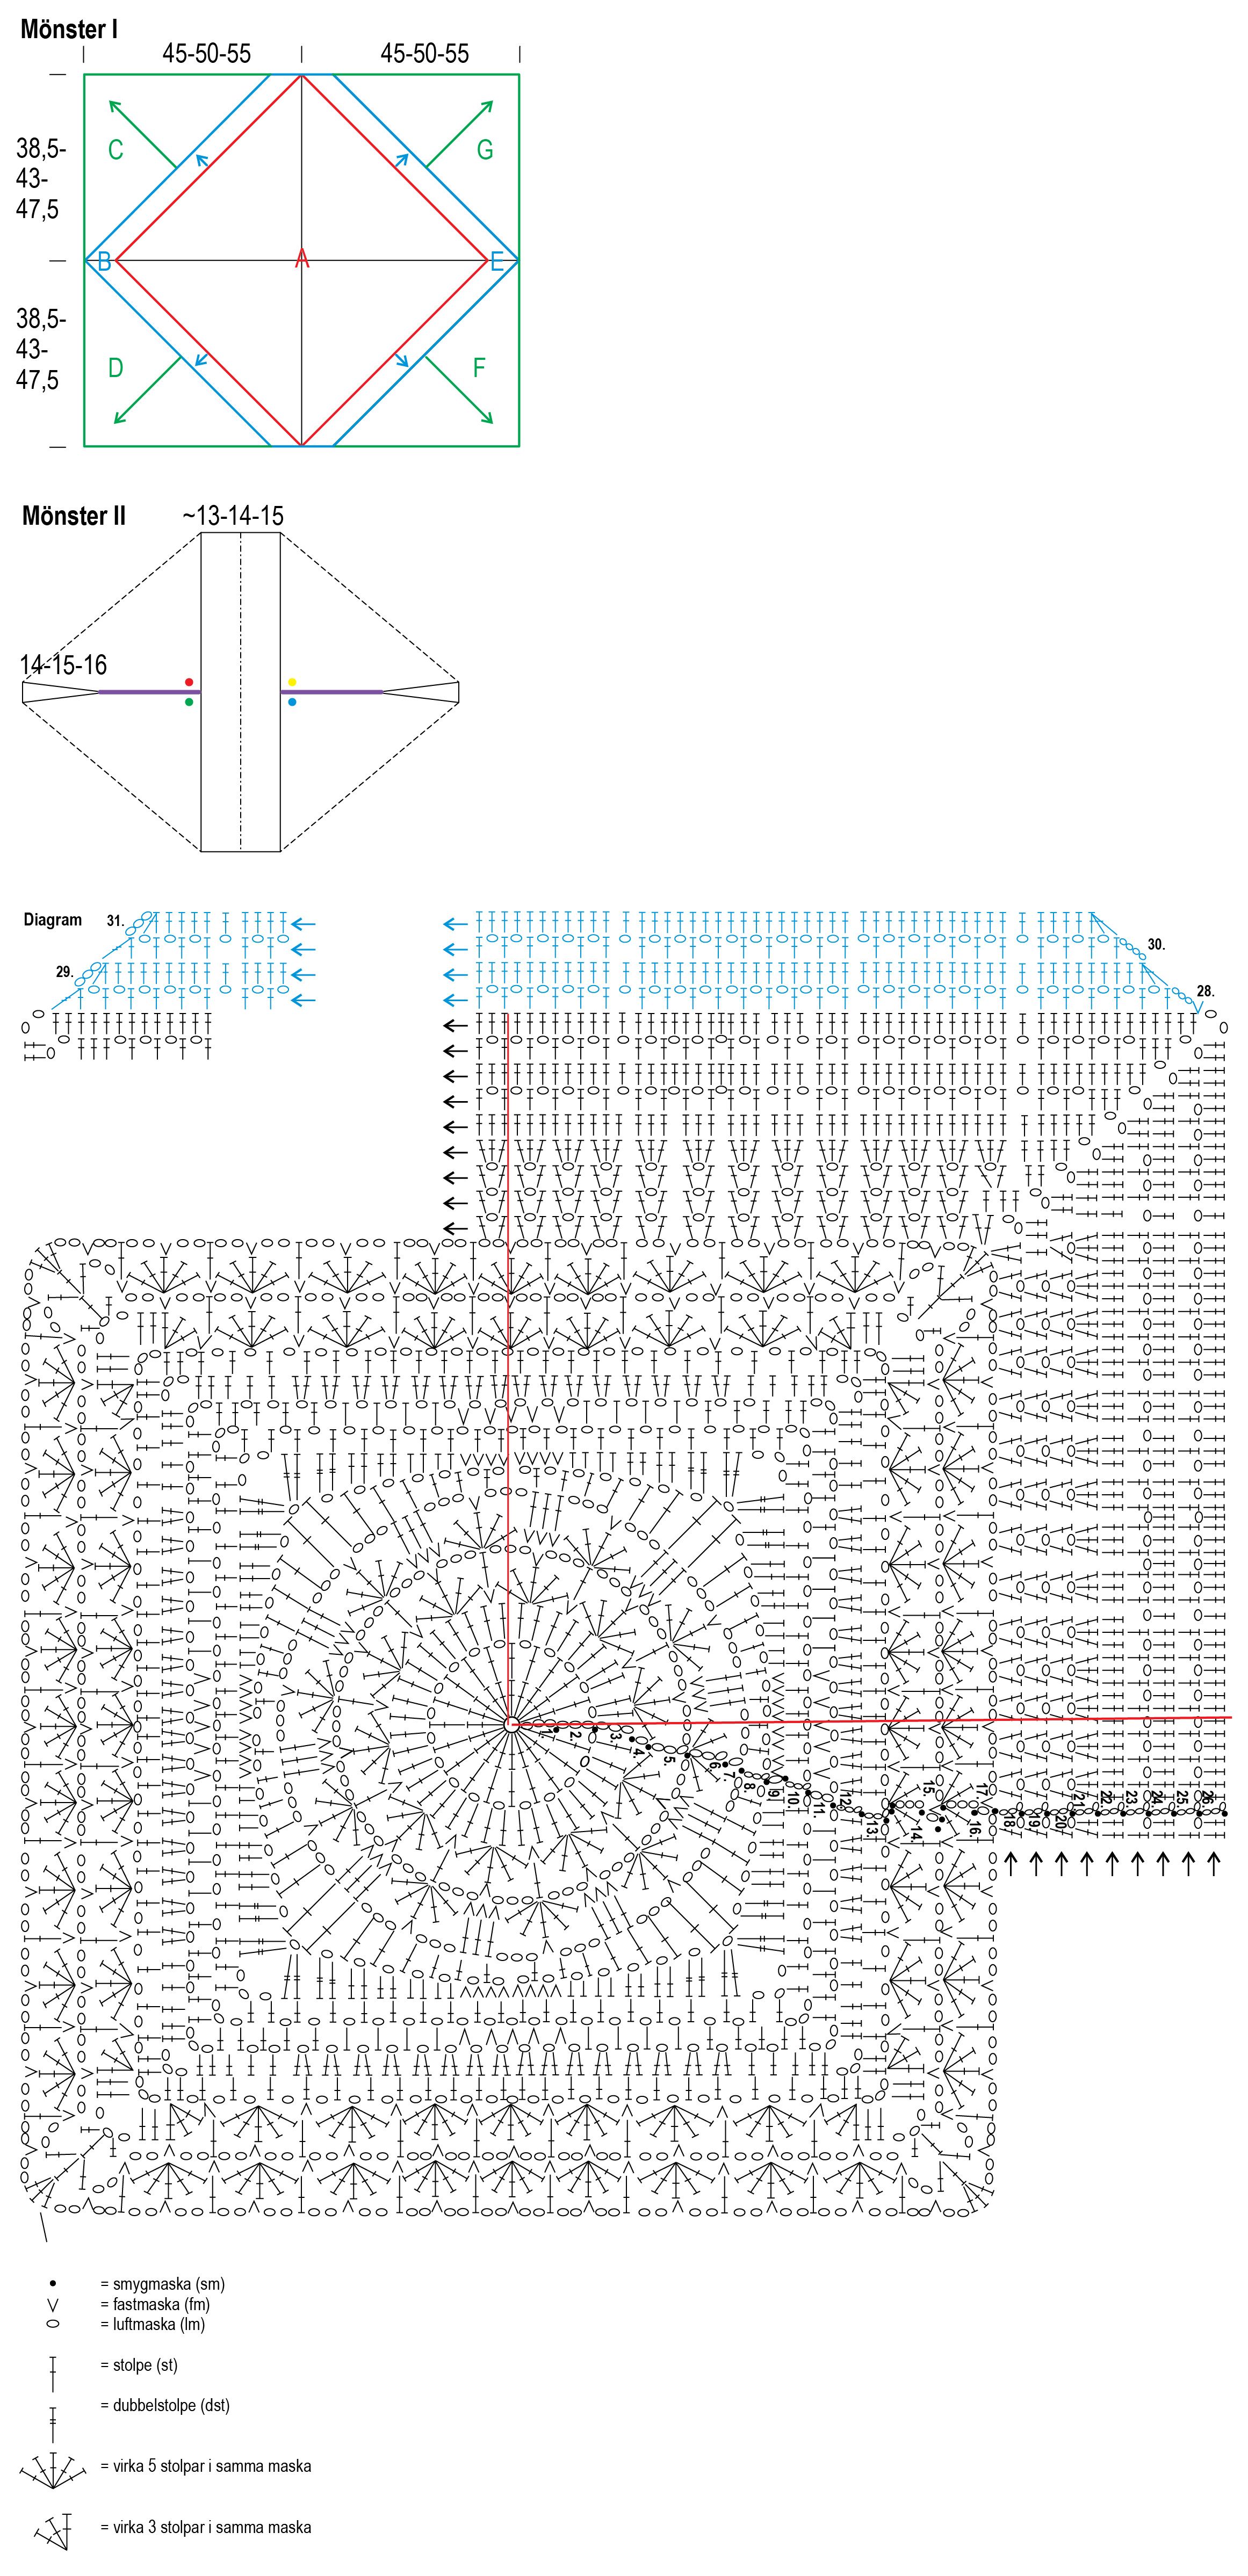
Square (Drawing I, A in red)
Wrap yarn around finger to form a magic ring and then crochet into this magic ring (see crochet chart), as follows:
Rnd 1: ch 3 (1st dc), 19 dc and join rnd with 1 sl st into 3rd ch st of beg of rnd = 20 dc.
Rnd 2: ch 3 (1st dc), *ch 1 and 1 dc into next dc, rep from * 18 more times, ch 1 and join rnd with 1 sl st into 3rd ch st of beg of rnd.
Continue working acc to rnds 3-17 of crochet chart. Then crochet rnds 18-26 (note that in the crochet chart, only ¼ of the chart is shown, work the section marked in red a total of 4 times in the round) and work rnds 25-26 as many times as needed (in every rnd, 2 sts are increased on both sides of every corner). When work measures approx. 77(86)95 cm/ 30.3(33.8)37.4”, measured from corner to corner and the last rnd was a dc-rnd, cut yarn.
Side section (Drawing I, B in blue)
Continue working on both sides of the square, as follows: join yarn with 1 sc at the corner (in crochet chart in blue) and crochet rnd 28 of the crochet chart: dec 2 sts acc to Drawing, then continue working as before to next corner, work the corner as set (on both sides of each corner, 2 sts are decreased) and work the second side as before and dec 2 sts at the corner as shown in Drawing. Turn work and continue working rows 29-31 back and forth as set. In every row, on both sides of the edges, 2 sts are decreased. Continue crocheting as set, until work, from center point to corner, measures approx. 45(50)55 cm/17.7(19.7)21.7”, ending with a dc-row.
Triangle on side section (Drawing I, C in green)
Continue working on 1 side only. Crochet as before, but only dec 2 sts on both sides of every row, until all sts are decreased. Cut yarn.
Second triangle on side section (Drawing I, D in green)
Join yarn with 1 sc into corner, as at the beg of row 28, and crochet this triangle in the same way as described for triangle C.
Work second side section (E) and the corresponding triangles (F and G) in the same way as described for first side section.
Finishing
Place work inside out onto a flat surface acc to measurements, dampen and leave to dry.
Bring corners of crocheted piece together, as shown in Drawing II. Close seams (marked in purple in the drawing), leaving an opening of approx. 14(15)16 cm/5.5(5.9)6.3” for the arms. Lightly steam the seams.
Sleeve cuffs:
Rnd 1: Join yarn with 1 sc into the seam and ch 3 (= 1st dc), then crochet 2 dc into each row and 1 dc at the straight line at the opening. The total stitch count has to be divisible by 2. Close rnd with 1 sl st into 3rd ch st at beg of rnd.
Rnd 2: ch 3 (= 1 dc), *1 FPdc (= front post double crochet: crochet 1 dc around dc of previous rnd, from front to back), 1 BPdc (= back post double crochet: crochet 1 dc around dc of previous rnd, from back to front), rep from * to end of rnd and join rnd with 1 sl st into 3rd ch st of beg of rnd.
Rep rnd 2, until sleeve cuff measures 20(21)22 cm/7.9(8.3)8.7”. Cut yarn.
Crochet second sleeve cuff in the same way.
Collar: Staring at the center of the back, measure approx. 55(58)61 cm/21.7(22.8)24” down, along the left front edge and place a marker at the beg of the round. Also place a marker at the corresponding place on the right front edge. With RS facing, start at the marker on the right edge and join yarn with 1 sc into front part.
Row 1: ch 2 (= 1st dc), then 2 dc into each row and 1 dc at the beg of the rnd. Crochet as set to left side marker, turn work.
Now work rows of front- and back post double crochets, as follows:
Row 2: ch 2 (= 1st dc), raised dc3tog into 1 st (alternately work FPdc and BPdc halfway, then yarn over hook and pull yarn through all 4 loops on the hook at the same time), *1 BPdc, 1 FPdc, rep from * to the last 4 sts of the row, raised dc3tog and 1 dc into last st. Turn work.
Crochet the raised-dc as they appear, i.e. crochet FPdc around FPdc of previous row and crochet BPdc around BPdc of previous row.
Row 3: ch 2 (= 1st dc), raised dc3tog, crochet raised-dc to the last 4 sts, raised dc3tog and 1 dc into last st. Turn work.
Rep row 3 until collar measures 14 cm/5.5”. Cut yarn.
If desired, sew a fastener onto front edge. Attach the fastener to the appropriate place on the first row.
Abbreviations
acc = according
beg = begin(ning)
BP = back post
BPdc = back post double crochet
ch = chain stitch
dc = double crochet
dc3tog = double crochet 3 stitches together
dec(‘s) = decrease(s)
FP = front post
FPdc = front post double crochet
inc(‘s) = increase(s)
rem = remaining
rep = repeat
rnd(s) = round(s)
sc = single crochet
sl st = slip stitch
st(s) = stitch(es)
tog = together
Novita 7 Veljestä Nature: Hurma, crocheted cardigan
Size(s)
S/M(L/XL)XXL
Finished dimensions
Finished measurements of cardigan:
Width approx. 90(100)110 cm/35.4(39.4)43.3”
Height approx. 77(86)95 cm/30.3(33.8)37.4”
Yarn demand
Novita 7 Veljestä Nature (183) Drops 750(900)1050 g
Needles and other supplies
Crochet hook: Novita 5 mm (US 8/UK 6) or size needed to fit gauge Notions: 1 fastener, if desired
Crochet stitch patterns: chain stitch (ch), single crochet (sc), double crochet (dc), treble (tr) and slip stitch (sl st), work acc to crochet chart and written instructions.
Gauge/Tension: Size of 1 square, worked acc to rnds 1-13: 27 x 27 cm/10.6” square
Note: this pattern is written in US crochet terms. Sometimes, they differ from UK terms. At the end of the pattern, you can find a list of Abbreviation & Term Differences between the U.S./Canada and United Kingdom (U.K.). Please check this list if you are used to the UK terms!
Square (Drawing I, A in red)
Wrap yarn around finger to form a magic ring and then crochet into this magic ring (see crochet chart), as follows:
Rnd 1: ch 3 (1st dc), 19 dc and join rnd with 1 sl st into 3rd ch st of beg of rnd = 20 dc.
Rnd 2: ch 3 (1st dc), *ch 1 and 1 dc into next dc, rep from * 18 more times, ch 1 and join rnd with 1 sl st into 3rd ch st of beg of rnd.
Continue working acc to rnds 3-17 of crochet chart. Then crochet rnds 18-26 (note that in the crochet chart, only ¼ of the chart is shown, work the section marked in red a total of 4 times in the round) and work rnds 25-26 as many times as needed (in every rnd, 2 sts are increased on both sides of every corner). When work measures approx. 77(86)95 cm/ 30.3(33.8)37.4”, measured from corner to corner and the last rnd was a dc-rnd, cut yarn.
Side section (Drawing I, B in blue)
Continue working on both sides of the square, as follows: join yarn with 1 sc at the corner (in crochet chart in blue) and crochet rnd 28 of the crochet chart: dec 2 sts acc to Drawing, then continue working as before to next corner, work the corner as set (on both sides of each corner, 2 sts are decreased) and work the second side as before and dec 2 sts at the corner as shown in Drawing. Turn work and continue working rows 29-31 back and forth as set. In every row, on both sides of the edges, 2 sts are decreased. Continue crocheting as set, until work, from center point to corner, measures approx. 45(50)55 cm/17.7(19.7)21.7”, ending with a dc-row.
Triangle on side section (Drawing I, C in green)
Continue working on 1 side only. Crochet as before, but only dec 2 sts on both sides of every row, until all sts are decreased. Cut yarn.
Second triangle on side section (Drawing I, D in green)
Join yarn with 1 sc into corner, as at the beg of row 28, and crochet this triangle in the same way as described for triangle C.
Work second side section (E) and the corresponding triangles (F and G) in the same way as described for first side section.
Finishing
Place work inside out onto a flat surface acc to measurements, dampen and leave to dry.
Bring corners of crocheted piece together, as shown in Drawing II. Close seams (marked in purple in the drawing), leaving an opening of approx. 14(15)16 cm/5.5(5.9)6.3” for the arms. Lightly steam the seams.
Sleeve cuffs:
Rnd 1: Join yarn with 1 sc into the seam and ch 3 (= 1st dc), then crochet 2 dc into each row and 1 dc at the straight line at the opening. The total stitch count has to be divisible by 2. Close rnd with 1 sl st into 3rd ch st at beg of rnd.
Rnd 2: ch 3 (= 1 dc), *1 FPdc (= front post double crochet: crochet 1 dc around dc of previous rnd, from front to back), 1 BPdc (= back post double crochet: crochet 1 dc around dc of previous rnd, from back to front), rep from * to end of rnd and join rnd with 1 sl st into 3rd ch st of beg of rnd.
Rep rnd 2, until sleeve cuff measures 20(21)22 cm/7.9(8.3)8.7”. Cut yarn.
Crochet second sleeve cuff in the same way.
Collar: Staring at the center of the back, measure approx. 55(58)61 cm/21.7(22.8)24” down, along the left front edge and place a marker at the beg of the round. Also place a marker at the corresponding place on the right front edge. With RS facing, start at the marker on the right edge and join yarn with 1 sc into front part.
Row 1: ch 2 (= 1st dc), then 2 dc into each row and 1 dc at the beg of the rnd. Crochet as set to left side marker, turn work.
Now work rows of front- and back post double crochets, as follows:
Row 2: ch 2 (= 1st dc), raised dc3tog into 1 st (alternately work FPdc and BPdc halfway, then yarn over hook and pull yarn through all 4 loops on the hook at the same time), *1 BPdc, 1 FPdc, rep from * to the last 4 sts of the row, raised dc3tog and 1 dc into last st. Turn work.
Crochet the raised-dc as they appear, i.e. crochet FPdc around FPdc of previous row and crochet BPdc around BPdc of previous row.
Row 3: ch 2 (= 1st dc), raised dc3tog, crochet raised-dc to the last 4 sts, raised dc3tog and 1 dc into last st. Turn work.
Rep row 3 until collar measures 14 cm/5.5”. Cut yarn.
If desired, sew a fastener onto front edge. Attach the fastener to the appropriate place on the first row.
Abbreviations
acc = according
beg = begin(ning)
BP = back post
BPdc = back post double crochet
ch = chain stitch
dc = double crochet
dc3tog = double crochet 3 stitches together
dec(‘s) = decrease(s)
FP = front post
FPdc = front post double crochet
inc(‘s) = increase(s)
rem = remaining
rep = repeat
rnd(s) = round(s)
sc = single crochet
sl st = slip stitch
st(s) = stitch(es)
tog = together
